When I pulled & inspected the steering column and steering rack from a 2006 Mazda RX-8, I tried to take a bunch of pictures during the process to show what's involved for anyone else in the same situation. This was actually the first major maintenance I'd done on the RX-8, and I couldn't find any write-ups on line detailing this particular project, so the first time through, it took me a whole weekend to pull the parts and then put everything back together. For reasons, not long after, I did it all again, but this time I only needed 4 1/2 hours. So, if you're doing this for the first time, with the help of this write up as a guide, you should be able to get this done in less than a day.
Disclaimers
Disclaimer 1: I'm just a shade tree mechanic, not an expert or certified technician. If you really want to go by the book, then go buy the book, i.e. the service manual, so you can look up all the torque values and other manufacturer recommendations. (Actually, I may have found that for free online - go to the Other Resources section below.)
Disclaimer 2: I'm writing this from memory. And while it hasn't been too long since I completed the project, and the photos certainly help to jog my memory, I may have forgotten a few details. If I forgot to mention any nuts, bults, clips, or connectors, I'm sorry.
Disclaimer 3: I did my best to remember to take pictures of everything as I went, but sometimes I didn't remember until after nuts and bolts were already pulled off, and I didn't feel like putting them back on just for this write up. So, for some of the photos, you just have to use your imagination about the nuts or bolts being there. Also, some of the pictures are from my first time through the process, and some are from the second, so there might be a few 'discontinuities' (like missing parts that I pulled unnecessarily the first time through, or different clothes on my part - temperatures that first weekend were down in the teens).
Required Tools
Okay, I didn't keep super close track of exactly which tools I used, but if you work on cars, you'll probably have all the basics. To the best of my recollection, every nut and bolt was either 10 mm, 12 mm, or 17 mm. You'll probably want both wrenches and sockets for all three sizes. The only 'specialty' sockets you'll need are deep well 12 mm and possibly 17 mm (I have a set of those Craftsmen Max Axess sockets, so I usually don't have to worry about deep well sockets, but even with those I still needed a 12 mm deep well for one tight space), and maybe a 1/2" drive 17 mm socket (the smaller ones can be 3/8" drive). You'll probably want a good 1/2" drive breaker bar to get the bolts off that hold the steering rack in place, or at least a long cheater bar to add to your ratchet / wrench. You'll probably also want a 6" extension for your 3/8" drive ratchet.
If you're going to have to replace the steering column, you'll probably also need a steering wheel puller. And either make sure it comes with bolts with the correct metric threads, or go out and buy those bolts separately.
Note if Replacing Only the Steering Rack
I did this as a general project where I had an issue with the steering, and I was trying to pinpoint where it was coming from, so I pulled both the steering column and steering rack. If you know the problem is in the steering rack and that you don't need to pull the steering column, you can probably skip all of the steps regarding the steering wheel. When you get to the lower U-joint on the steering column (Step 5), you should still remove the lower bolt. But then, loosen the upper bolt, and slide the U-joint up onto the steering column to get it clear of the steering rack. Then, jump ahead to Step 11. Similarly, when going back together, you can skip the steering wheel steps. Though you should still try to make sure the wheels are straight and the steering wheel centered before reattaching the U-joint to the steering rack.
Also, as far as required tools, you won't need that deep well 12 mm socket, as that was for some of the nuts holding the steering column in place.
Other Resources
I've found a few other excellent resources for working on the RX-8 (after tackling this project, of course). The write up on this page should still be very useful for the level of detail, actual photos, and tips. But the other resources provide more official information (including recommended torque values).
Rotary Heads RX-8 PDF Technical Manual - I believe this is that actual, official service manual from Mazda. It has a ton of information.
AutoZone Repair Guide - That's a link directly to the steering rack page, but if you sign up for their MyZone, you can access the Repair Guide for the entire vehicle (or any other vehicle you might own). It seems to be based on the service manual.
Summary Instructions
If you understand most everything that needs to be done, here are the basic steps. Note that all the steps are links to that step in the detailed instructions.
- Step 1: Jack up the front end and remove the front wheels.
- Step 2: Remove the air box
- Step 3: Remove the air box shelf
- Step 4: Remove the battery & battery box
- Step 5: Disconnect the steering column lower u-joint from the steering rack
- Step 6: Remove the trim & cross member from underneath the steering column
- Step 7: Remove the trim from behind the steering wheel
- Step 8: Undo all the wire connectors to the steering column
- Step 9: Undo all the nuts holding the steering column & drop the steering column
- Step 10: Pull the steering column out from the steering rack
(If you don't know what a clock spring is, then definitely go read the detailed instructions on this one for an important warning.) - Step 10b: Remove steering wheel and/or lower U-Joint if necessary
- Step 11: Remove all the panels underneath the front of the car
- Step 12: Remove lower radiator brackets
- Step 13: Disconnect the tie rod ends from the steering knuckle
- Step 14: Disconnect the wires going to the steering rack
- Step 15: Clean power steering wiring harness connectors
- Step 16: Remove the steering rack
- Step 17: Install the new rack
- Step 18: Connect the tie rod ends to the steering knuckles
- Step 19: Install the lower radiator brackets
- Step 20: Reconnect the power steering wiring harness
- Step 21: Put wire ties on power steering wiring harness on steering rack
- Step 22: Install the front wheels
- Step 23: Connect the steering column to the steering rack
- Step 24: Install the nuts holding the steering column in place
- Step 25: Check for interferences - adjust tie rod ends if necessary
- Step 26: Install all the panels underneath the car
- Step 27: Install all the wire connectors to the steering column
- Step 28: Install the trim behind the steering wheel
- Step 29: Install the trim & cross member from underneath the steering column
- Step 30: Install the battery box and battery
- Step 31: Install the air box shelf
- Step 32: Install the air box
- Step 33: Calibrate the DSC
- Step 34: Lower the front of the car & fully tighten the lug nuts
- Step 35: Go for a test drive
- Step 36: Do a front end alignment
Detailed Instructions
Note that all pictures are links to high-res versions.
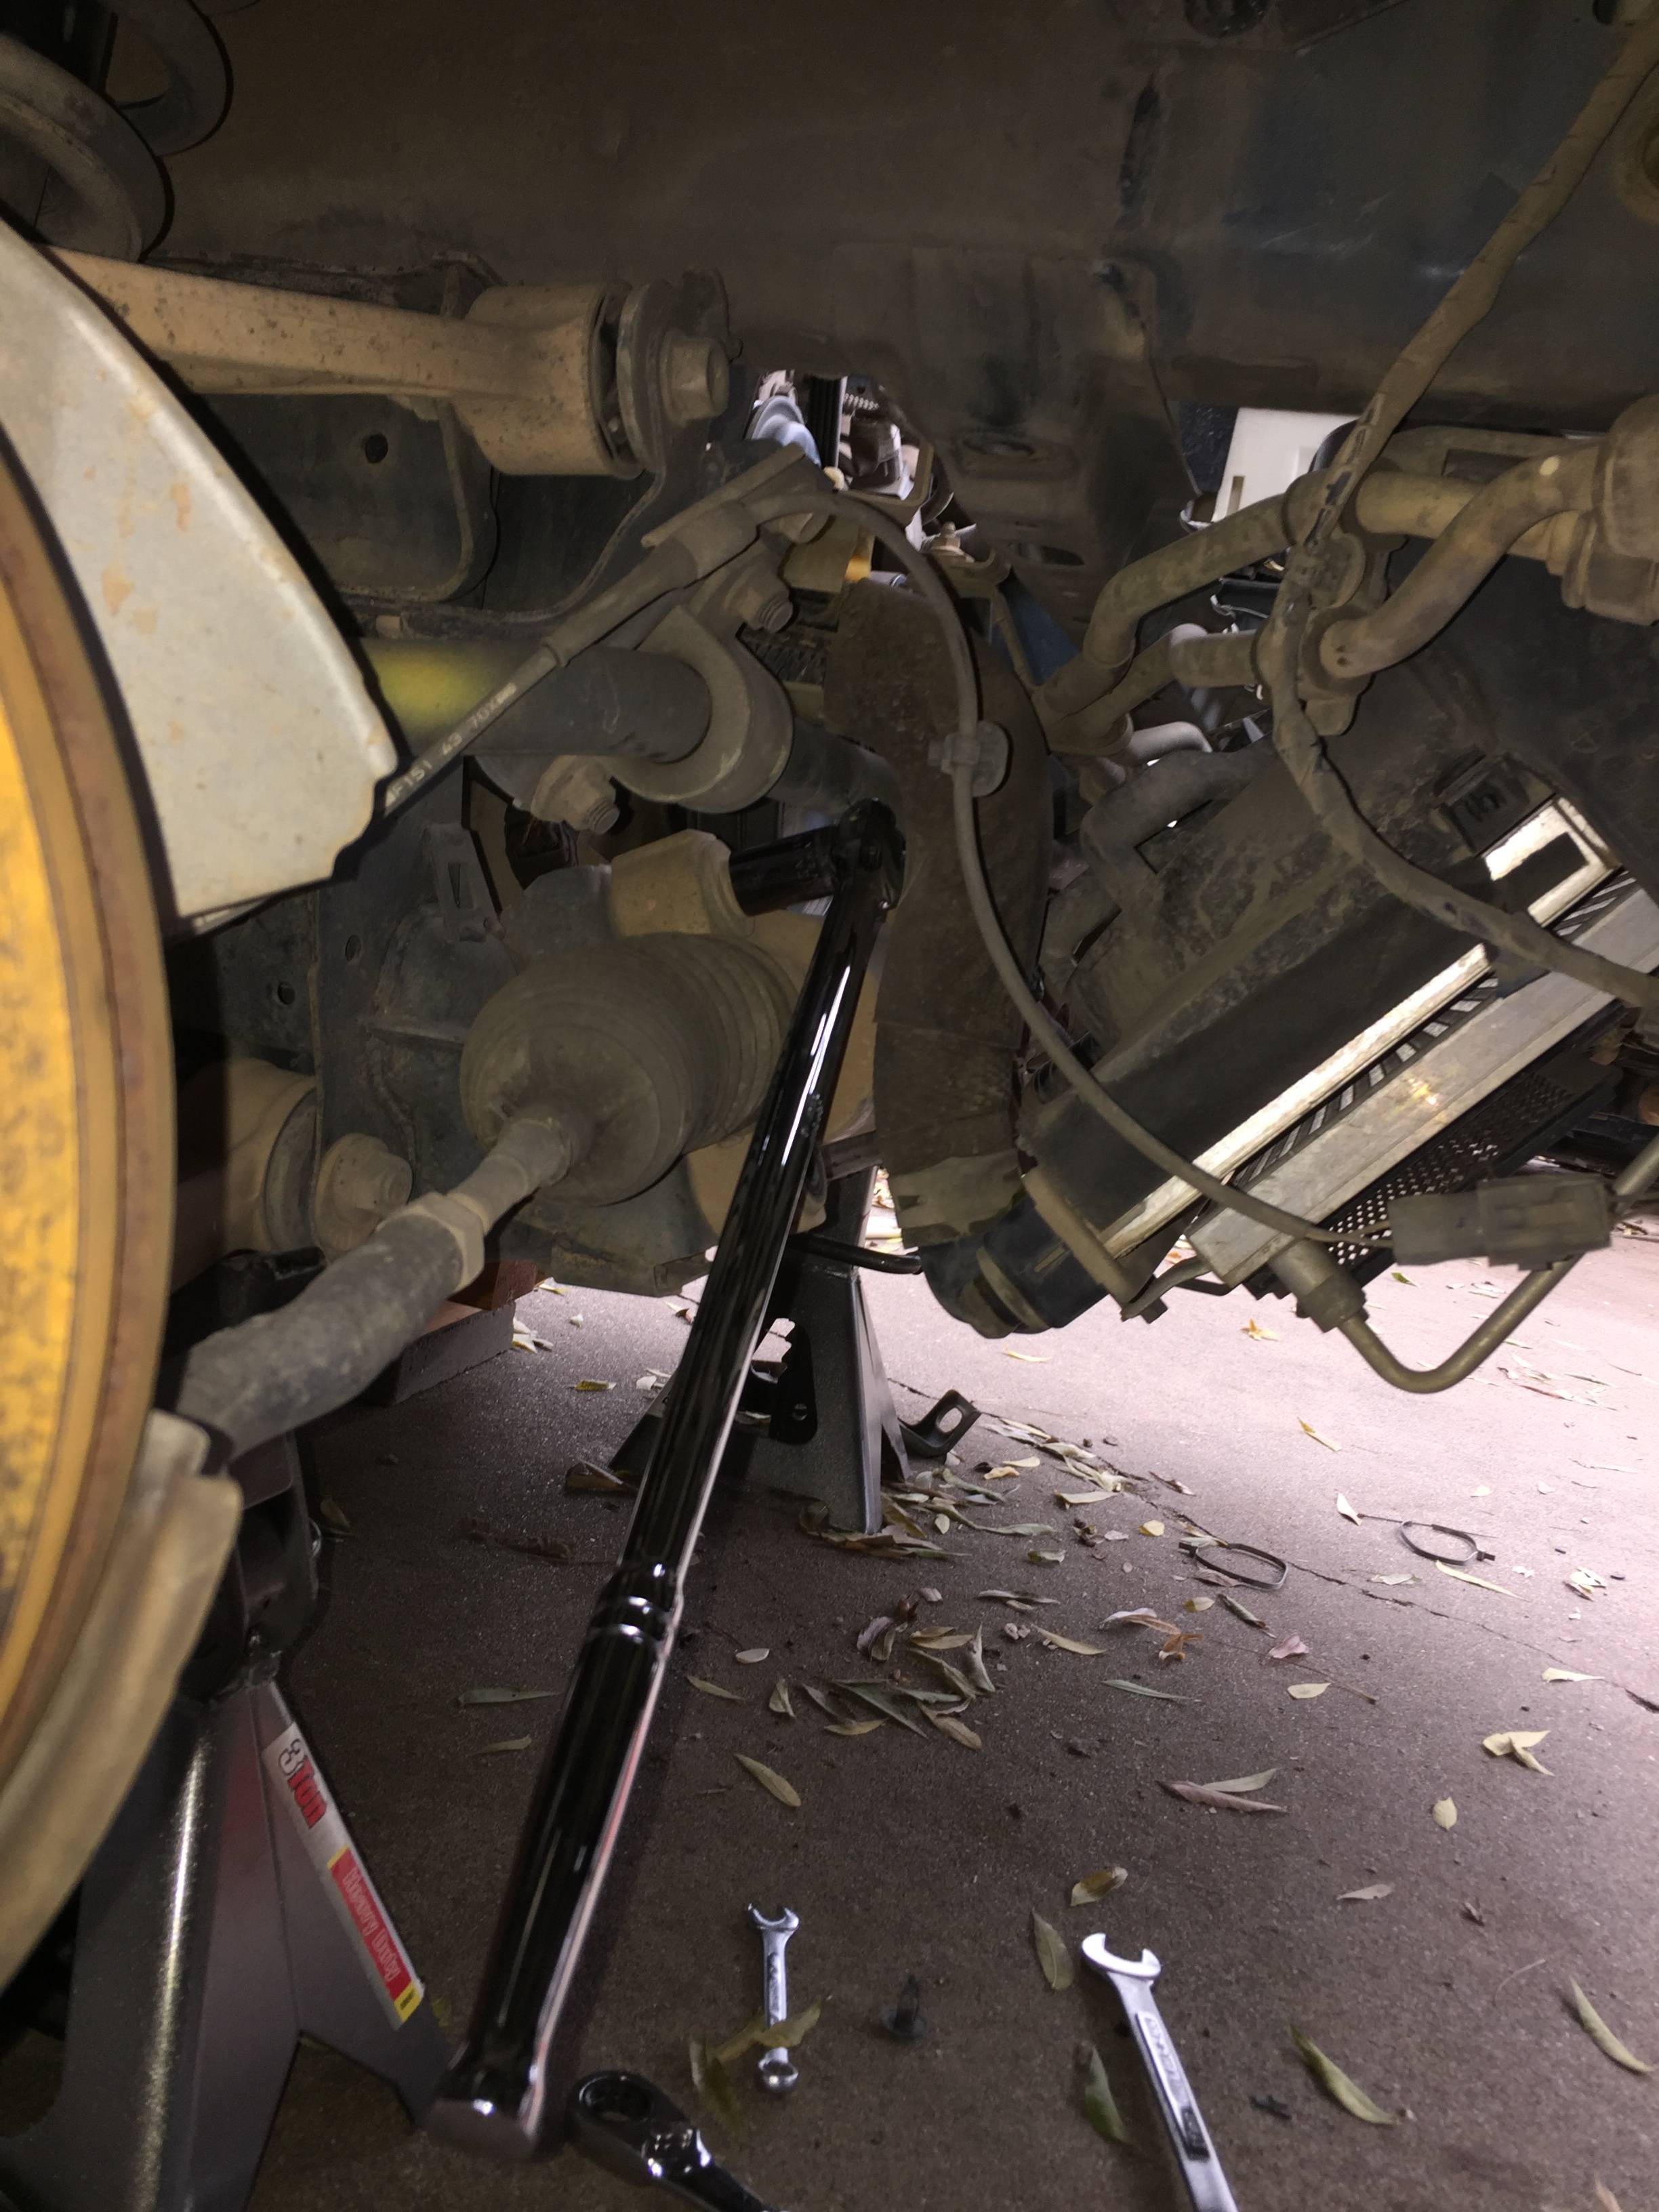
Step 1: Jack up the front end and remove the front wheels
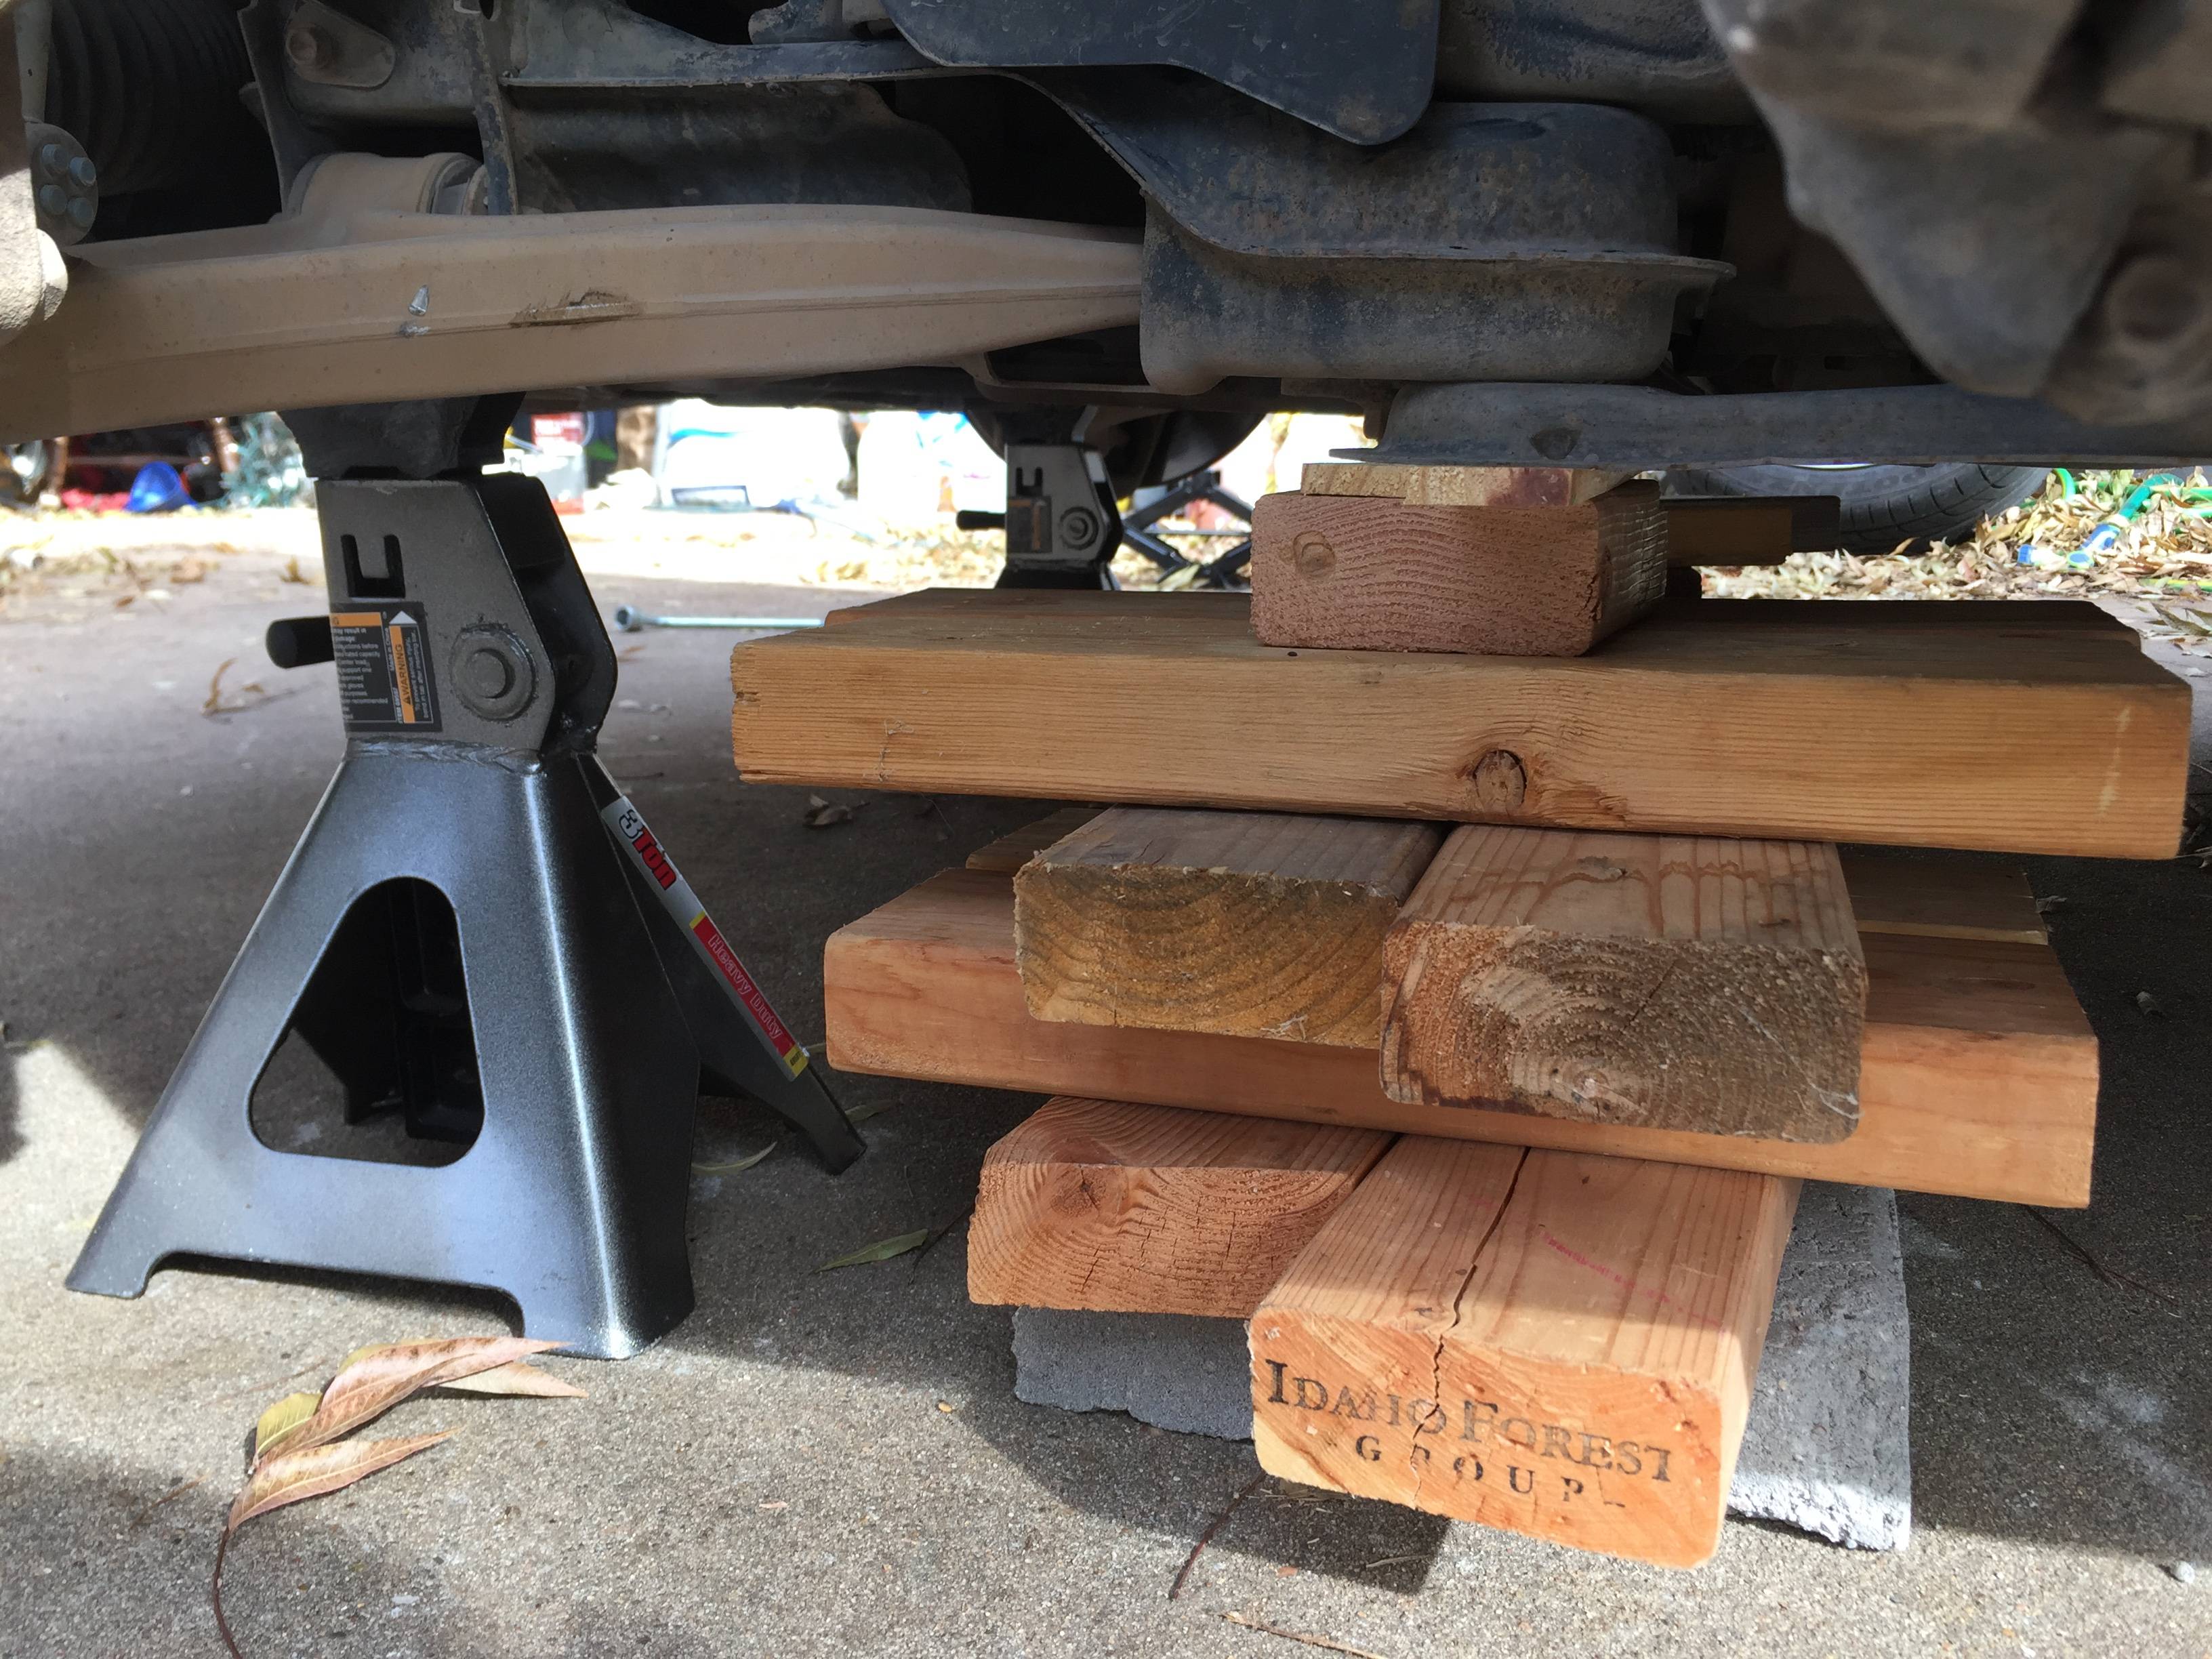
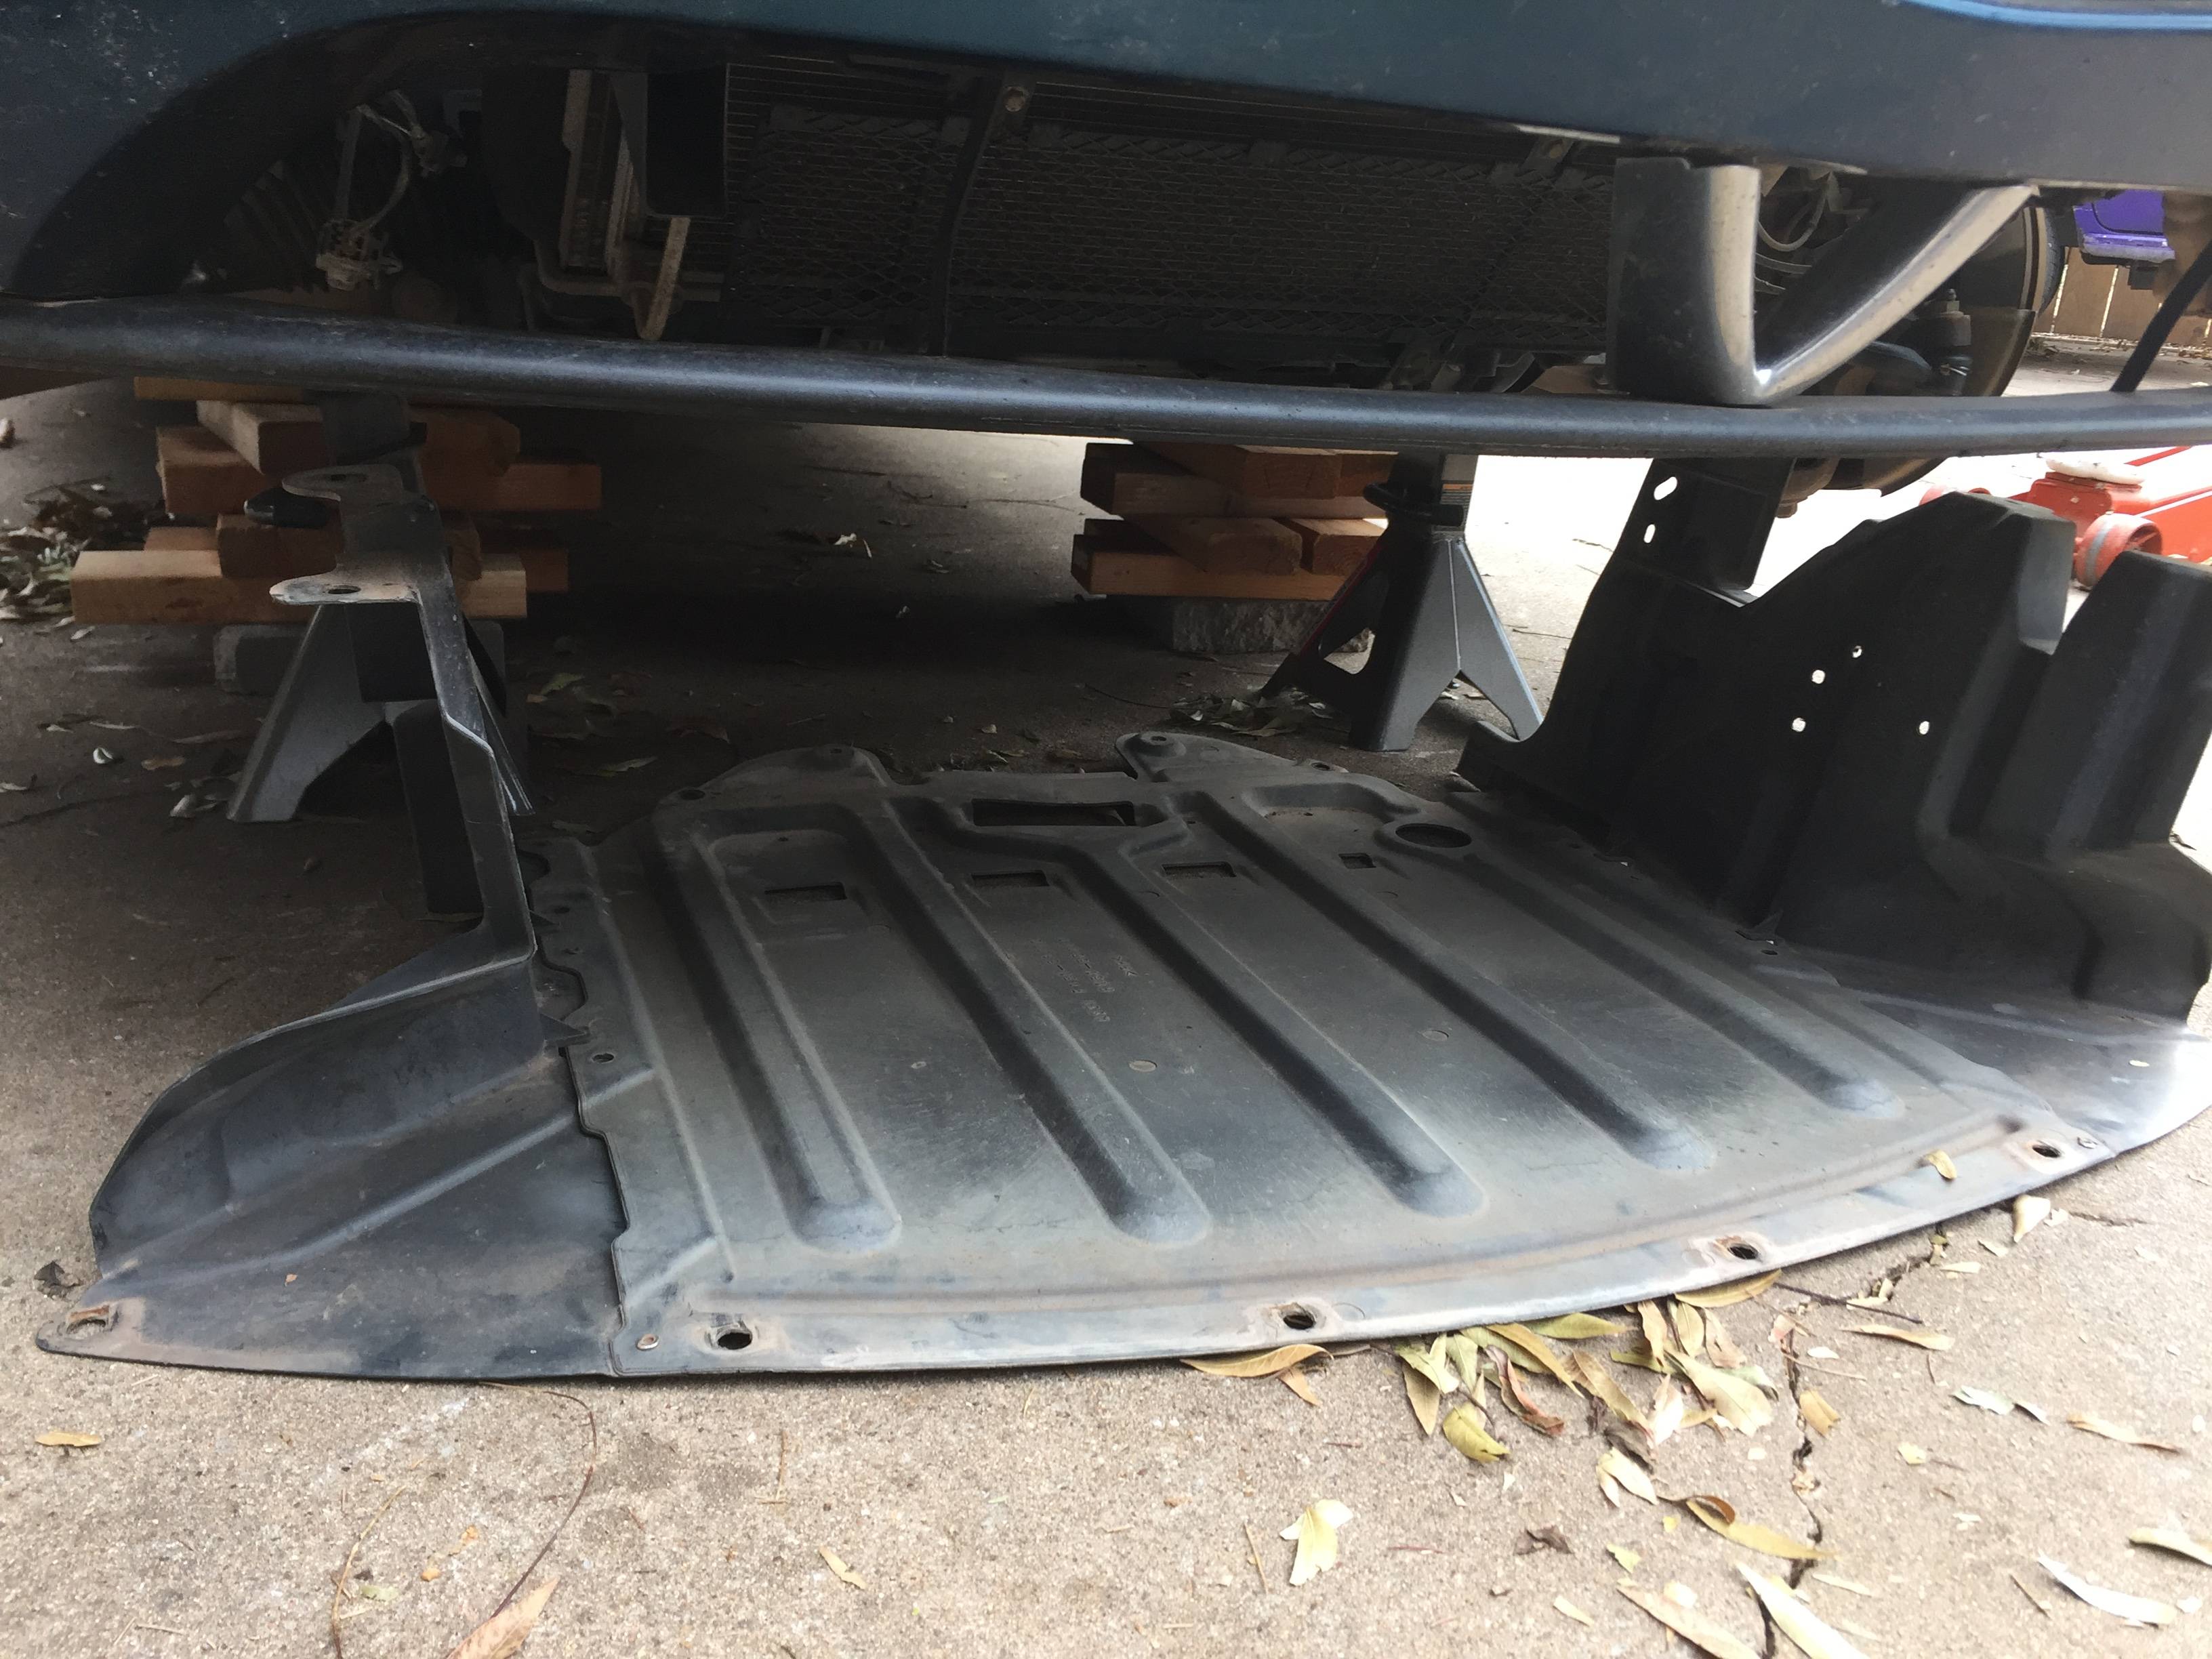
First things first, break loose the lug nuts on the front wheels (don't take them all the way off), then jack up the front of the car and put it on jack stands and/or blocks. I used both, because I'm a little paranoid about the stability of the jack stands while I'm underneath the car. Not only will this provide access to the underside of the car, it will also make it easier to turn the steering wheel to access some bolts on the steering column, and it will keep you from having to bend over quite as far when working underneath the hood. Make sure you have the parking brake on. For double measure, I also chocked the rear wheels. Here's a photo showing where I put the jack stands and blocks.
Once the car's jacked up, loosen all the lug nuts completely and take off the front wheels.
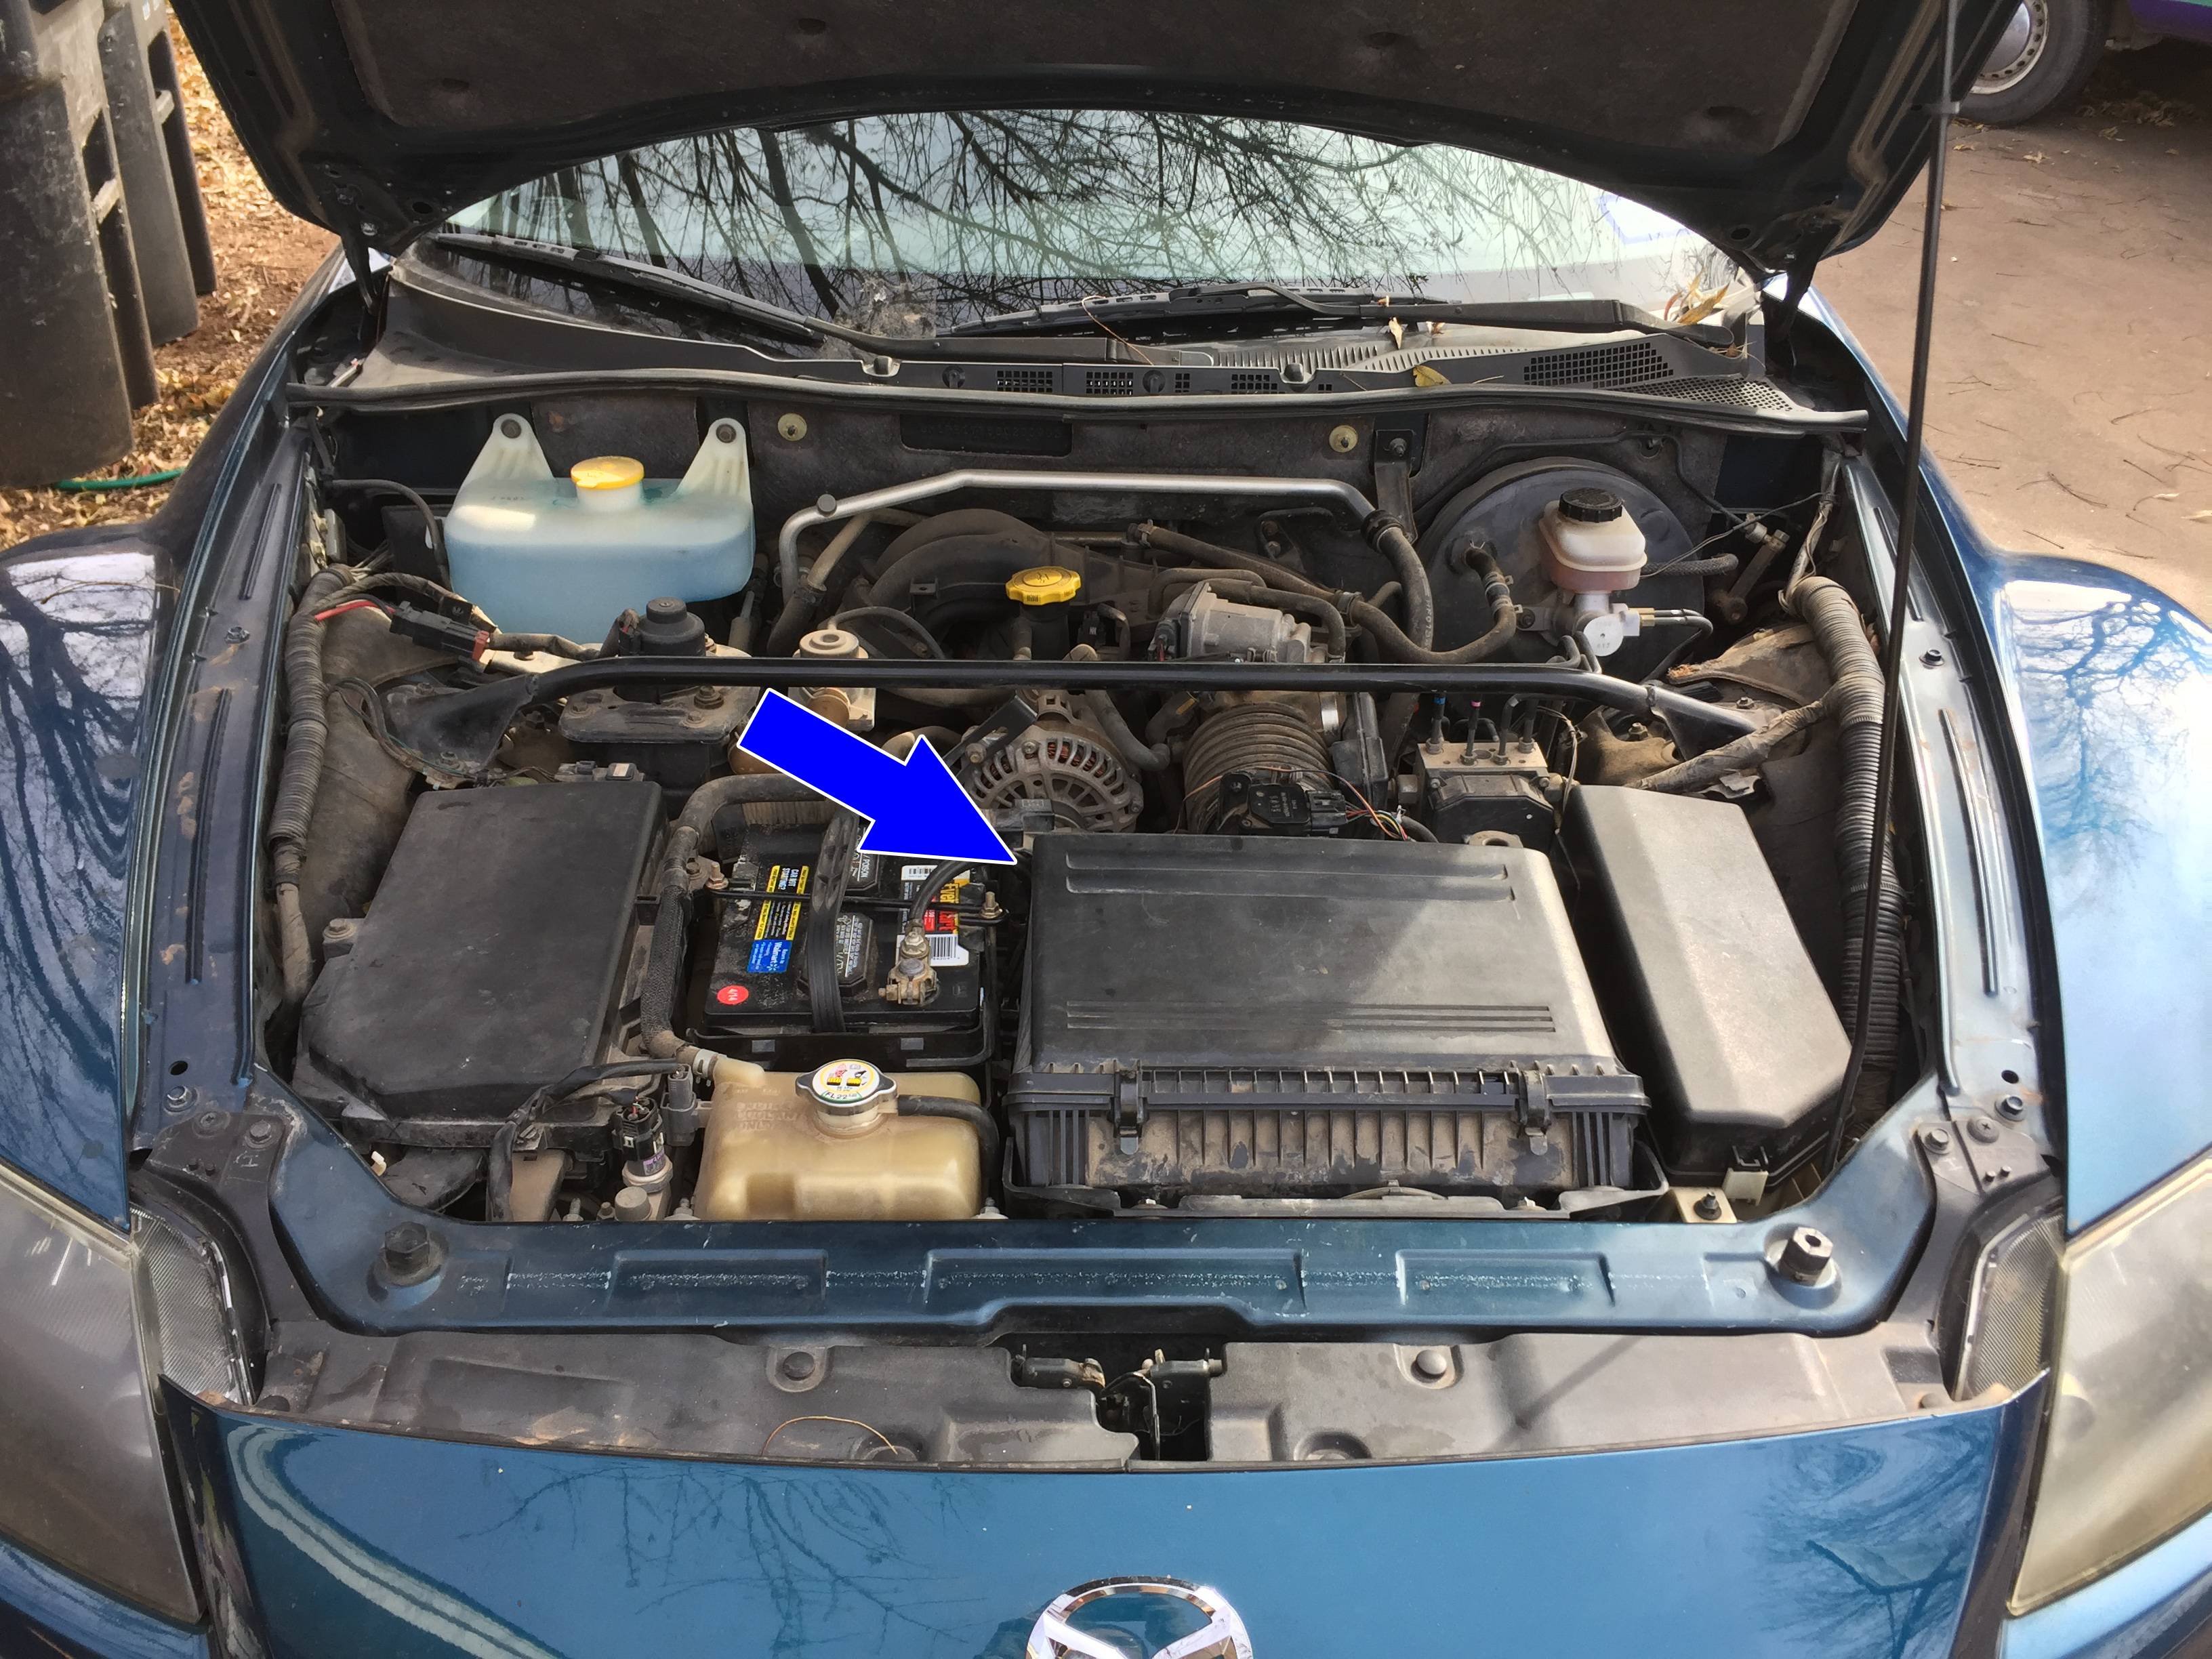
I'll admit, this was one of my hang ups my first time because I just didn't know what was holding the air box in, and I spent a bunch of time looking for non-existent bolts. The only thing that holds the airbox in place is 4 rubber grommets. So, once you disconnect all the hoses and electrical connectors, it just takes a little brute force to pull it out. Just to be clear, this is the part I'm talking about:
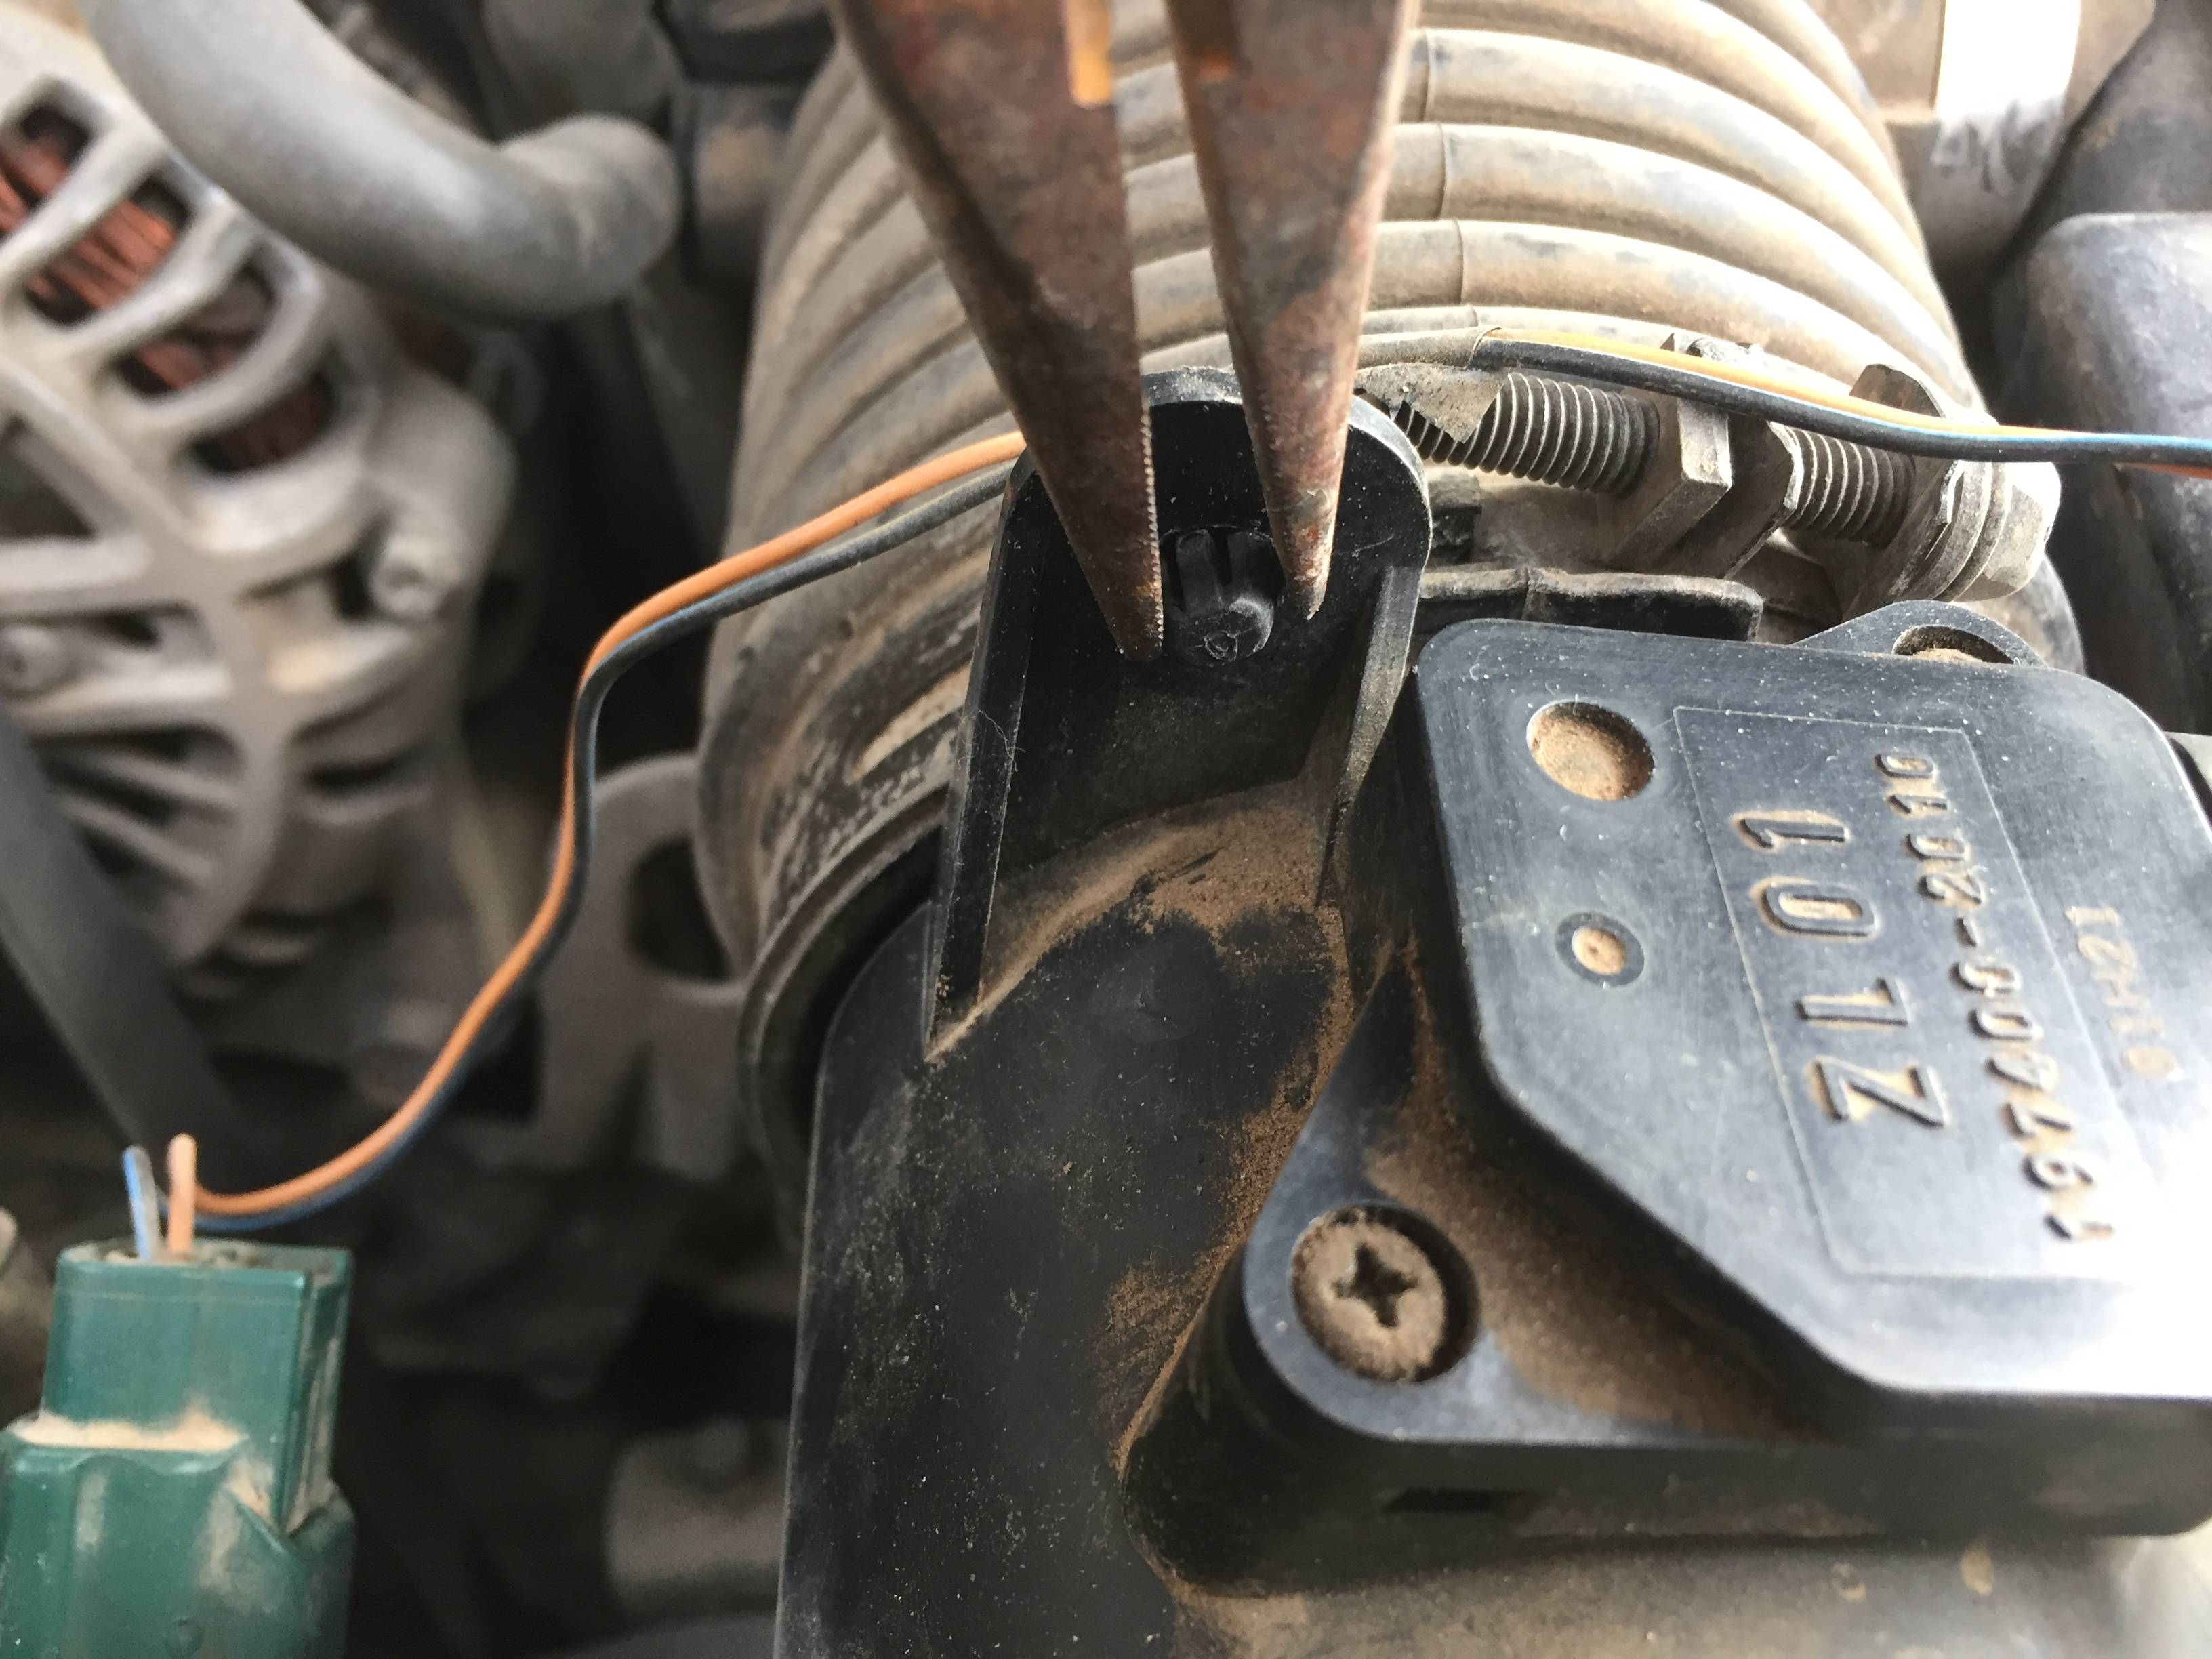
There are 2 clips holding wires to the air box. Since you can get to the back sides of these clips pretty easily, use some needle nose pliers to squeeze the clips to make them easy to pull out of their holes. You'll end up doing this a lot during this project, but I'm only going to show this one picture of it.
Next, remove the two wiring connectors and two small hoses going to the airbox. Then, loosen the hose clamp connecting the flexible air intake duct to the airbox. (Pretend there are still wires connected in the picture below.)

Now it's time for the elbow grease. Push back on the flexible air intake duct while lifting up on the back of the airbox. Remember, it just rubber grommets holding it in place, so just pull until it pops out. After you're done, it will look about like this (but it takes a lot more force than just a few fingers):

Then, you just kind of push the box up and back to pull it out of the front two grommets and get it out completely.
Step 3: Remove the air box shelf
Remove the two nuts, two bolts, and two hoses holding the air box in place.

Now, carefully tilt the shelf forward to where you can access all those clips still in place holding the wires to the shelf, and use a needle nose to remove them all. It's a whole lot easier to get those clips off this way than to try to do it before tilting the shelf forward (though speaking through exerience - that is possible). But note that the access isn't as easy as the photo up above showing how to remove the clip from the air box.
When you're sure everything's disconnected, just pull the shelf out.
Step 4: Remove the battery & battery box
At the very least, you should disconnect the negative battery terminal. You may be able to get the job done without removing the whole battery & battery box, but for the 10 minutes it takes, it's worth having a better view of everything.
I didn't actually take any photos of removing the battery since it's so obvious how to do so. Just remove the terminals, then the bracket holding the battery in place.
To remove the battery box, first you have to separate the top half from the lower half. The top half just clips into place on the lower half, so you'll have to go around pushing out on the sides of the top half until all those clips are released. Here's a photo of the bottom of that top half after it's been removed, so that you can see what the clips look like that you're going to be dealing with.
Now, you can take out the lower half of the battery box just by removing the 3 bolts holding it in place.

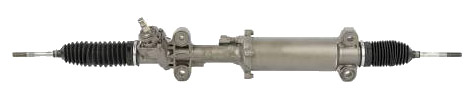
Step 5: Disconnect the steering column lower u-joint from the steering rack
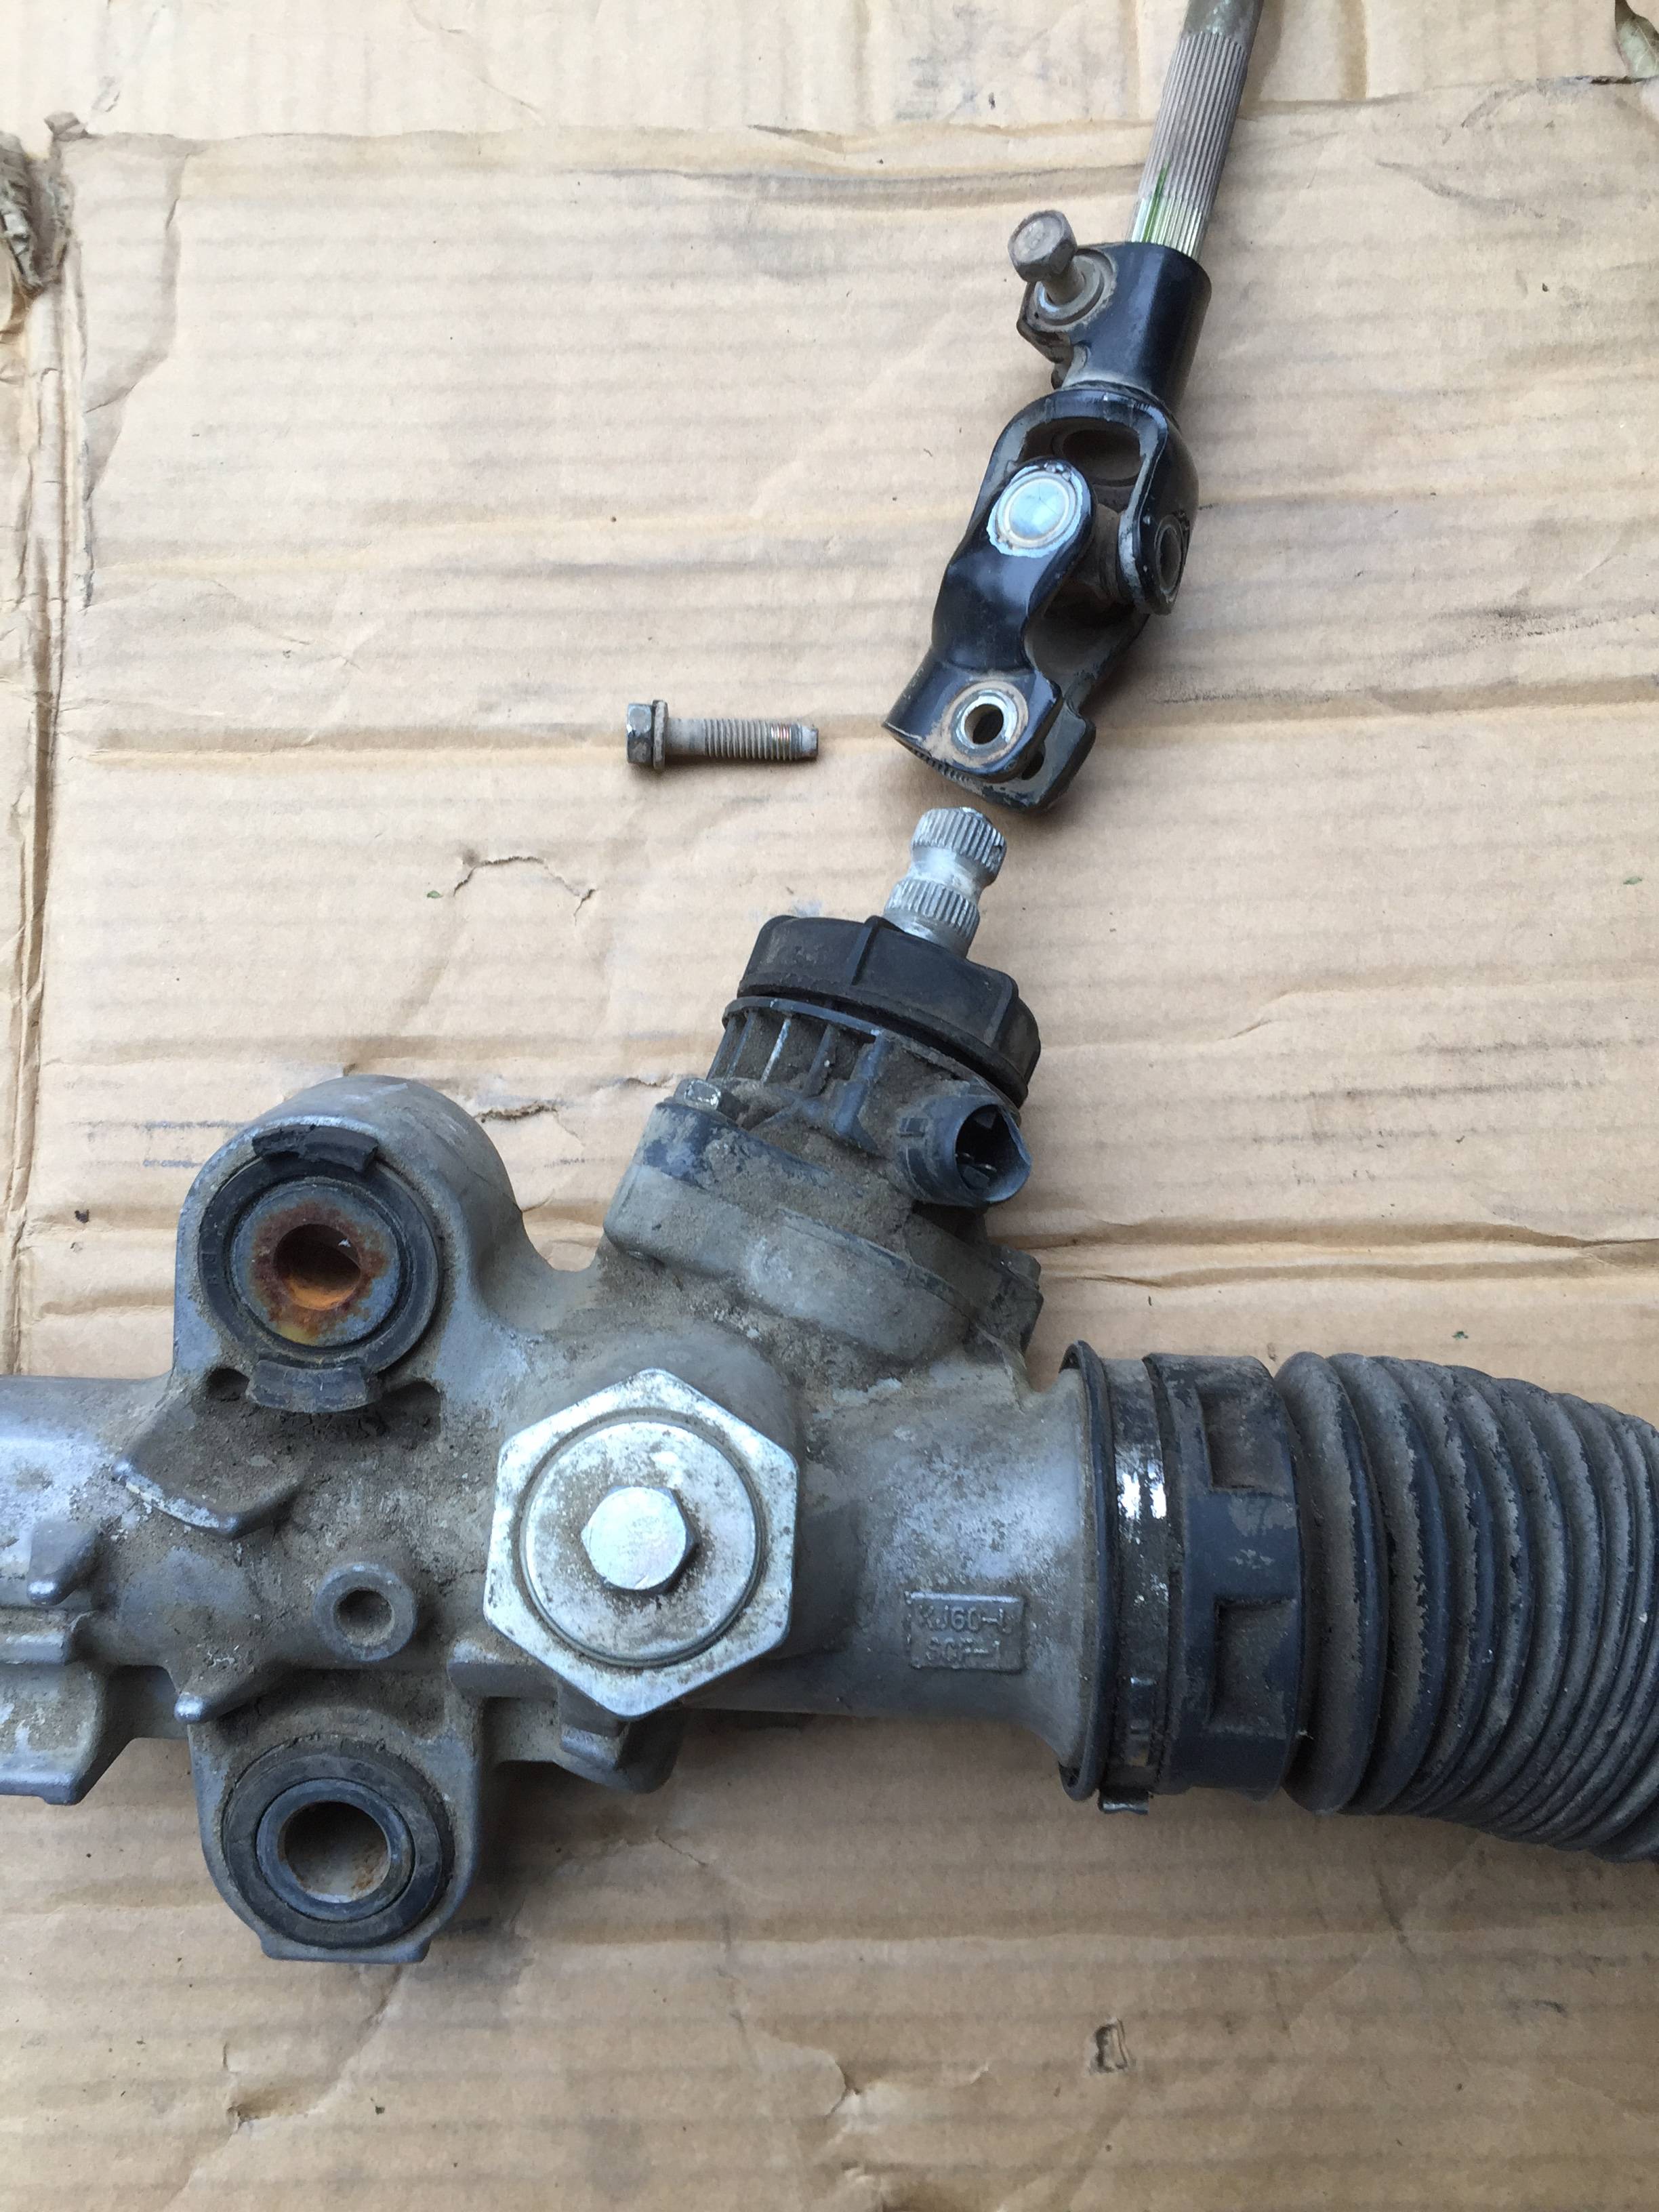
I didn't actually get a good picture of just the U-joint while it was still installed in the car, but here's what it looks like on its own, to give you an idea of what to look for. This also shows you how it all goes together so you can understand how it all works even when you can't see it.
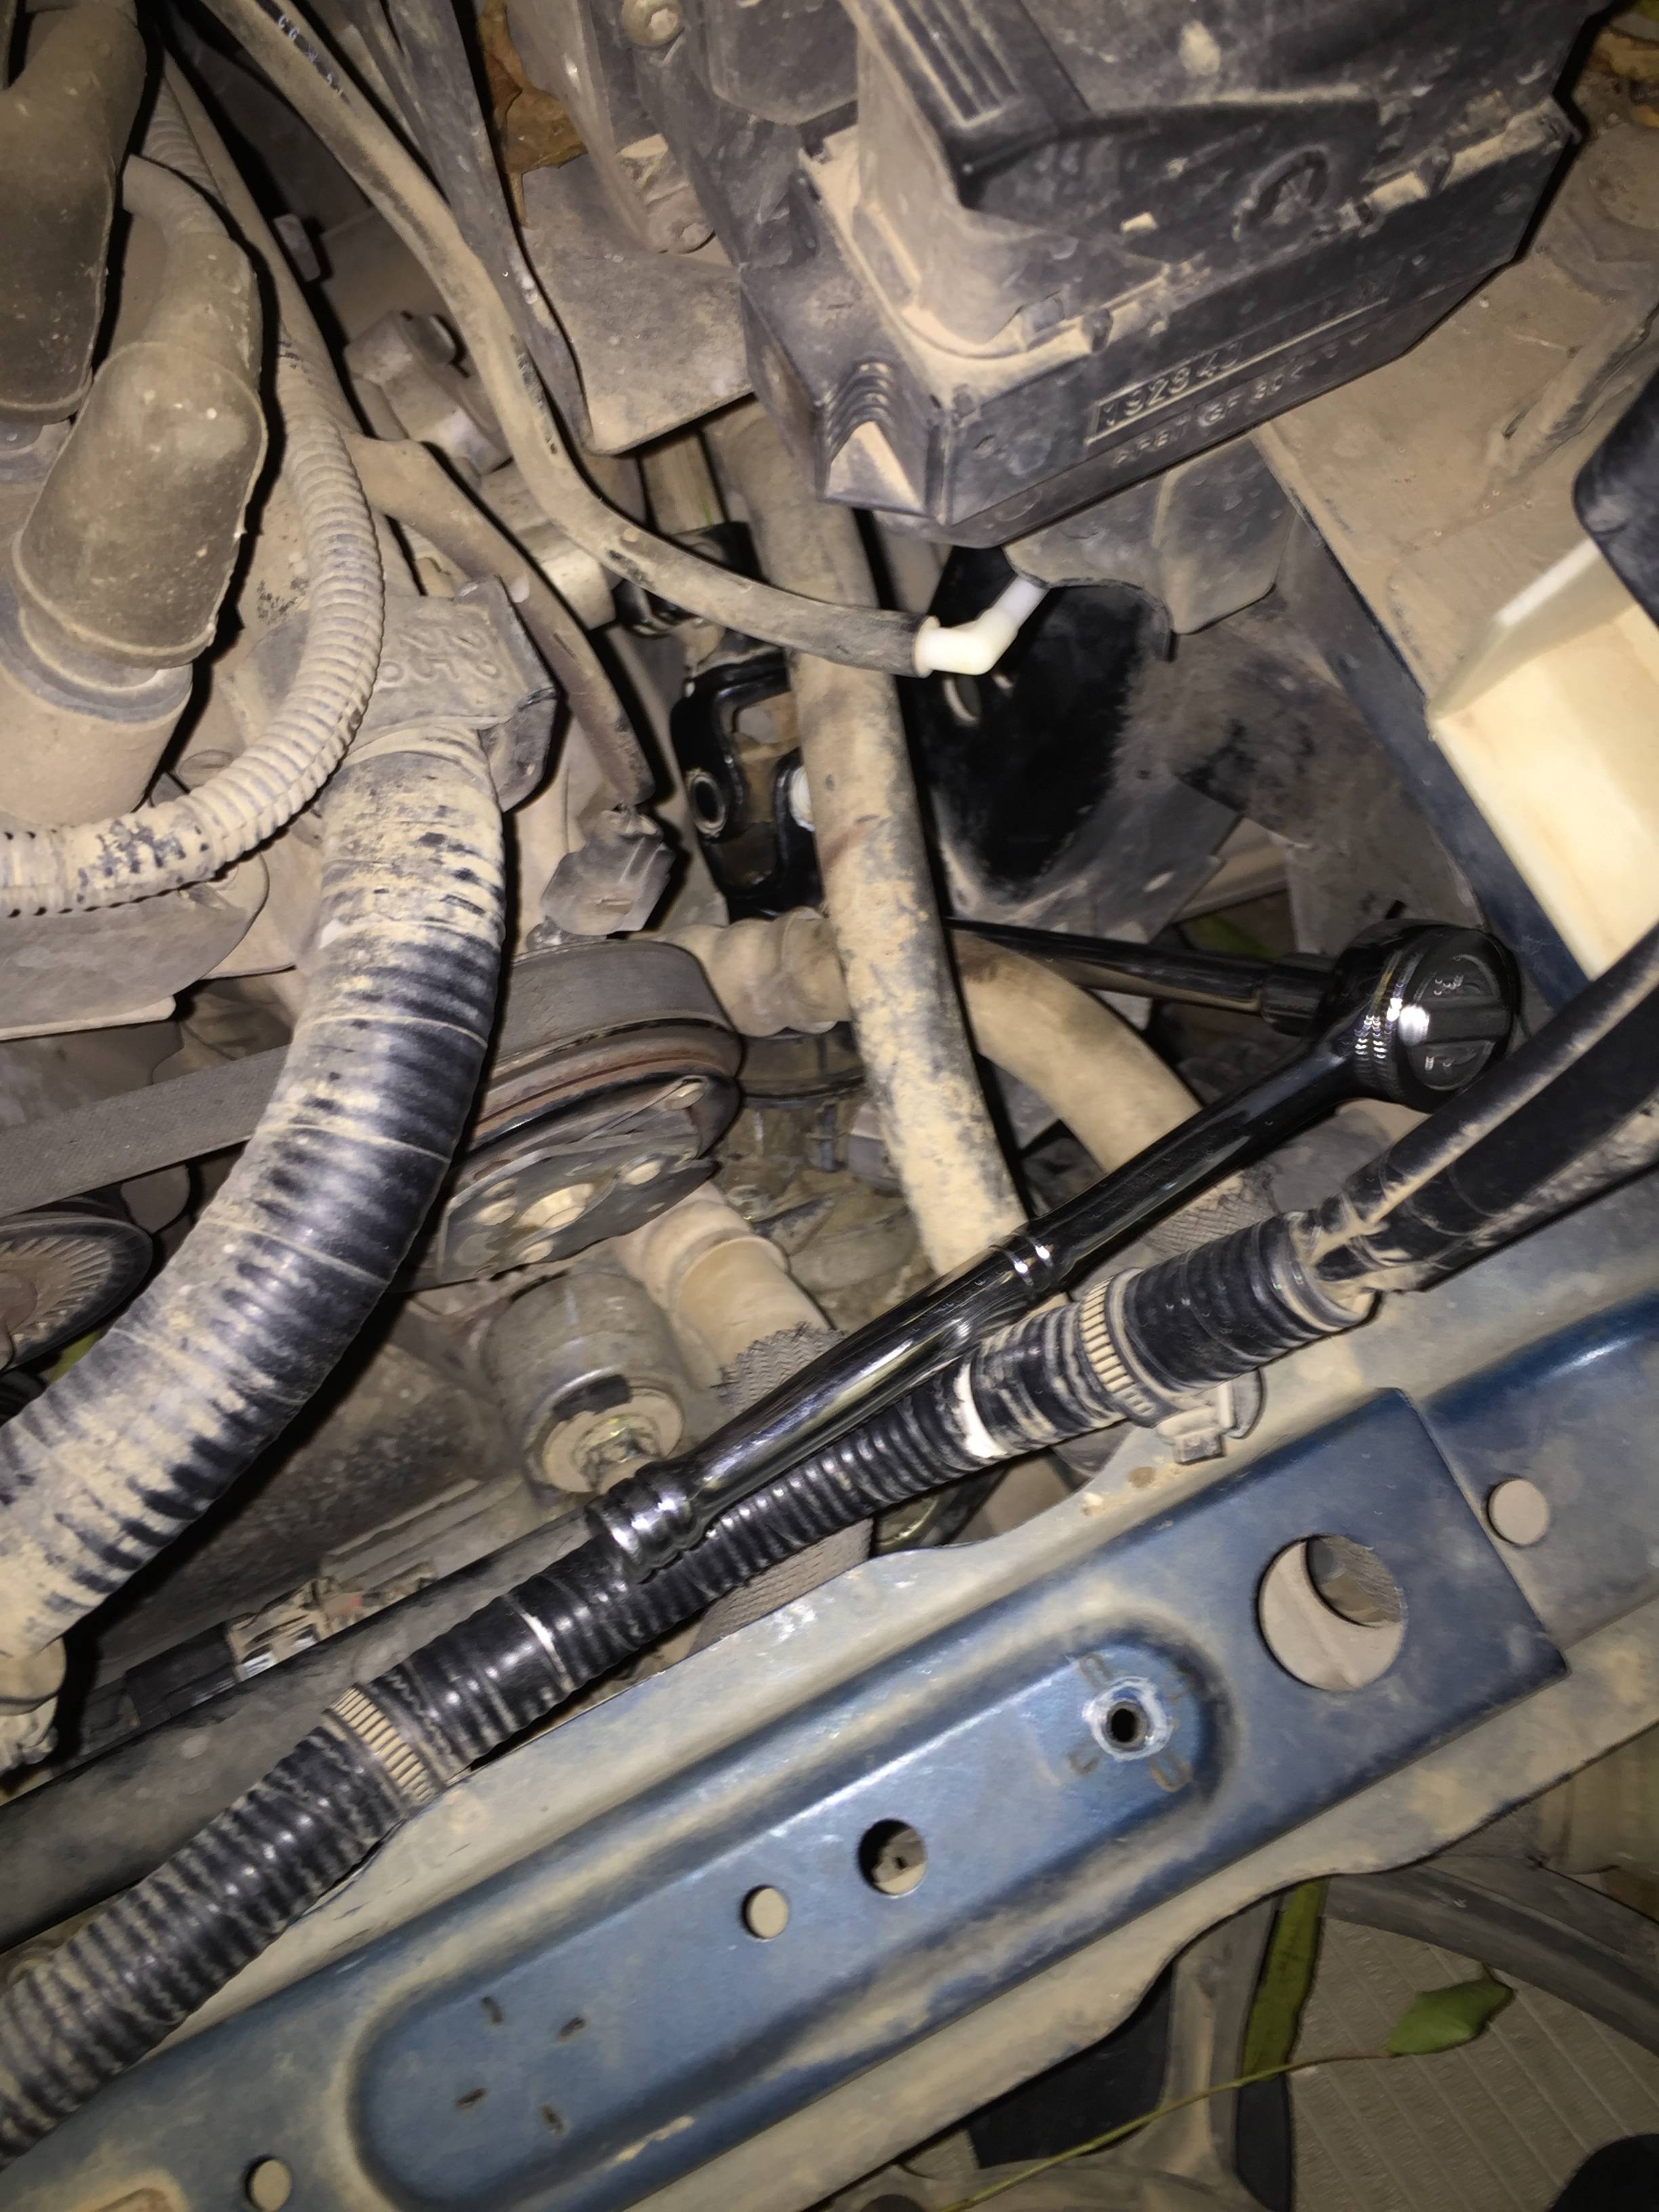
You'll probably have to turn the steering wheel a little bit to get the bolt that holds the u-joint to the steering rack at an angle where you can access it with a socket. For me, it was roughly 45° to the left, though you'll probably have to go back and forth from the steering wheel to under the hood once or twice to get the bolt exactly where it needs to be. Once there, this is where you'll want the 6" extension on your ratchet. Here's how I positioned the ratchet to get to the bolt.
Once you loosen the bolt, take it and the washer all the way out. You won't be able to remove the steering column with that bolt still in place. (I wish I'd known that. The one write-up I'd read about removing the steering column indicated that you leave the bolt in place.)
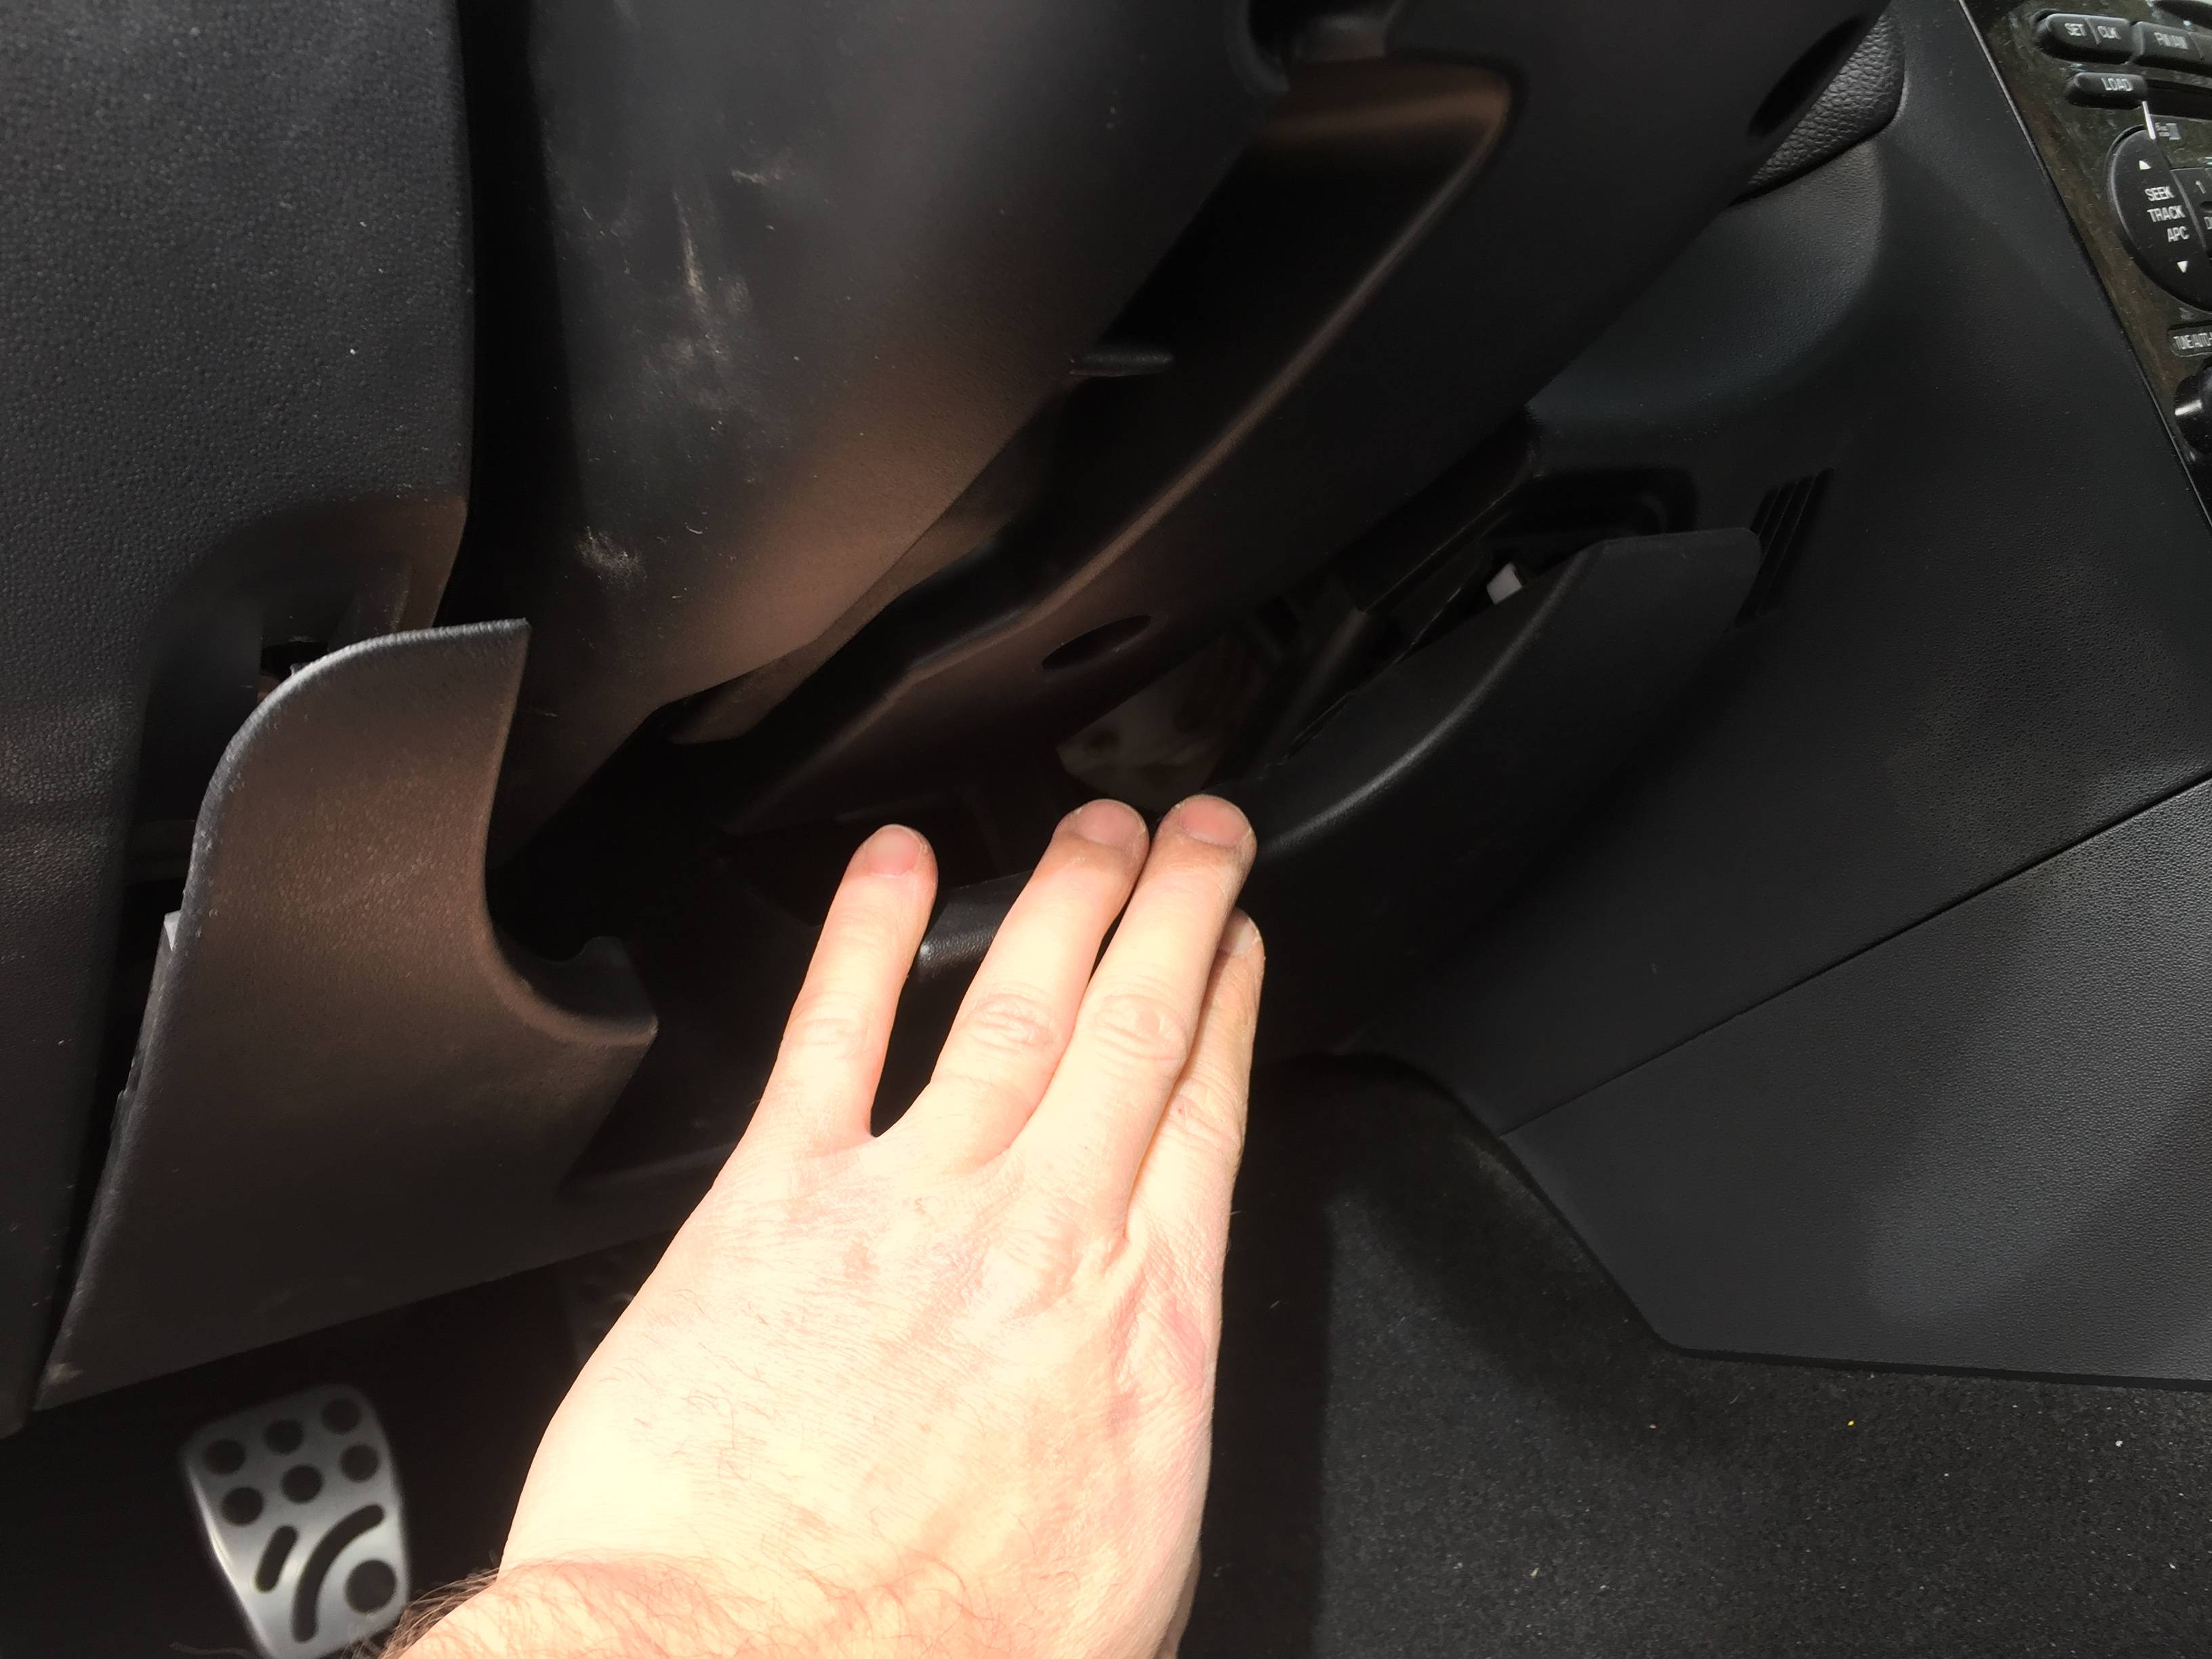
Step 6: Remove the trim & cross member from underneath the steering column
Time to move into the cabin for a little bit. First, take off the trim piece covering the cross member under the steering wheel. Just grab and pull from the top.
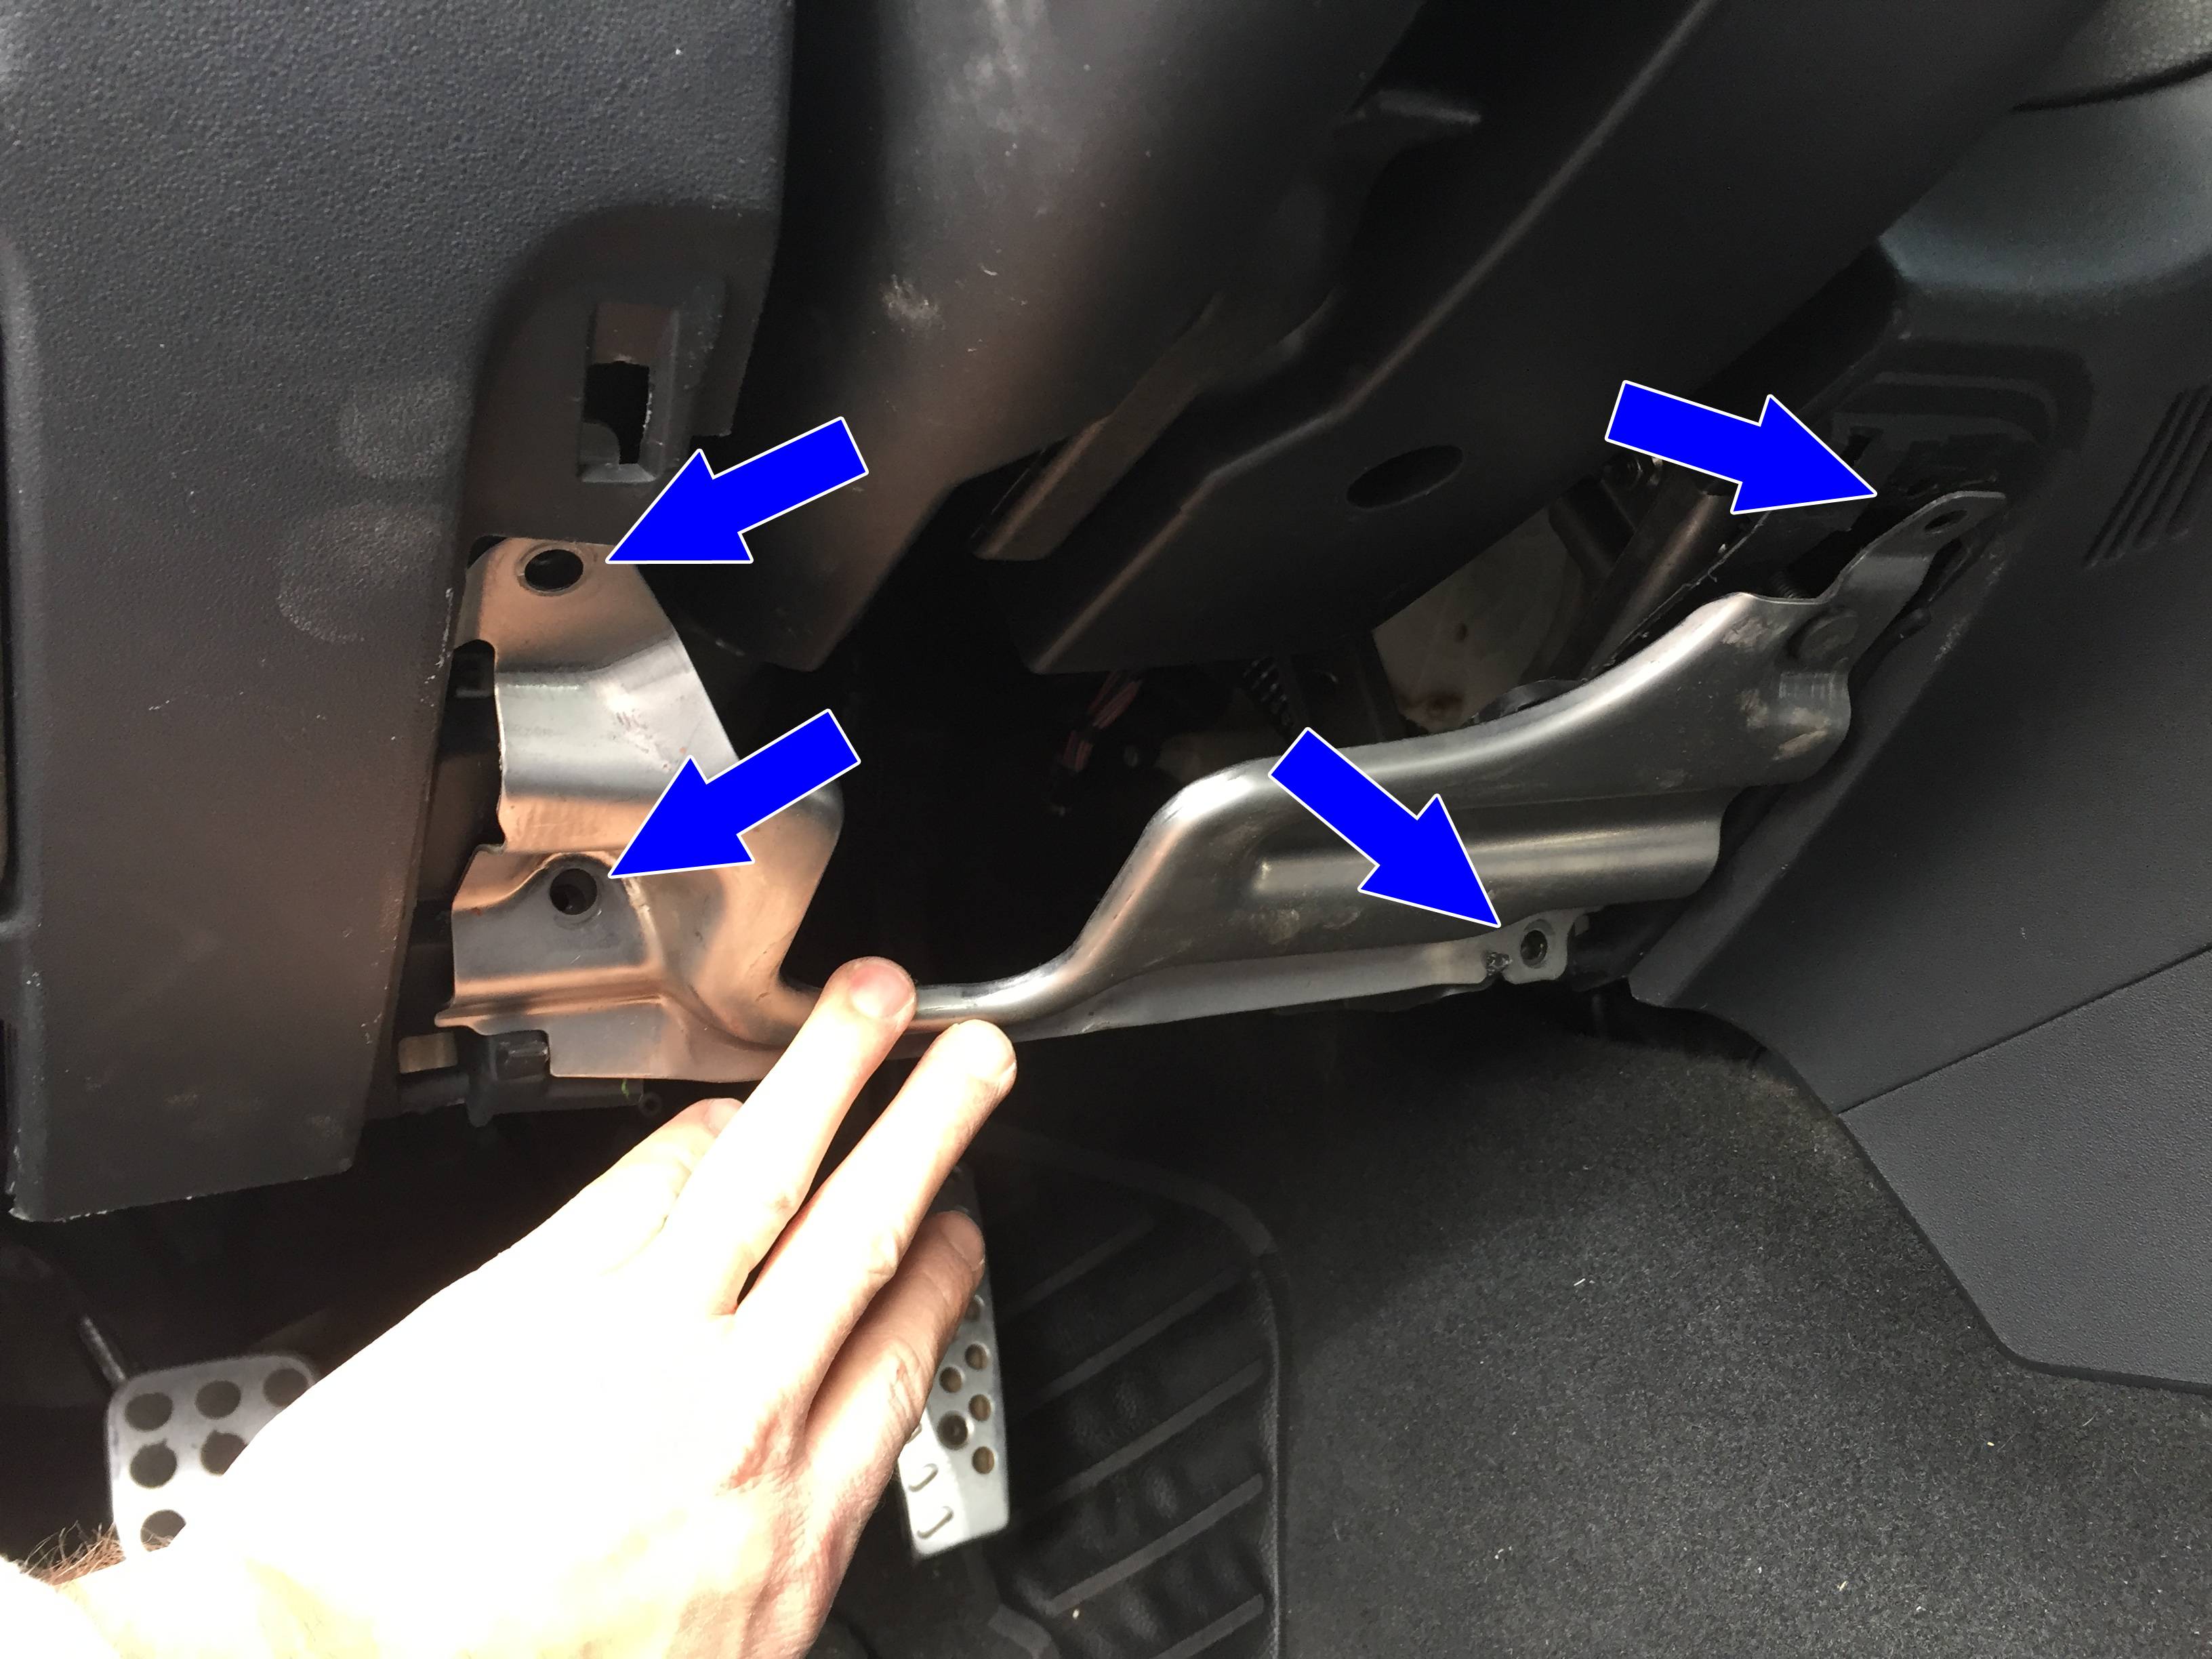
Next, unscrew the 4 screws holding the cross member in place and remove it. (Once again, use your imagination about the screws being in the photo.)
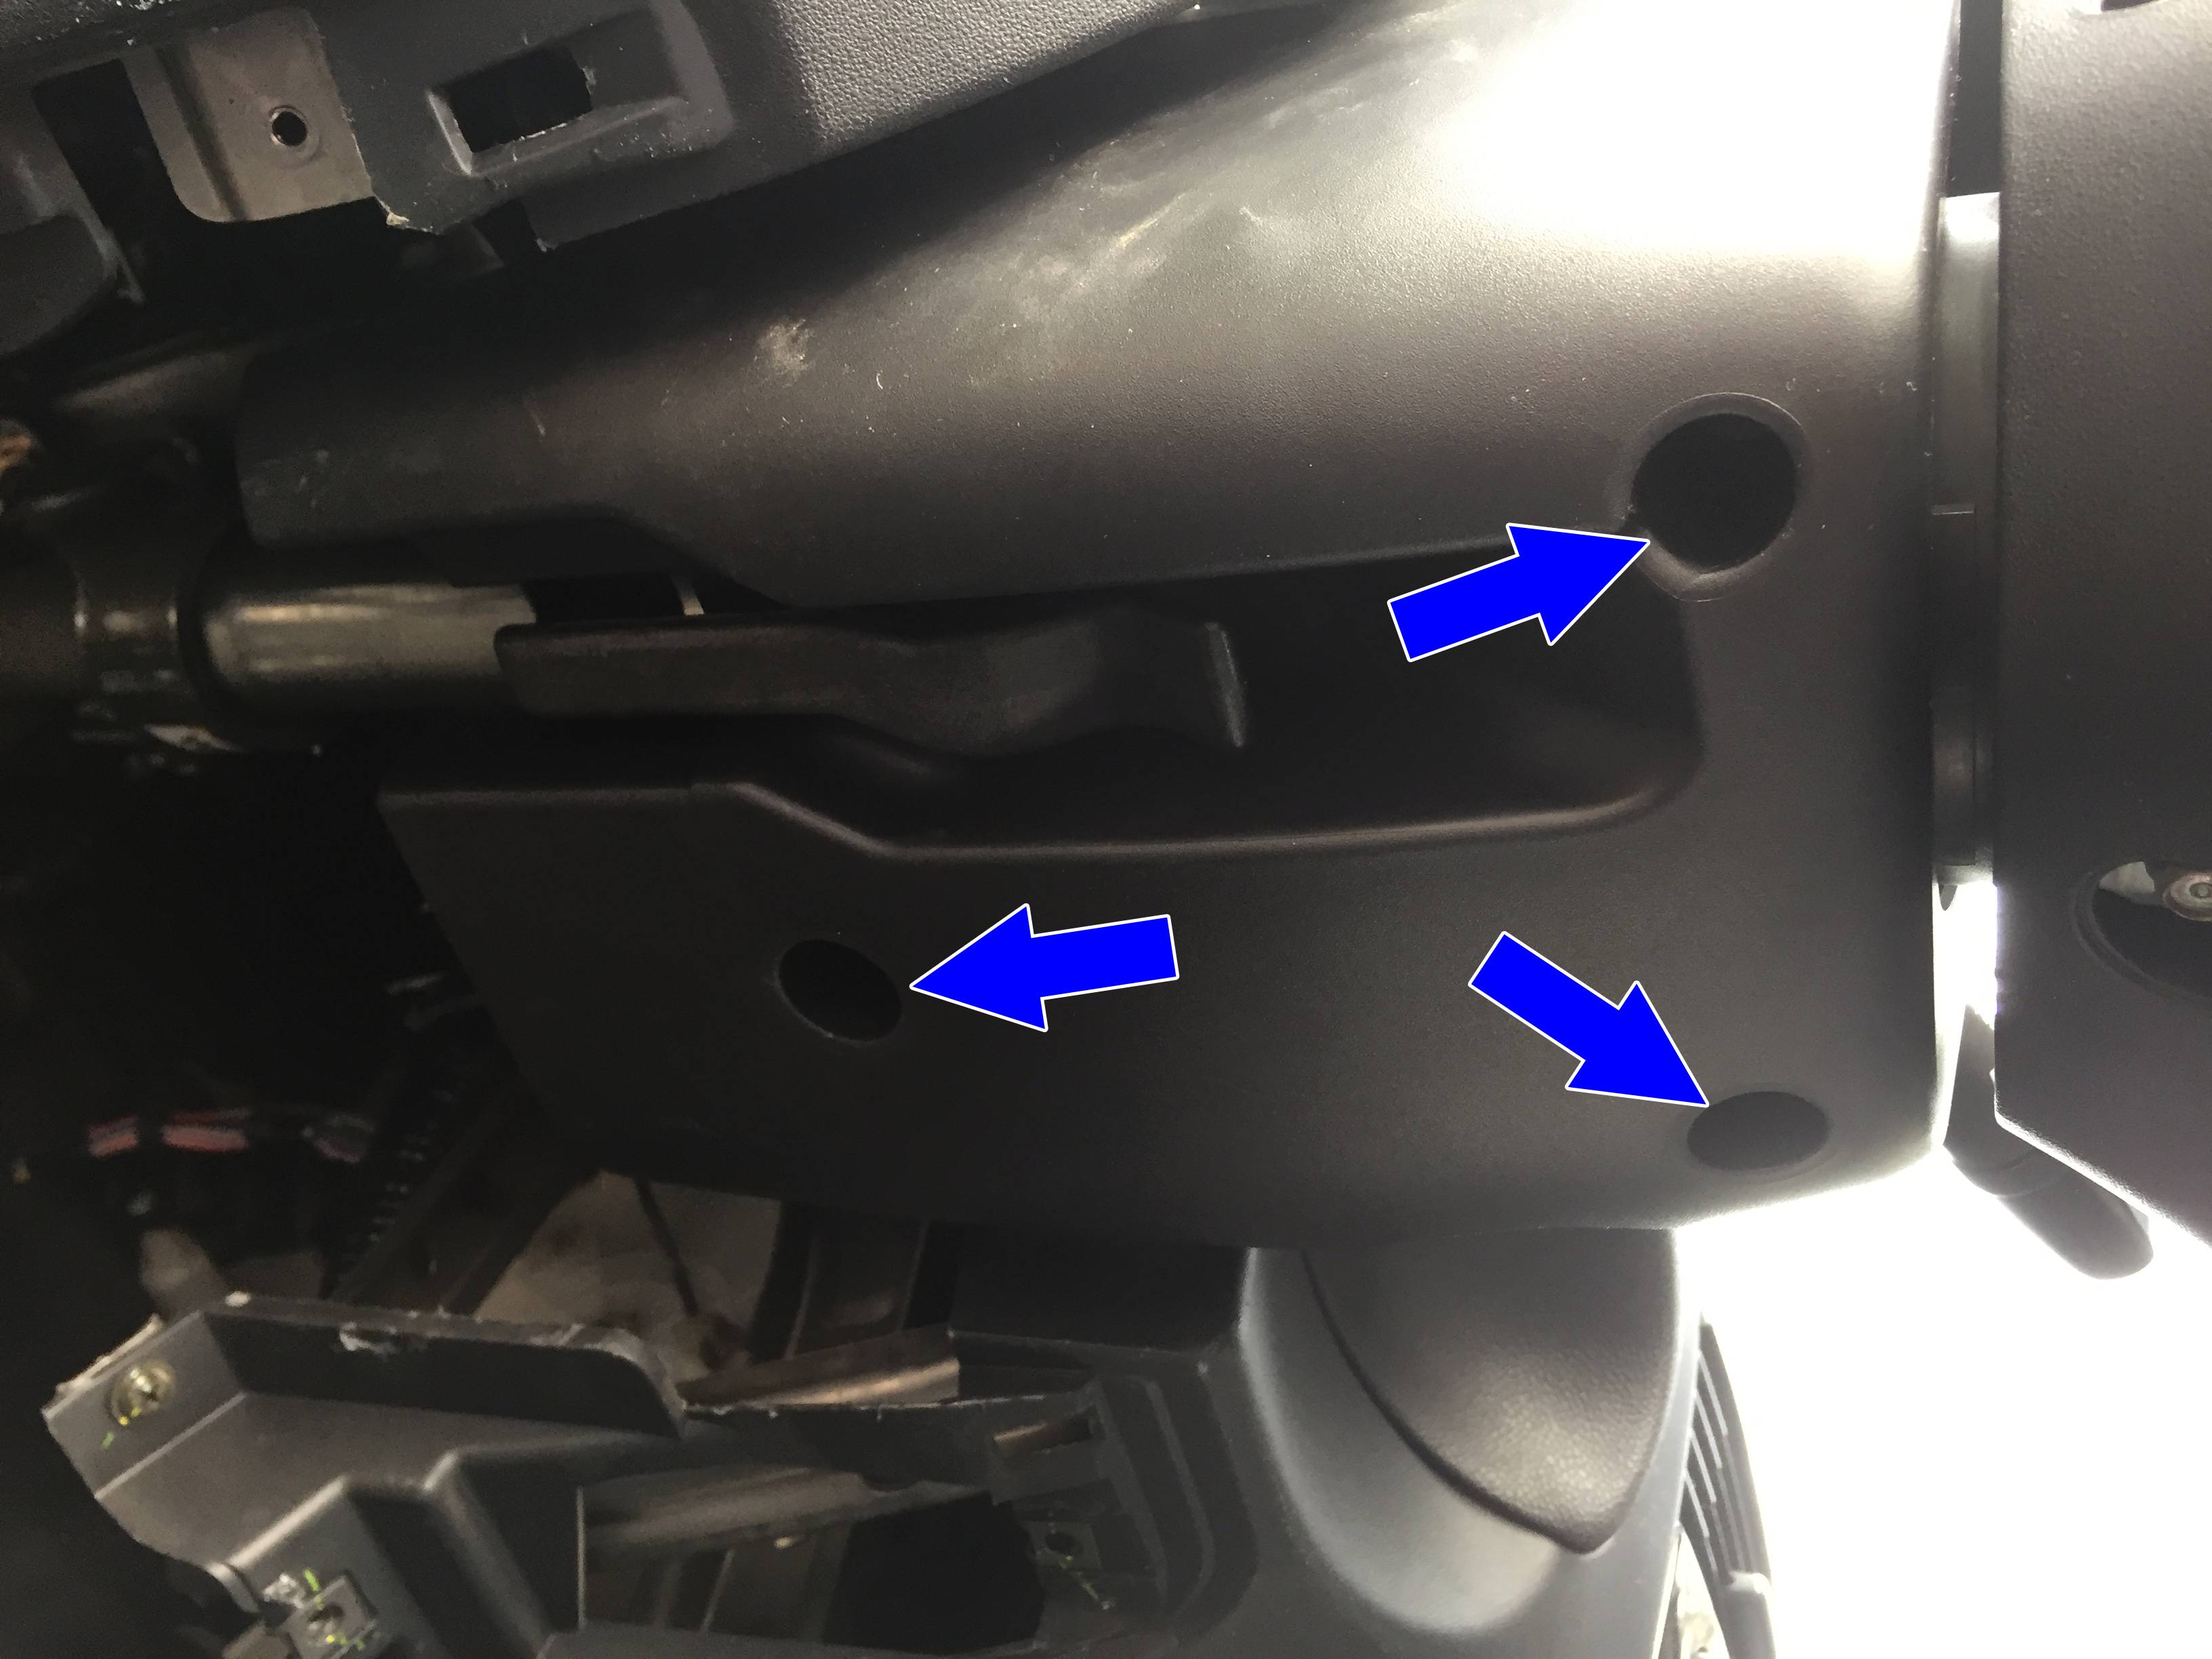
Step 7: Remove the trim from behind the steering wheel
There are 3 screws holding the trim around the steering column just behind the steering wheel. Take those out.
The top and bottom halves of that trim are just snapped together. Simply pull them apart to separate them. It seems easier if you start at the end towards the firewall, and then work your way around. You should probably open the tilt steering lever before starting this. Once you get the havles separated, don't just drop the lower piece, as there's a wire still attached.
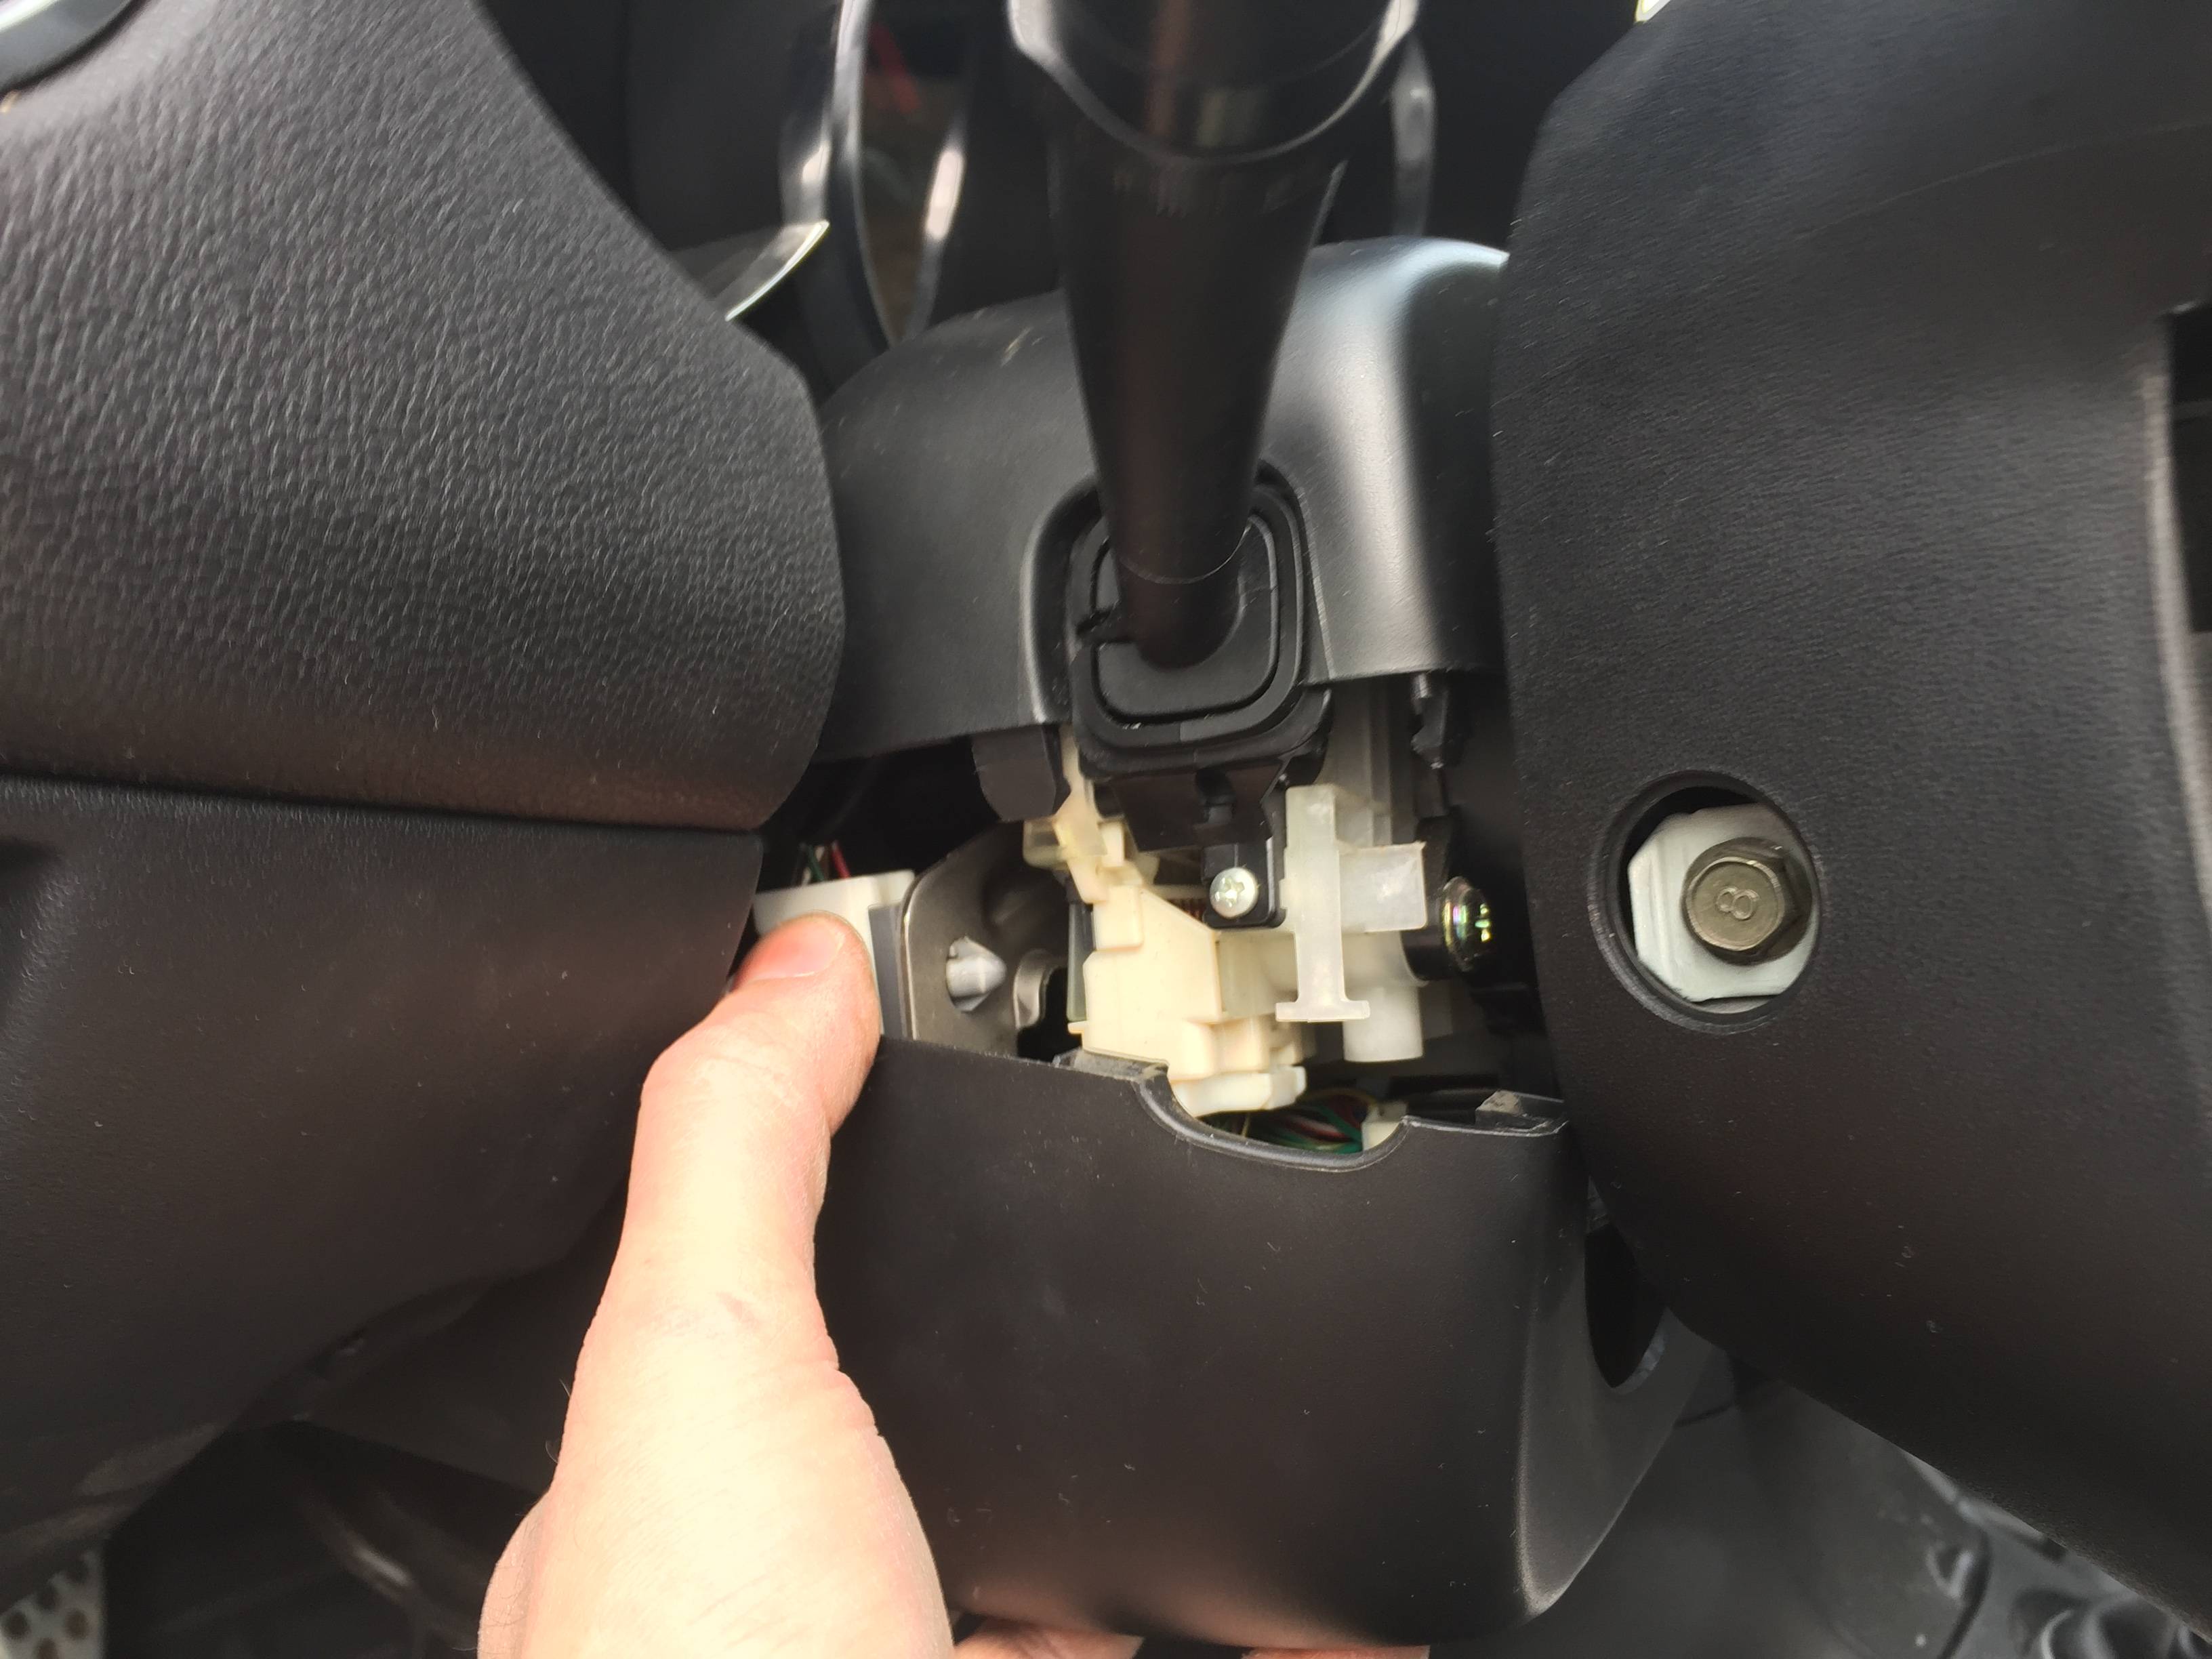
To get that wire unattached, press on the little clip holding the light into the trim. This is a little tricky. I found that an open needle nose worked the easiest for me, though you might want to try a small screwdriver. If you can't get it, you can always unscrew the little Philips head screws holding the light bracket in place, but then you'll have to keep track of all the little pieces (and put it back together again).
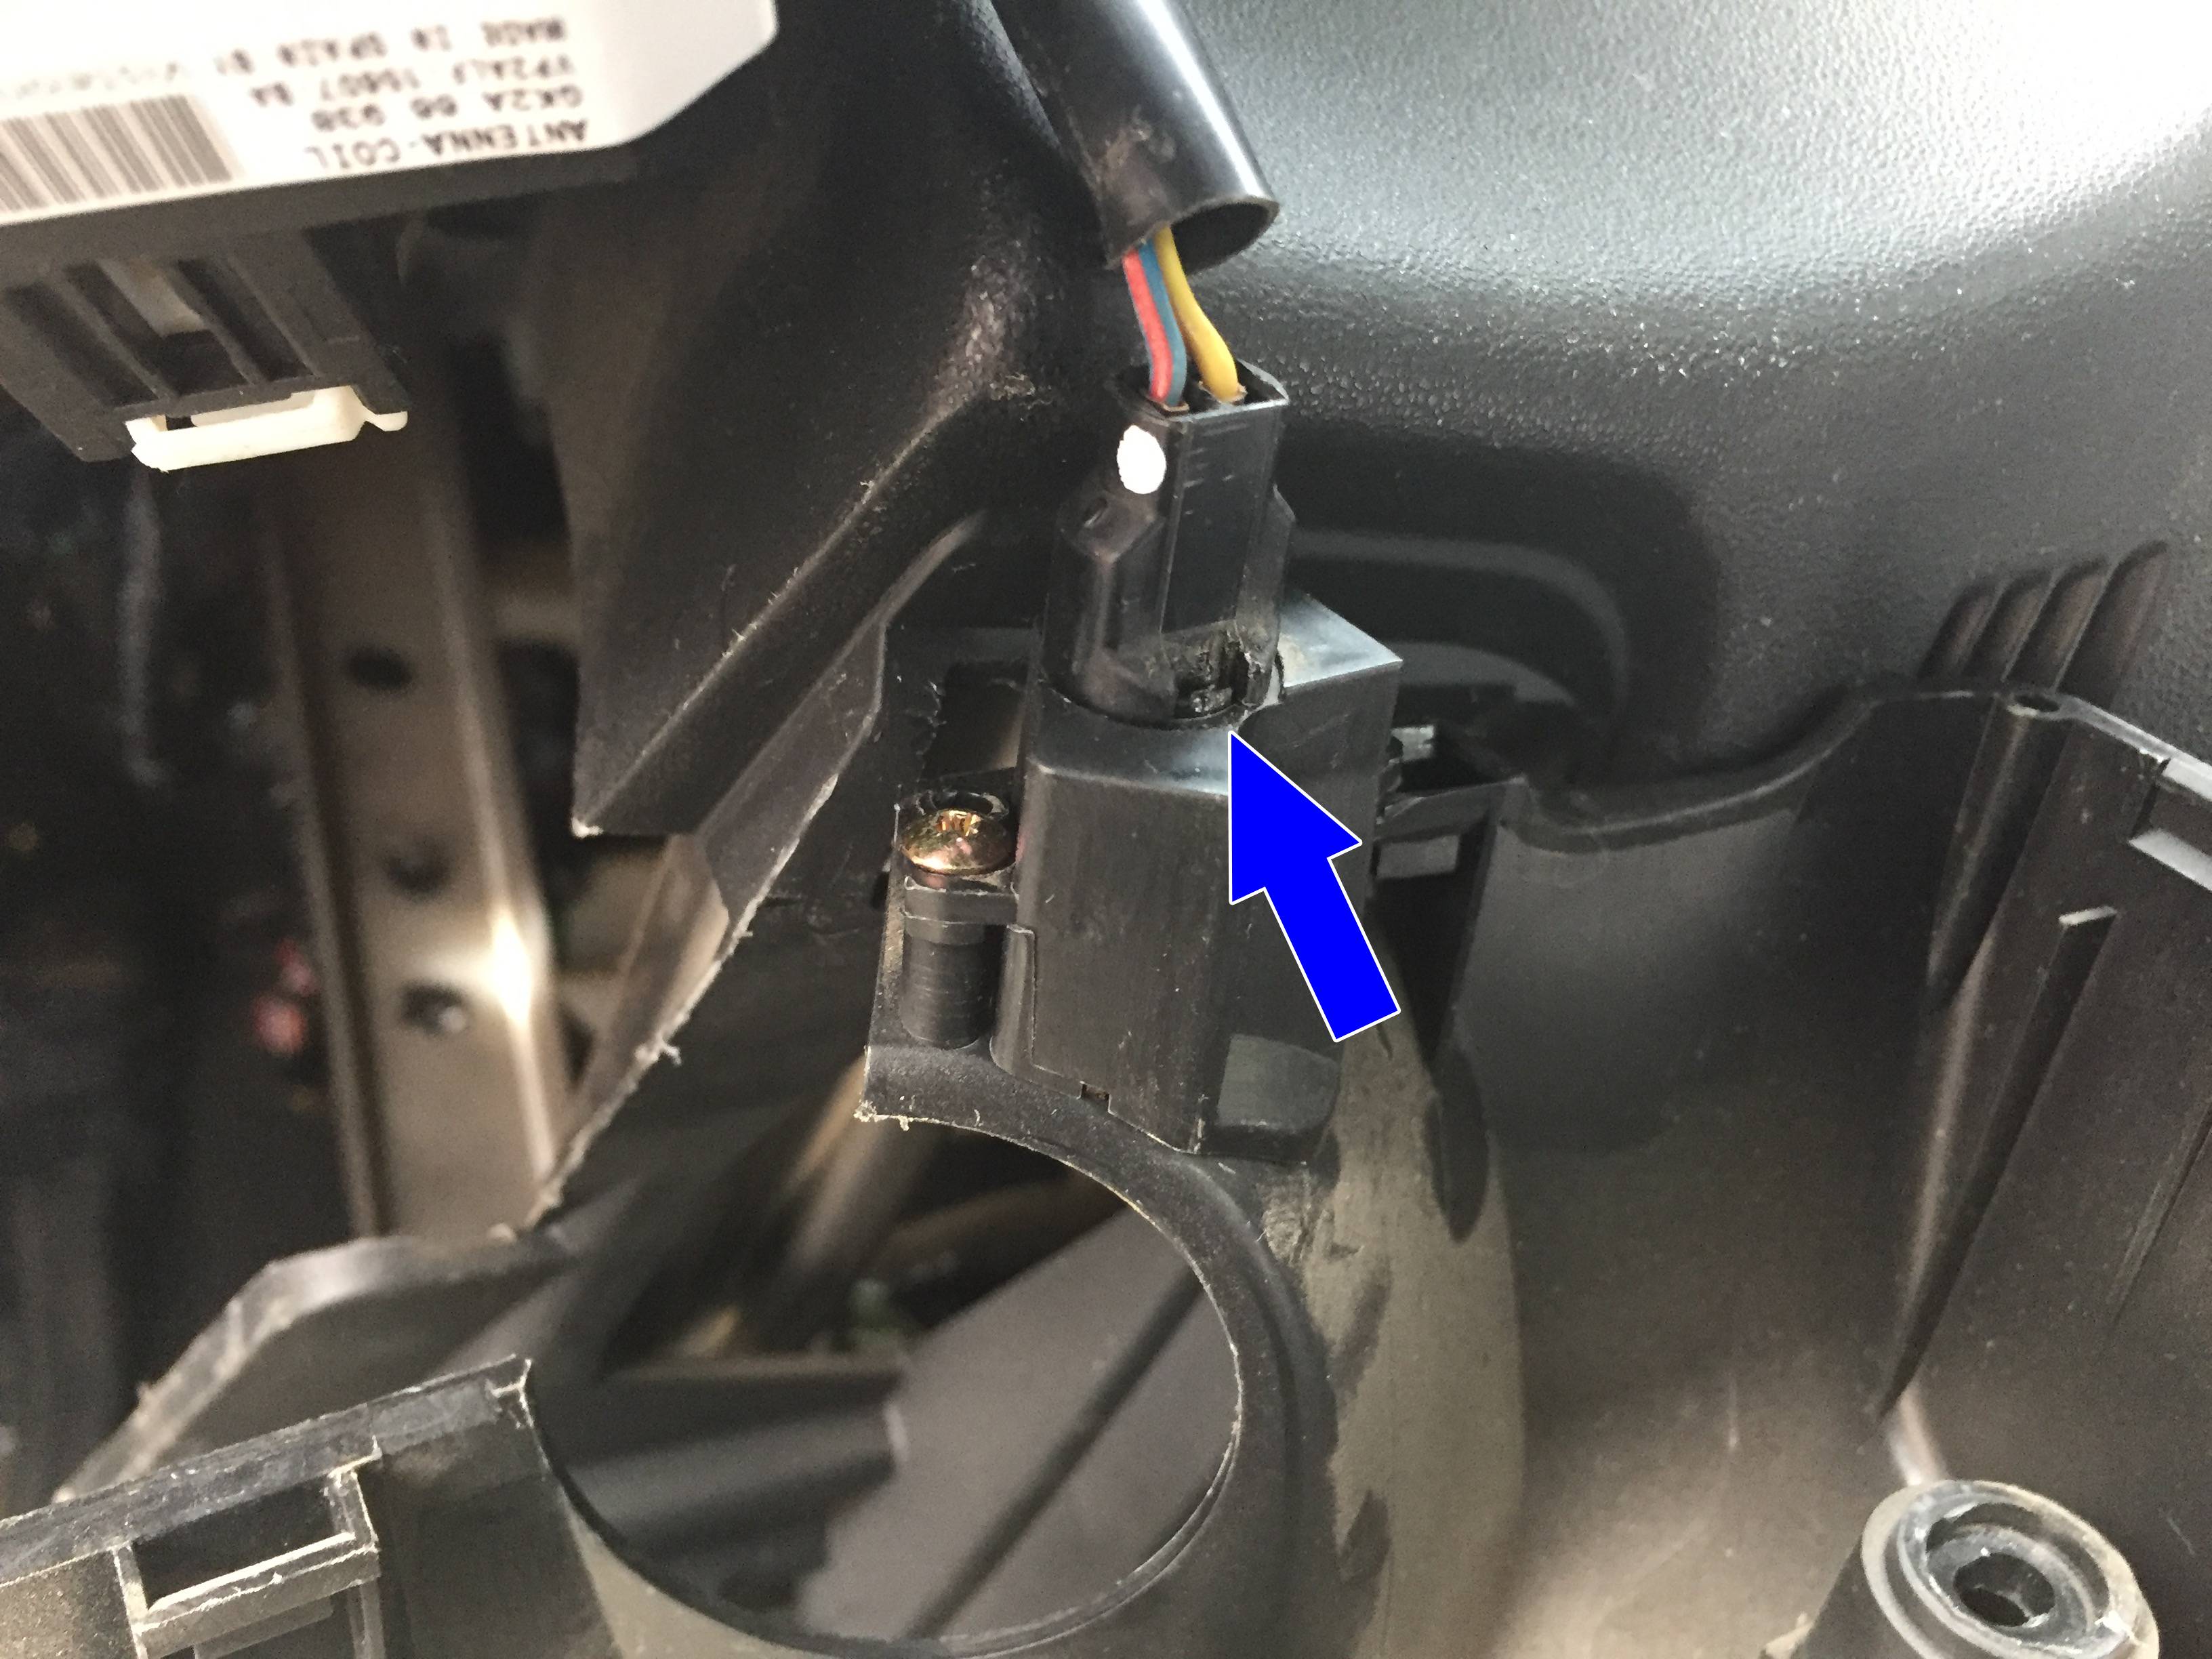
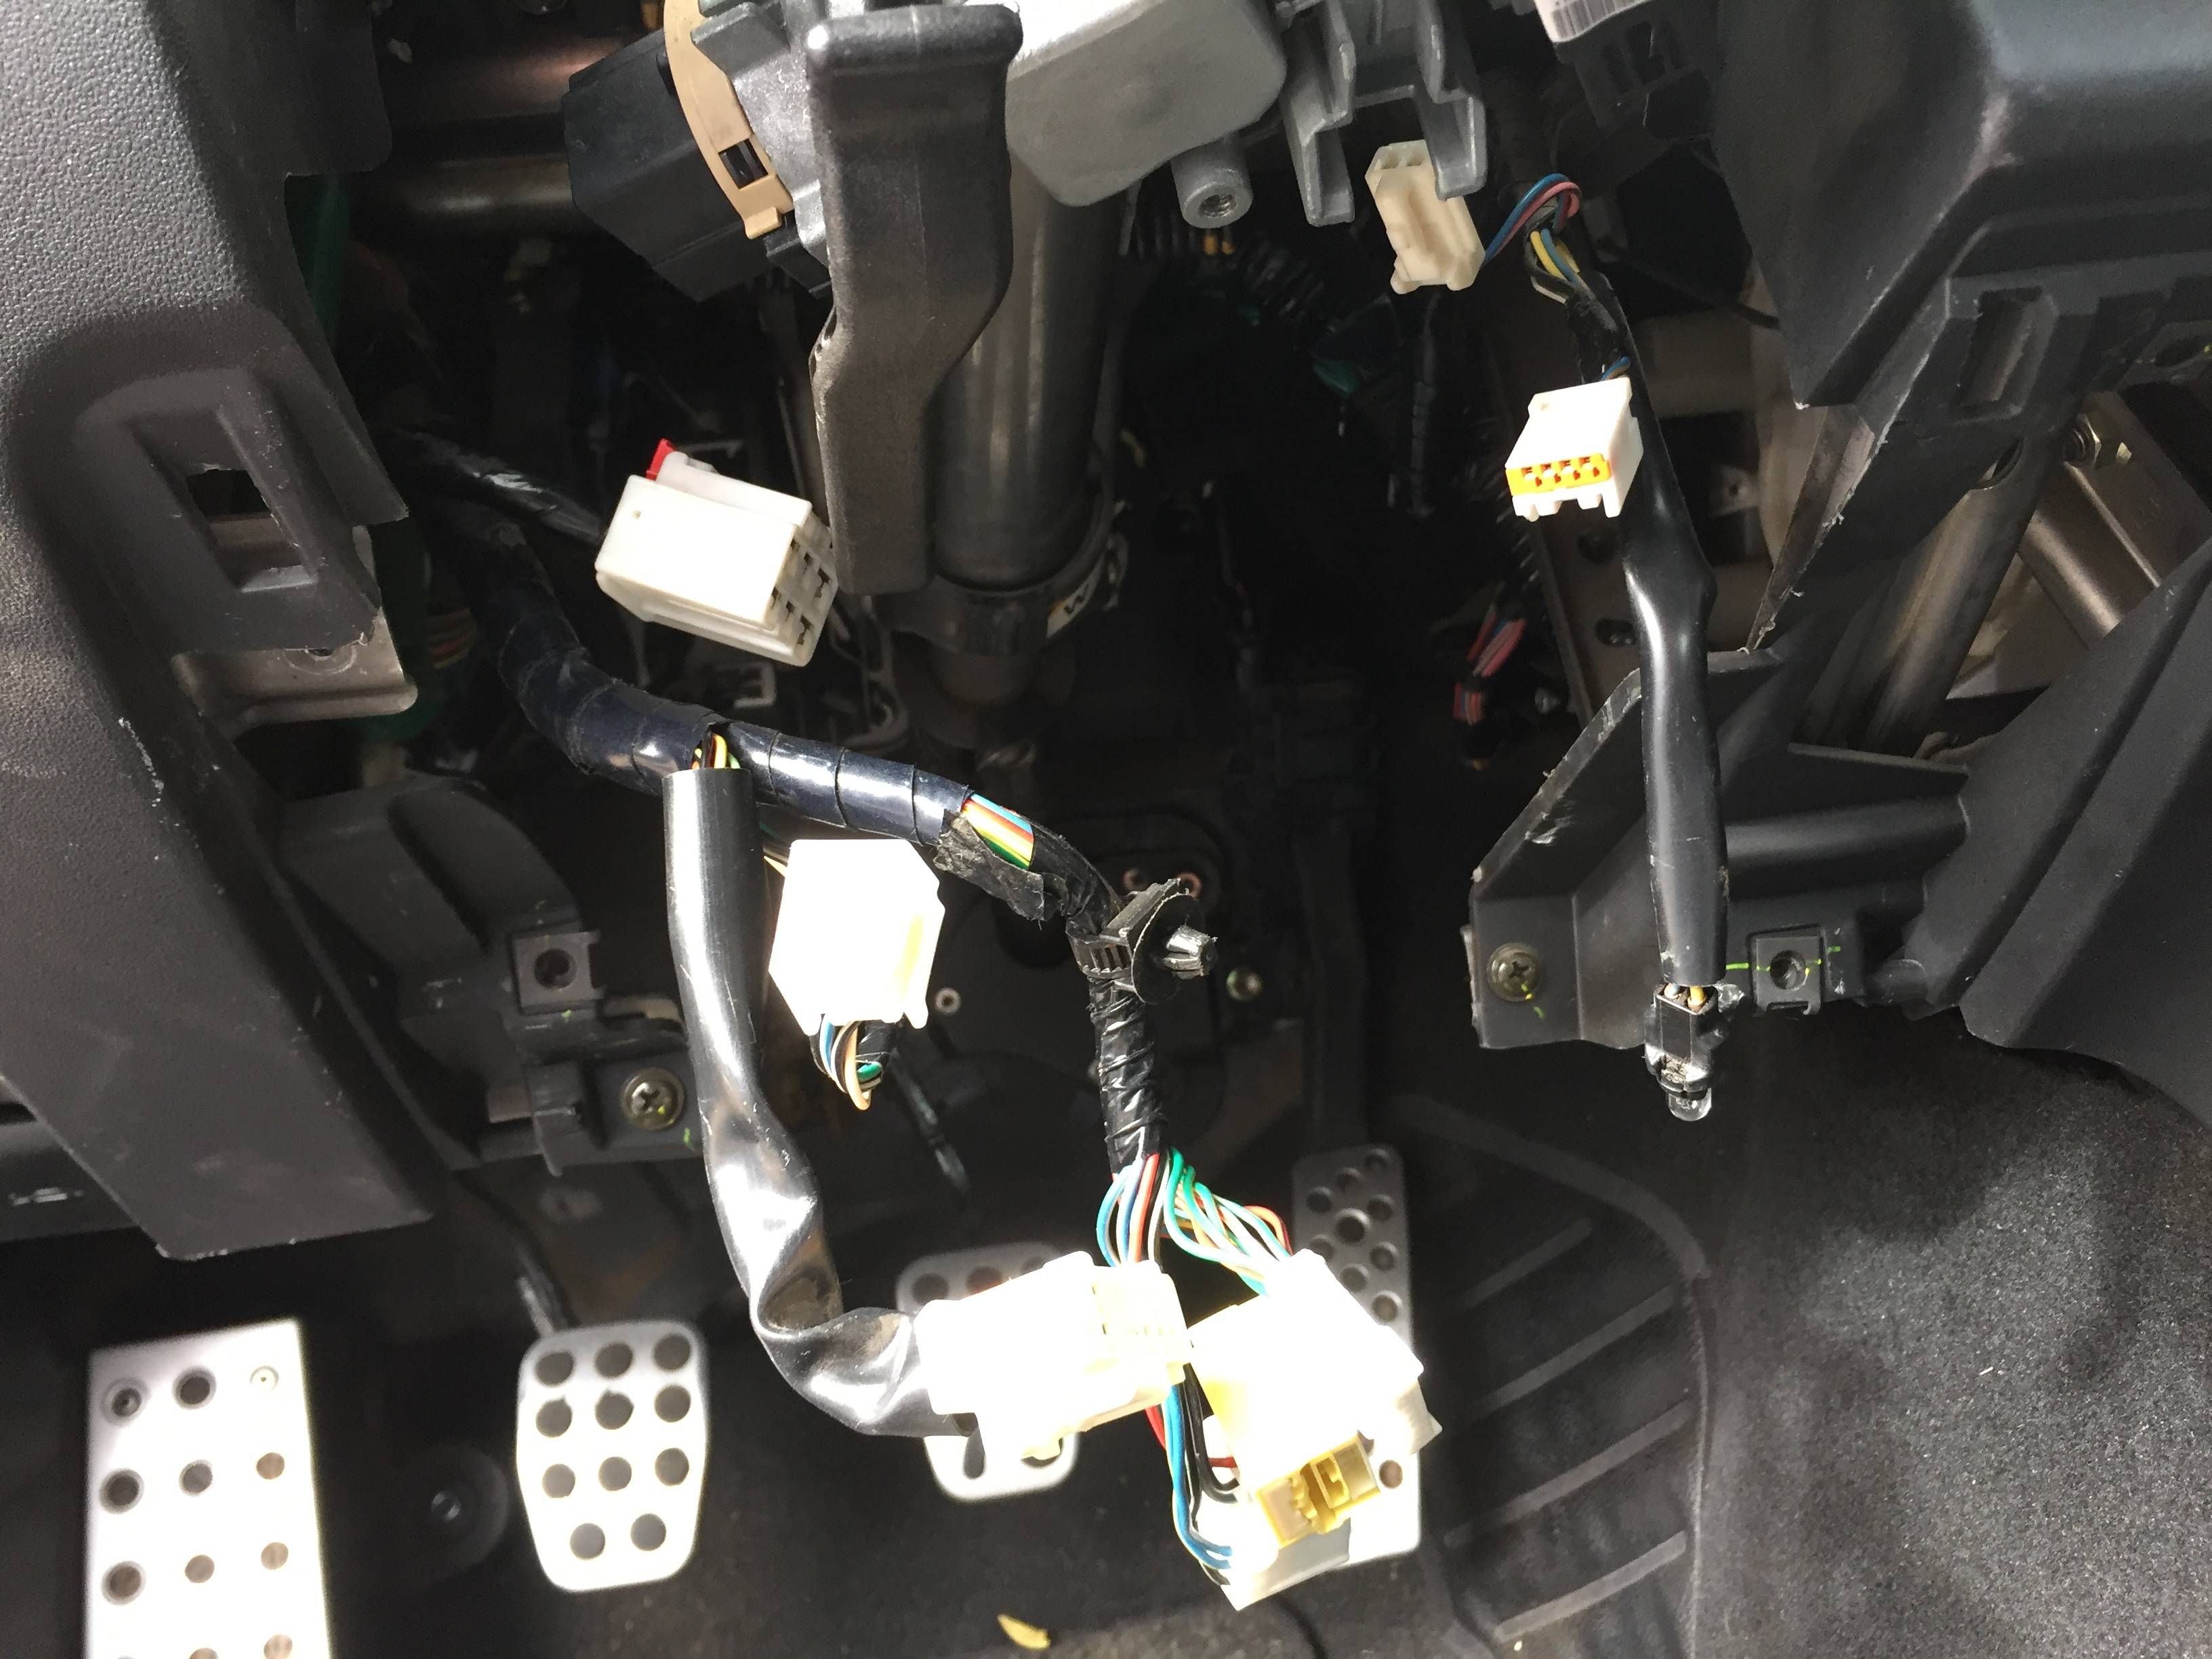
Step 8: Undo all the wire connectors to the steering column
There are a bunch of wires connectors going to the steering column just behind the steering wheel. I think there are 7 total. Disconnect all of them. And don't worry about remembering which goes where - they're all unique, so you can't accidentally plug one in where it doesn't belong. I didn't get a picture before disconnecting them, but here they all are afterwards.
Step 9: Undo all the nuts holding the steering column & drop the steering column
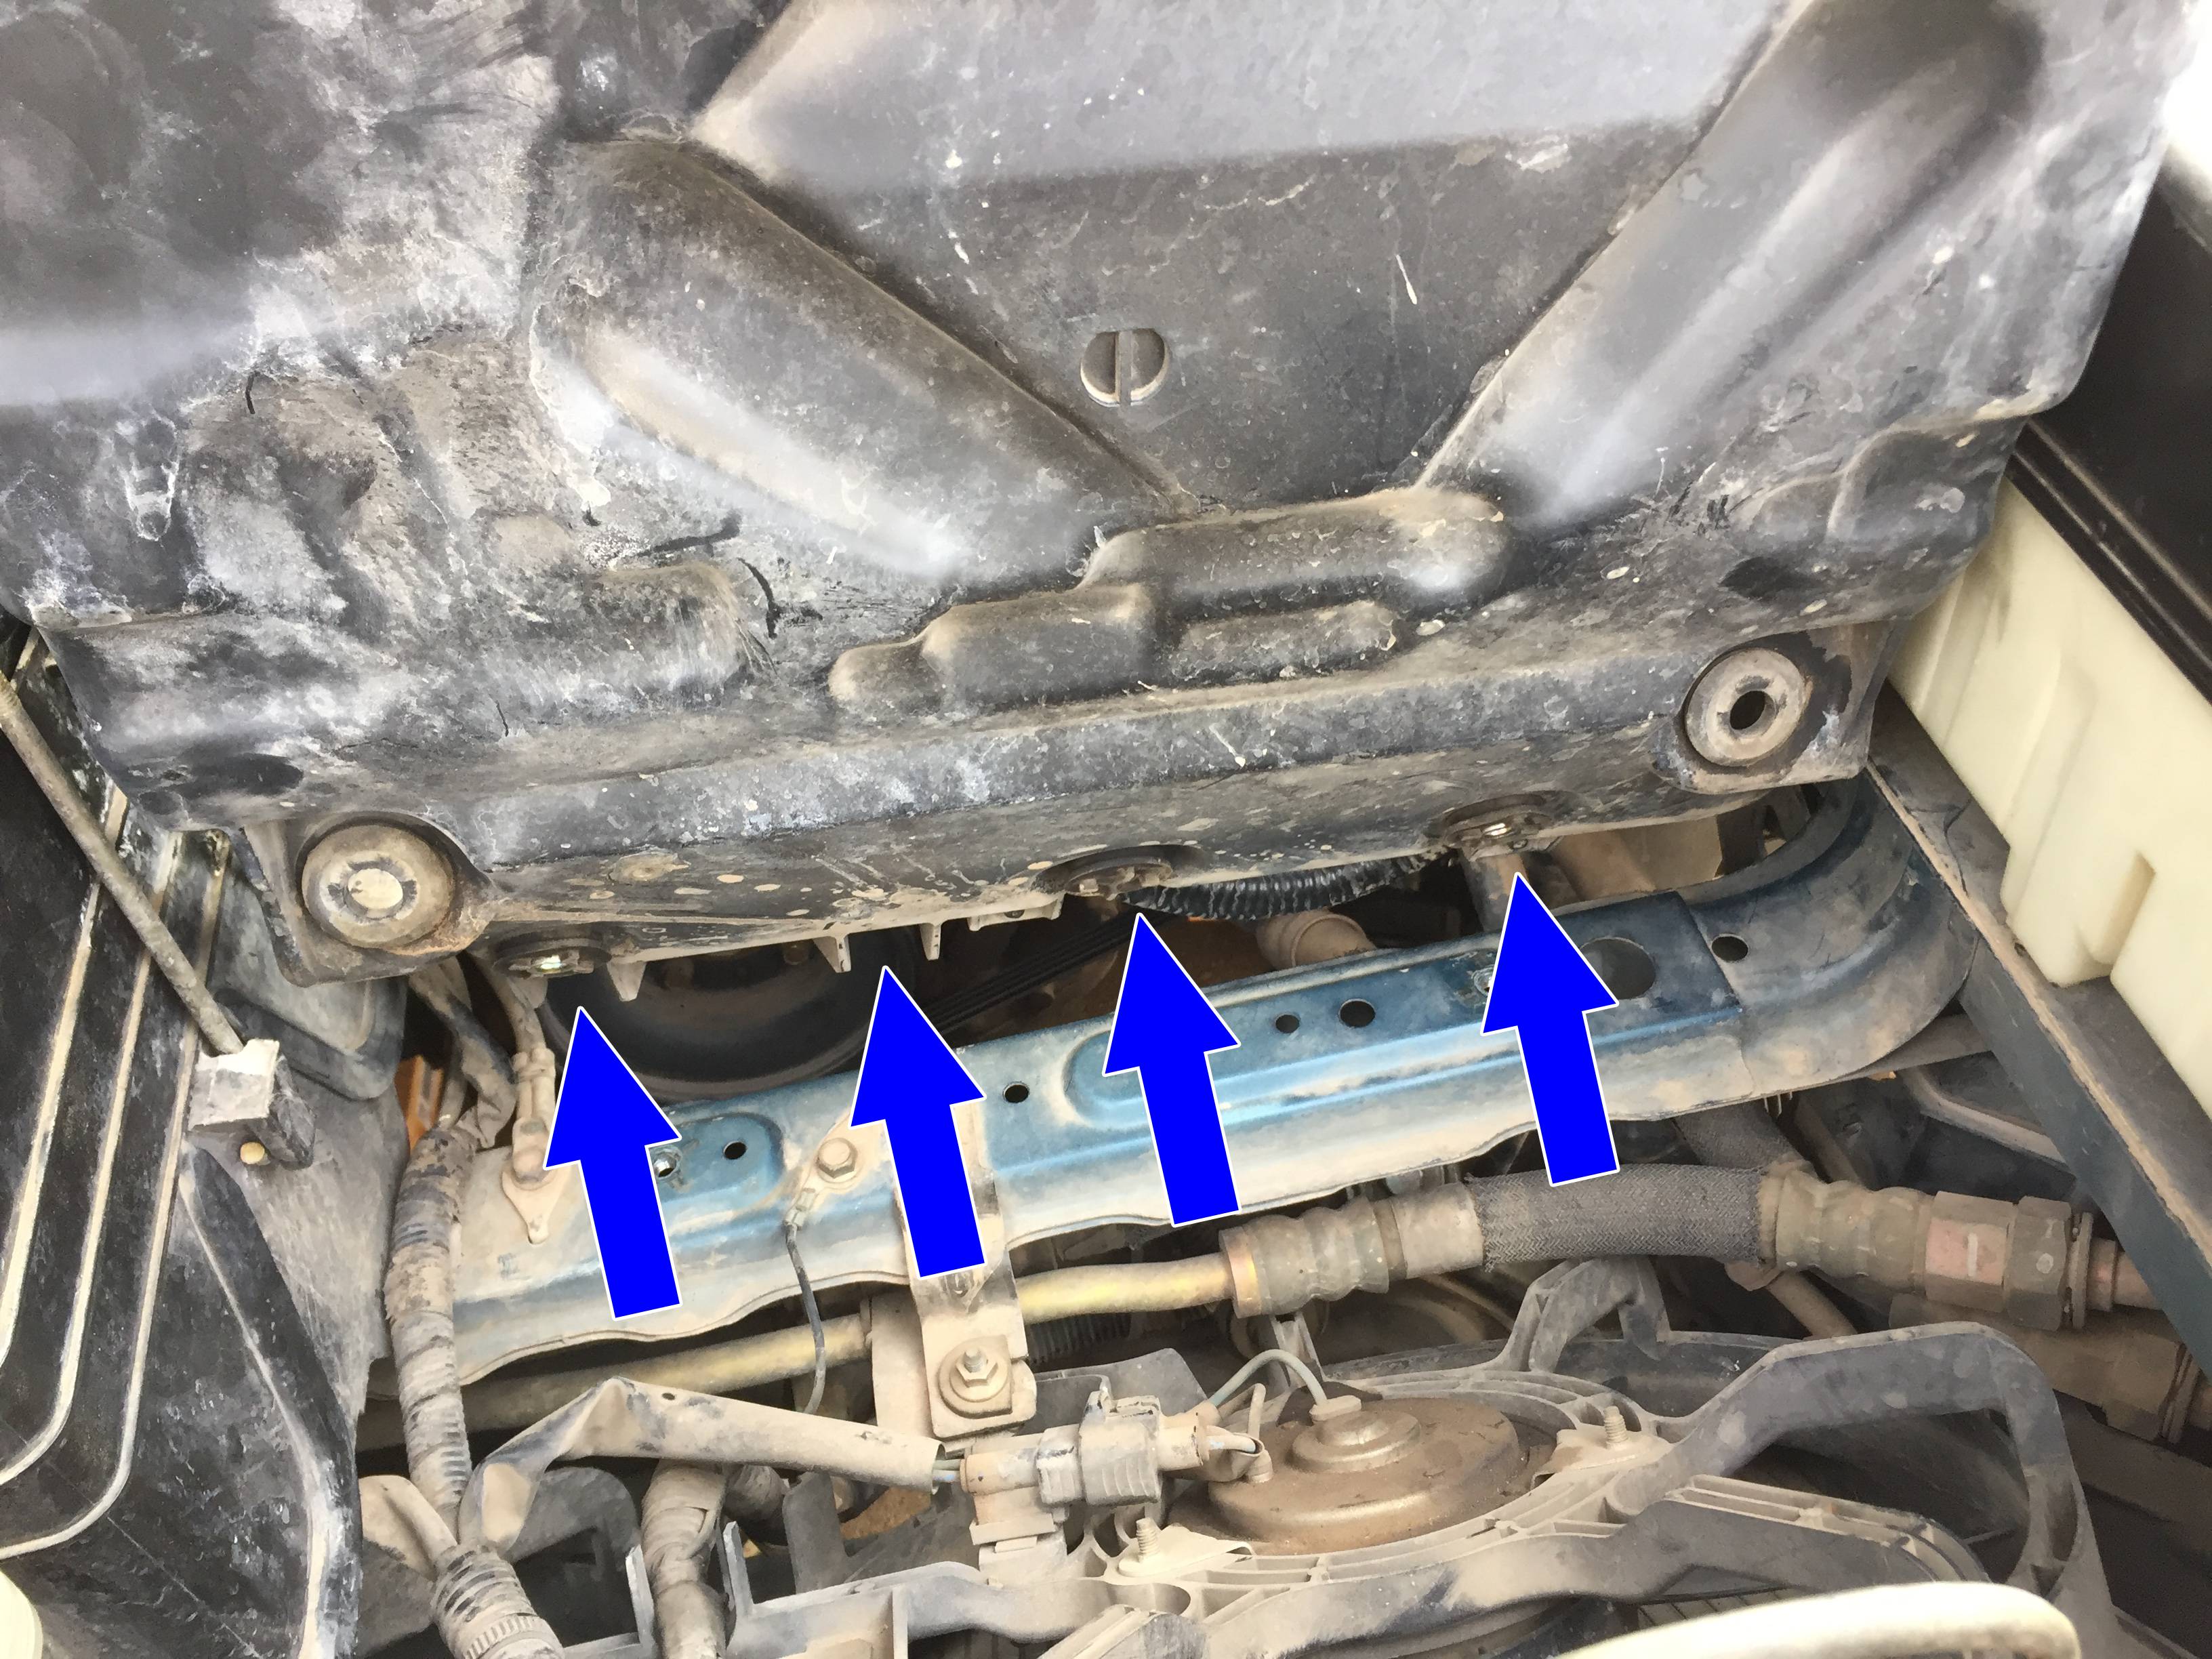
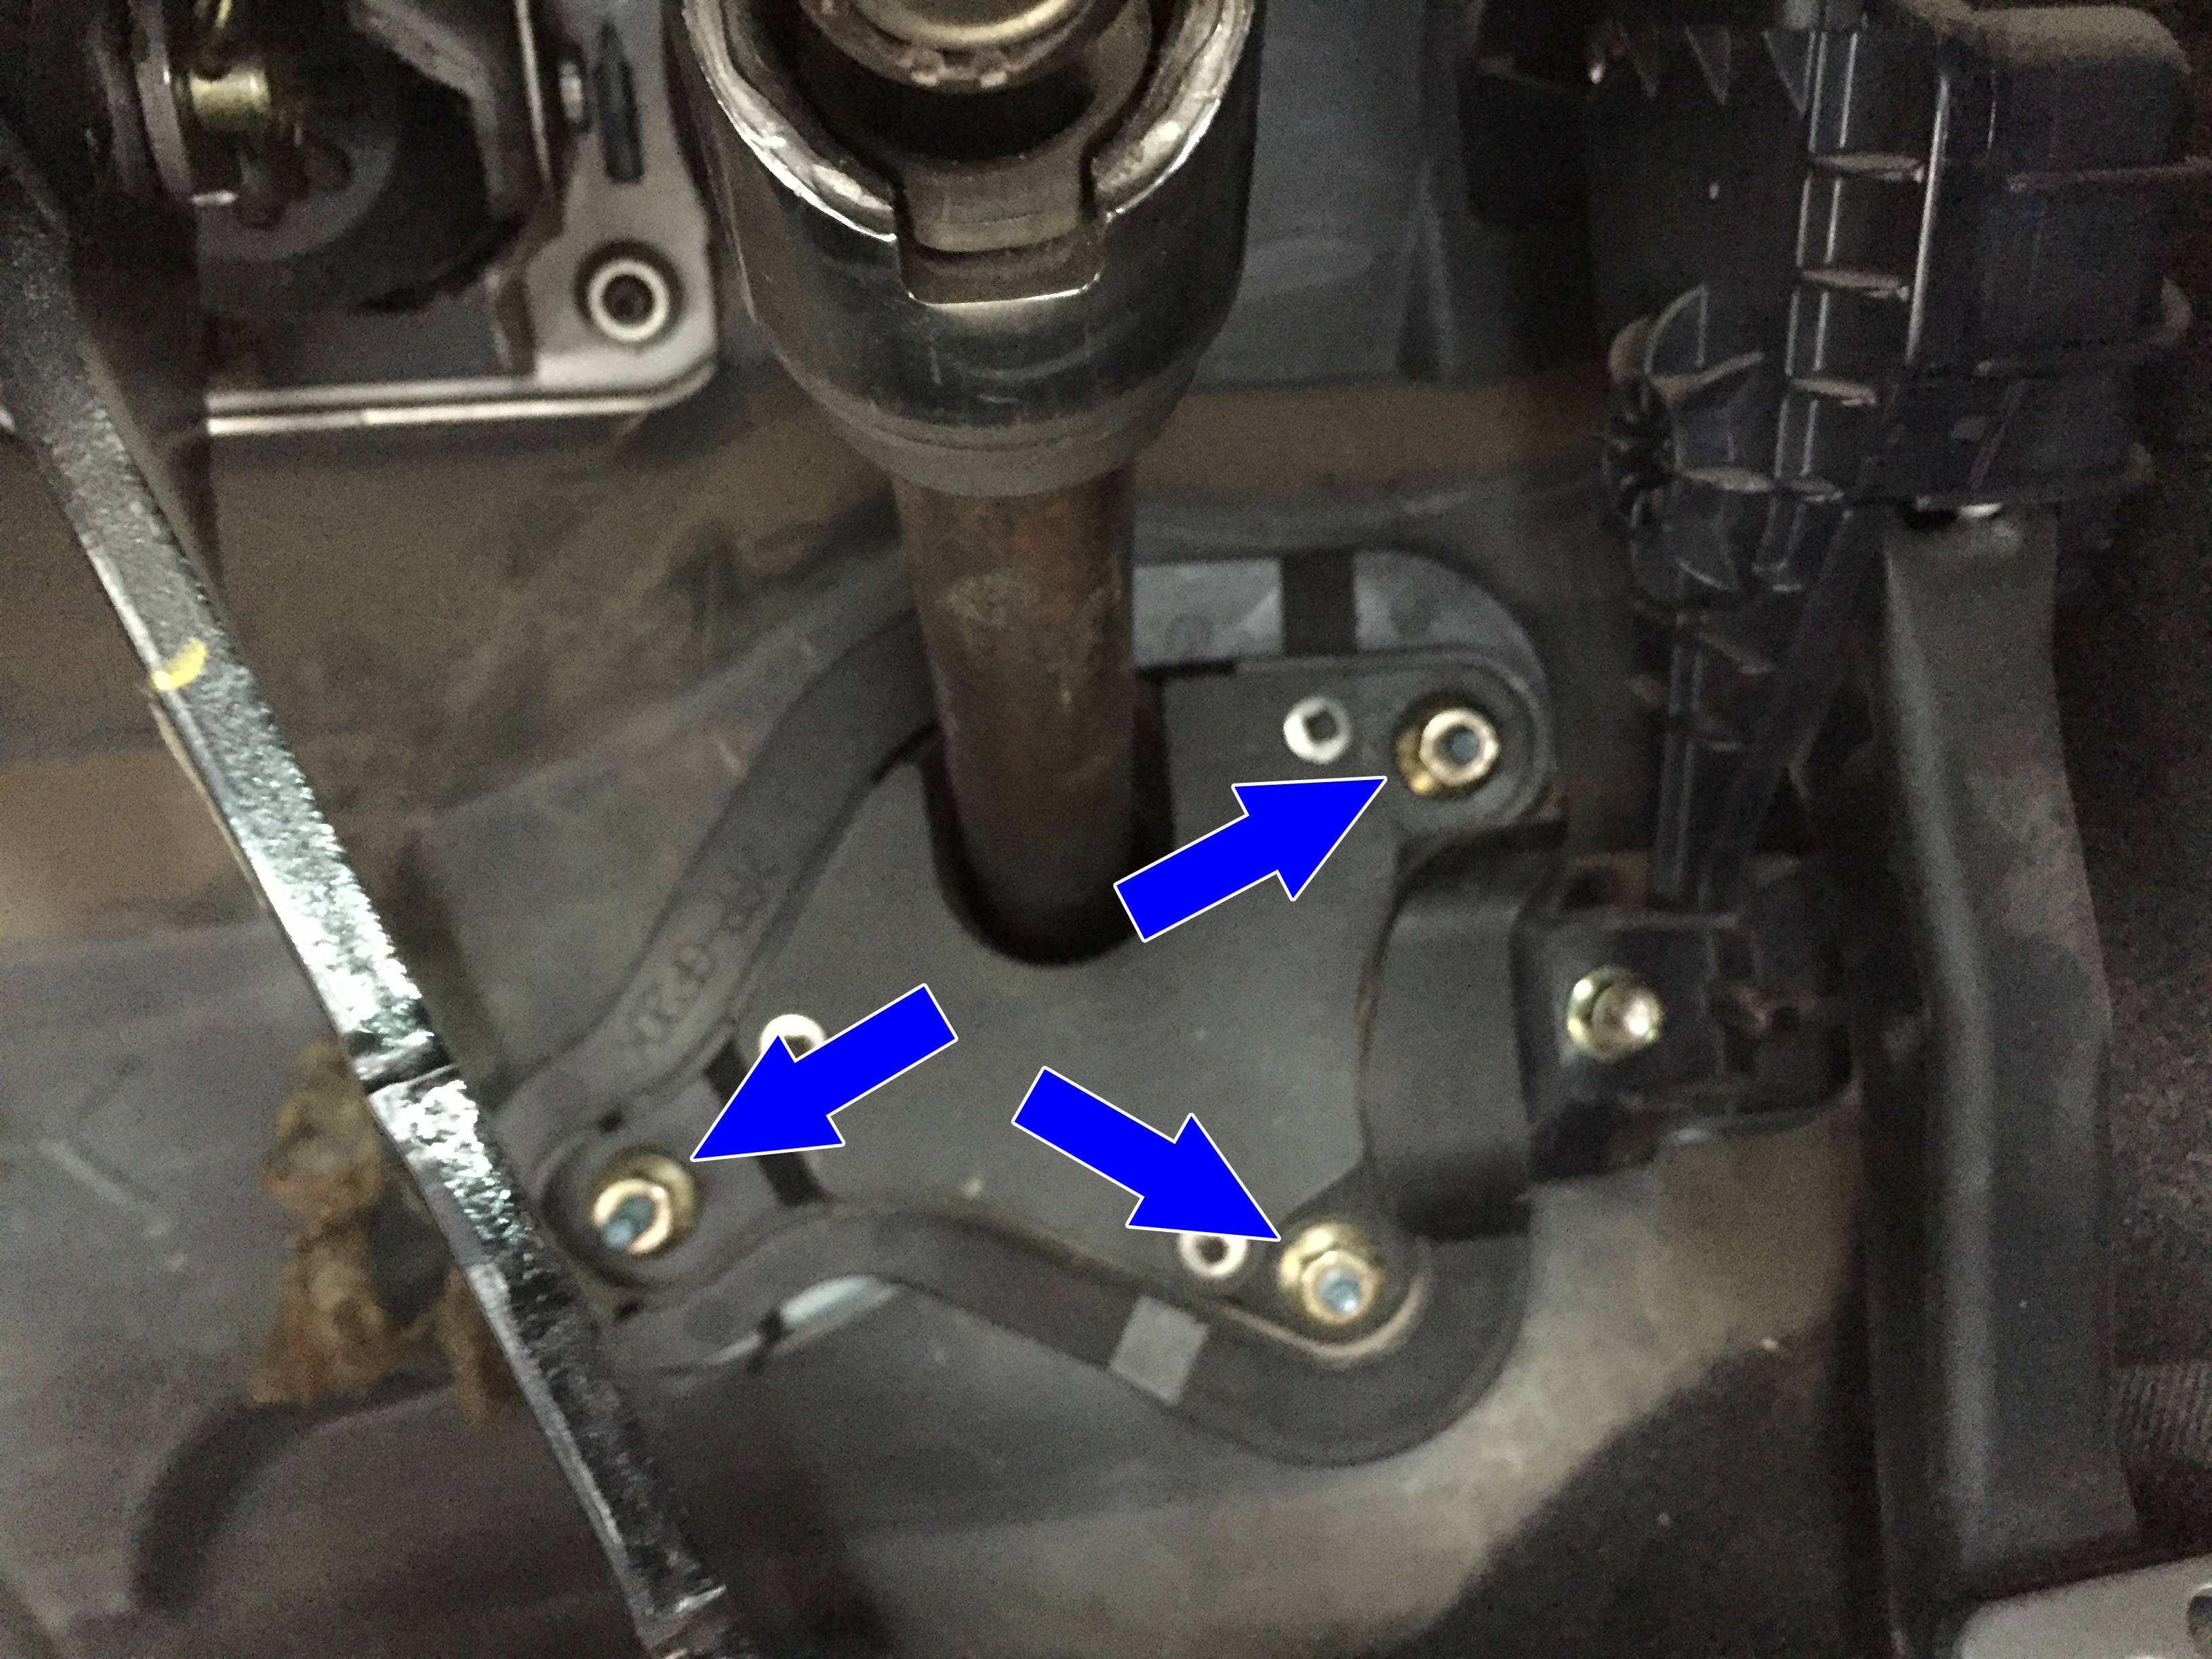
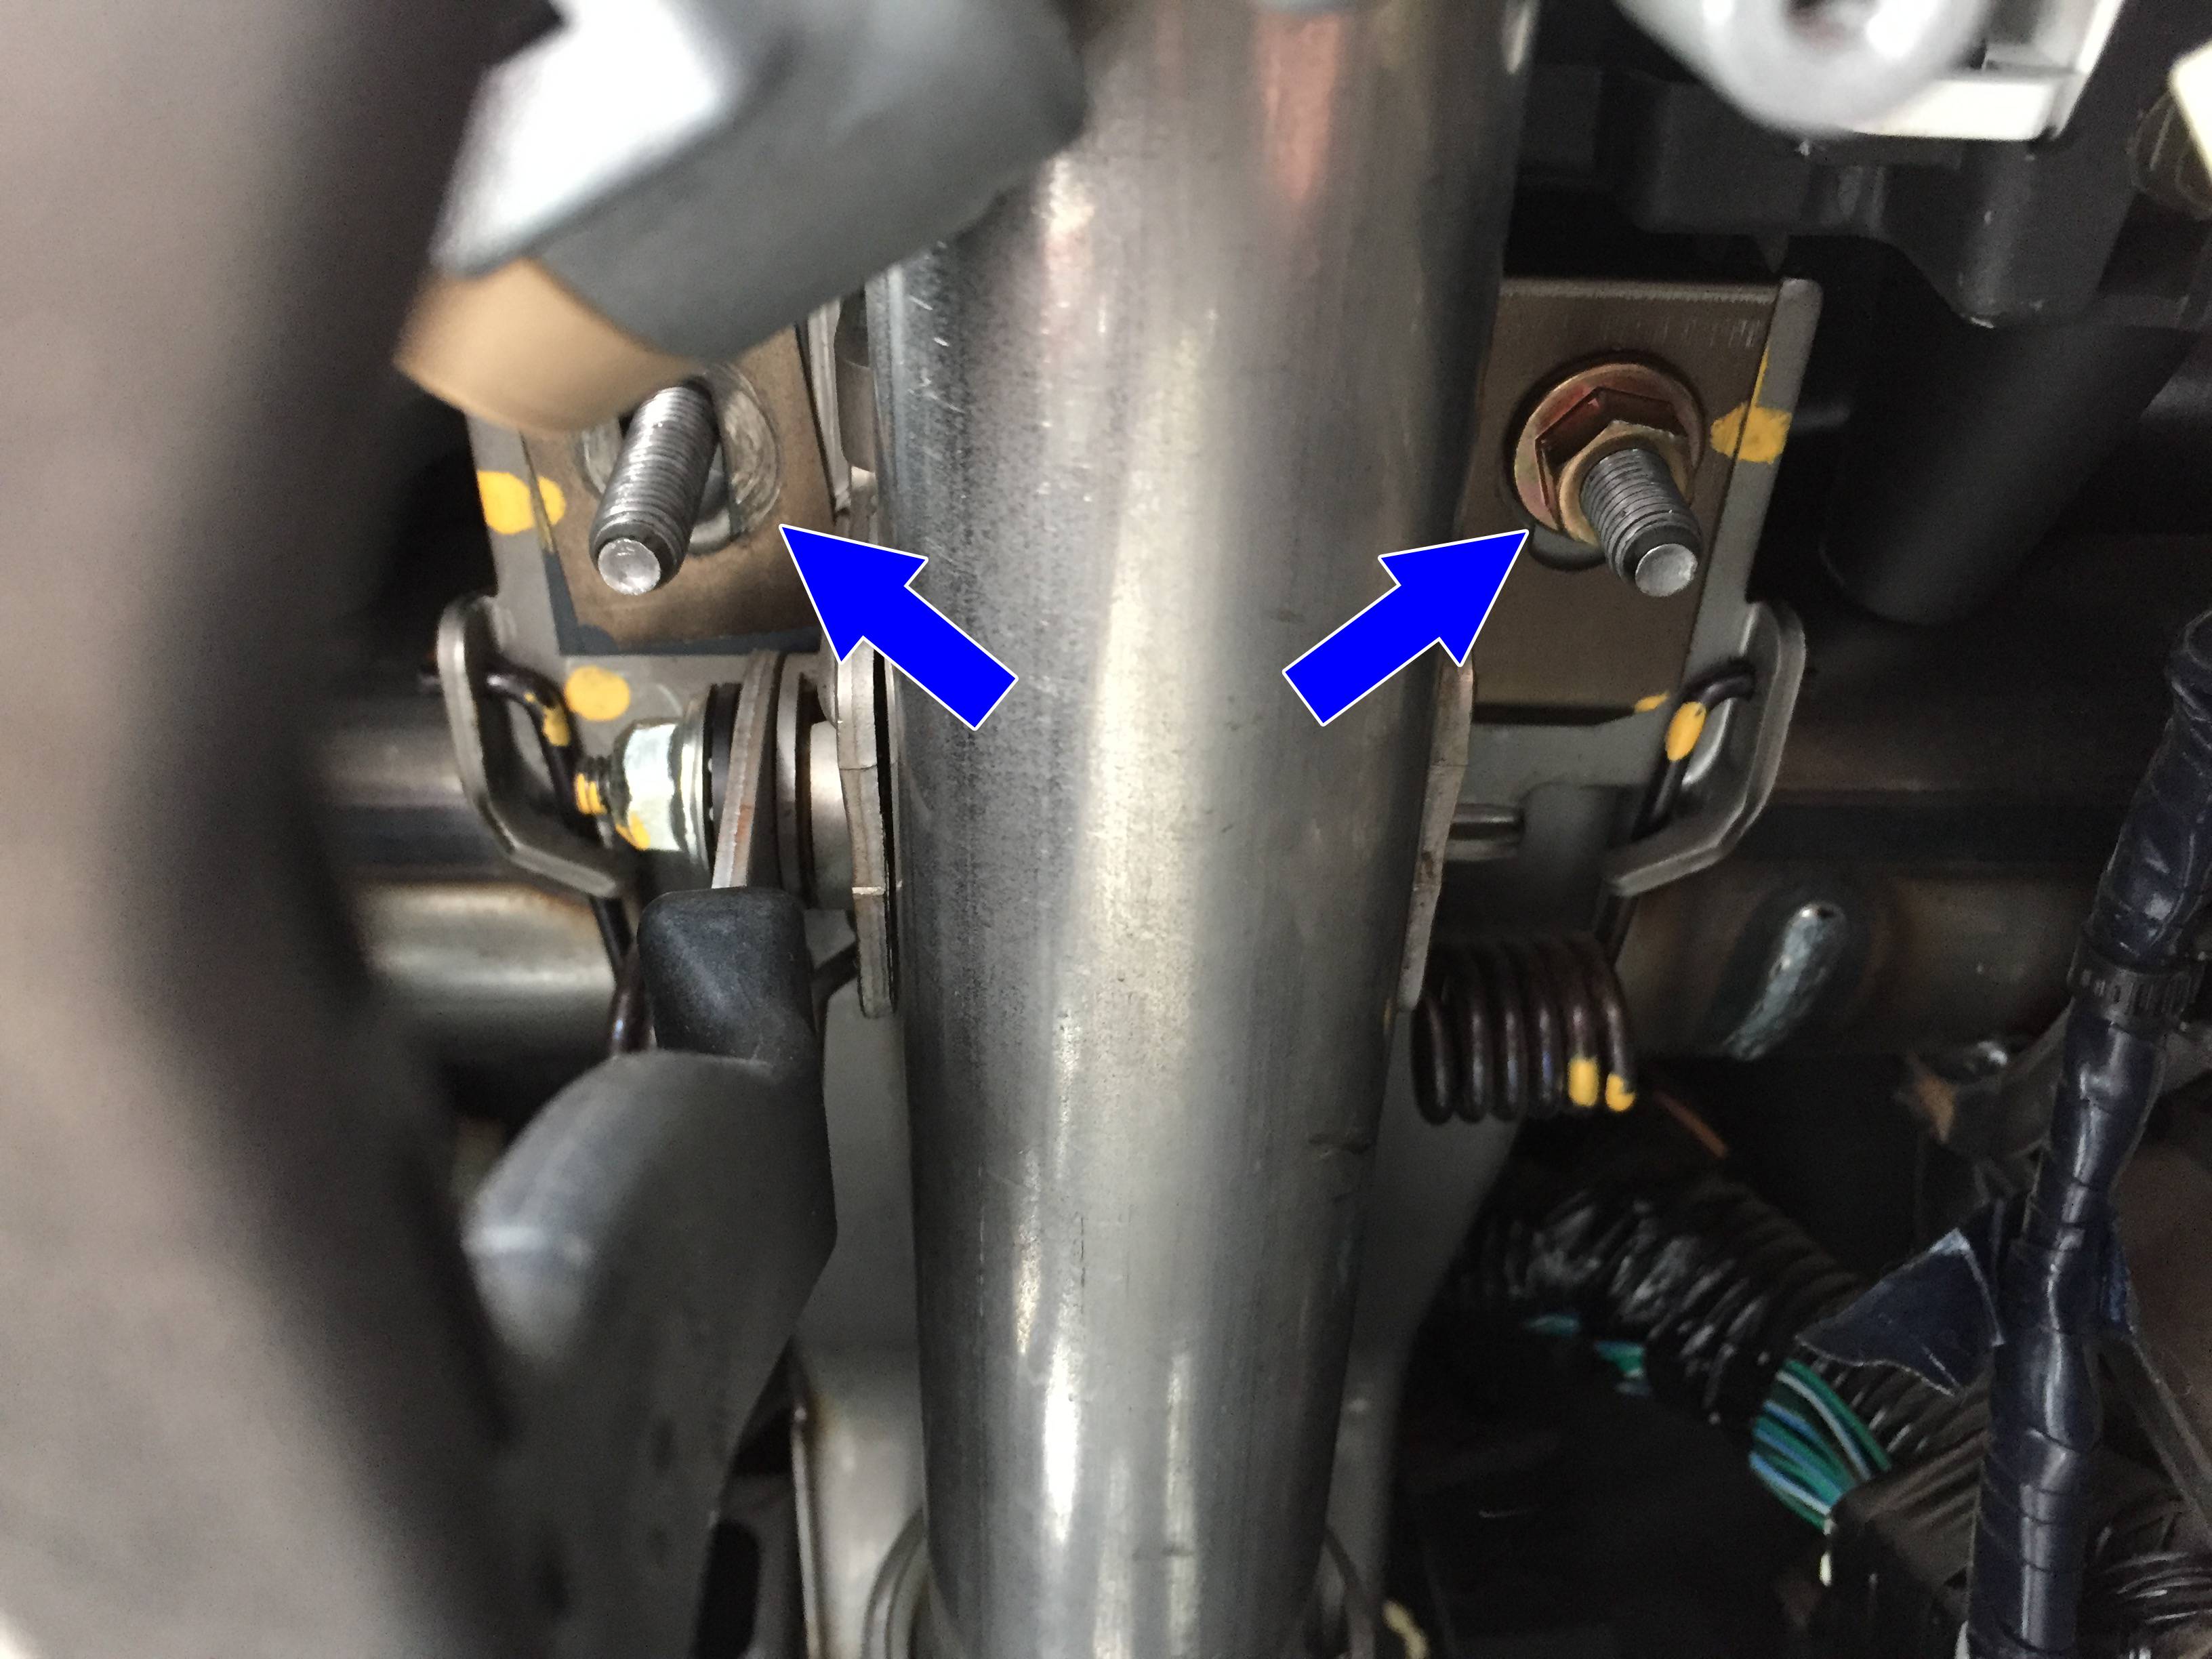
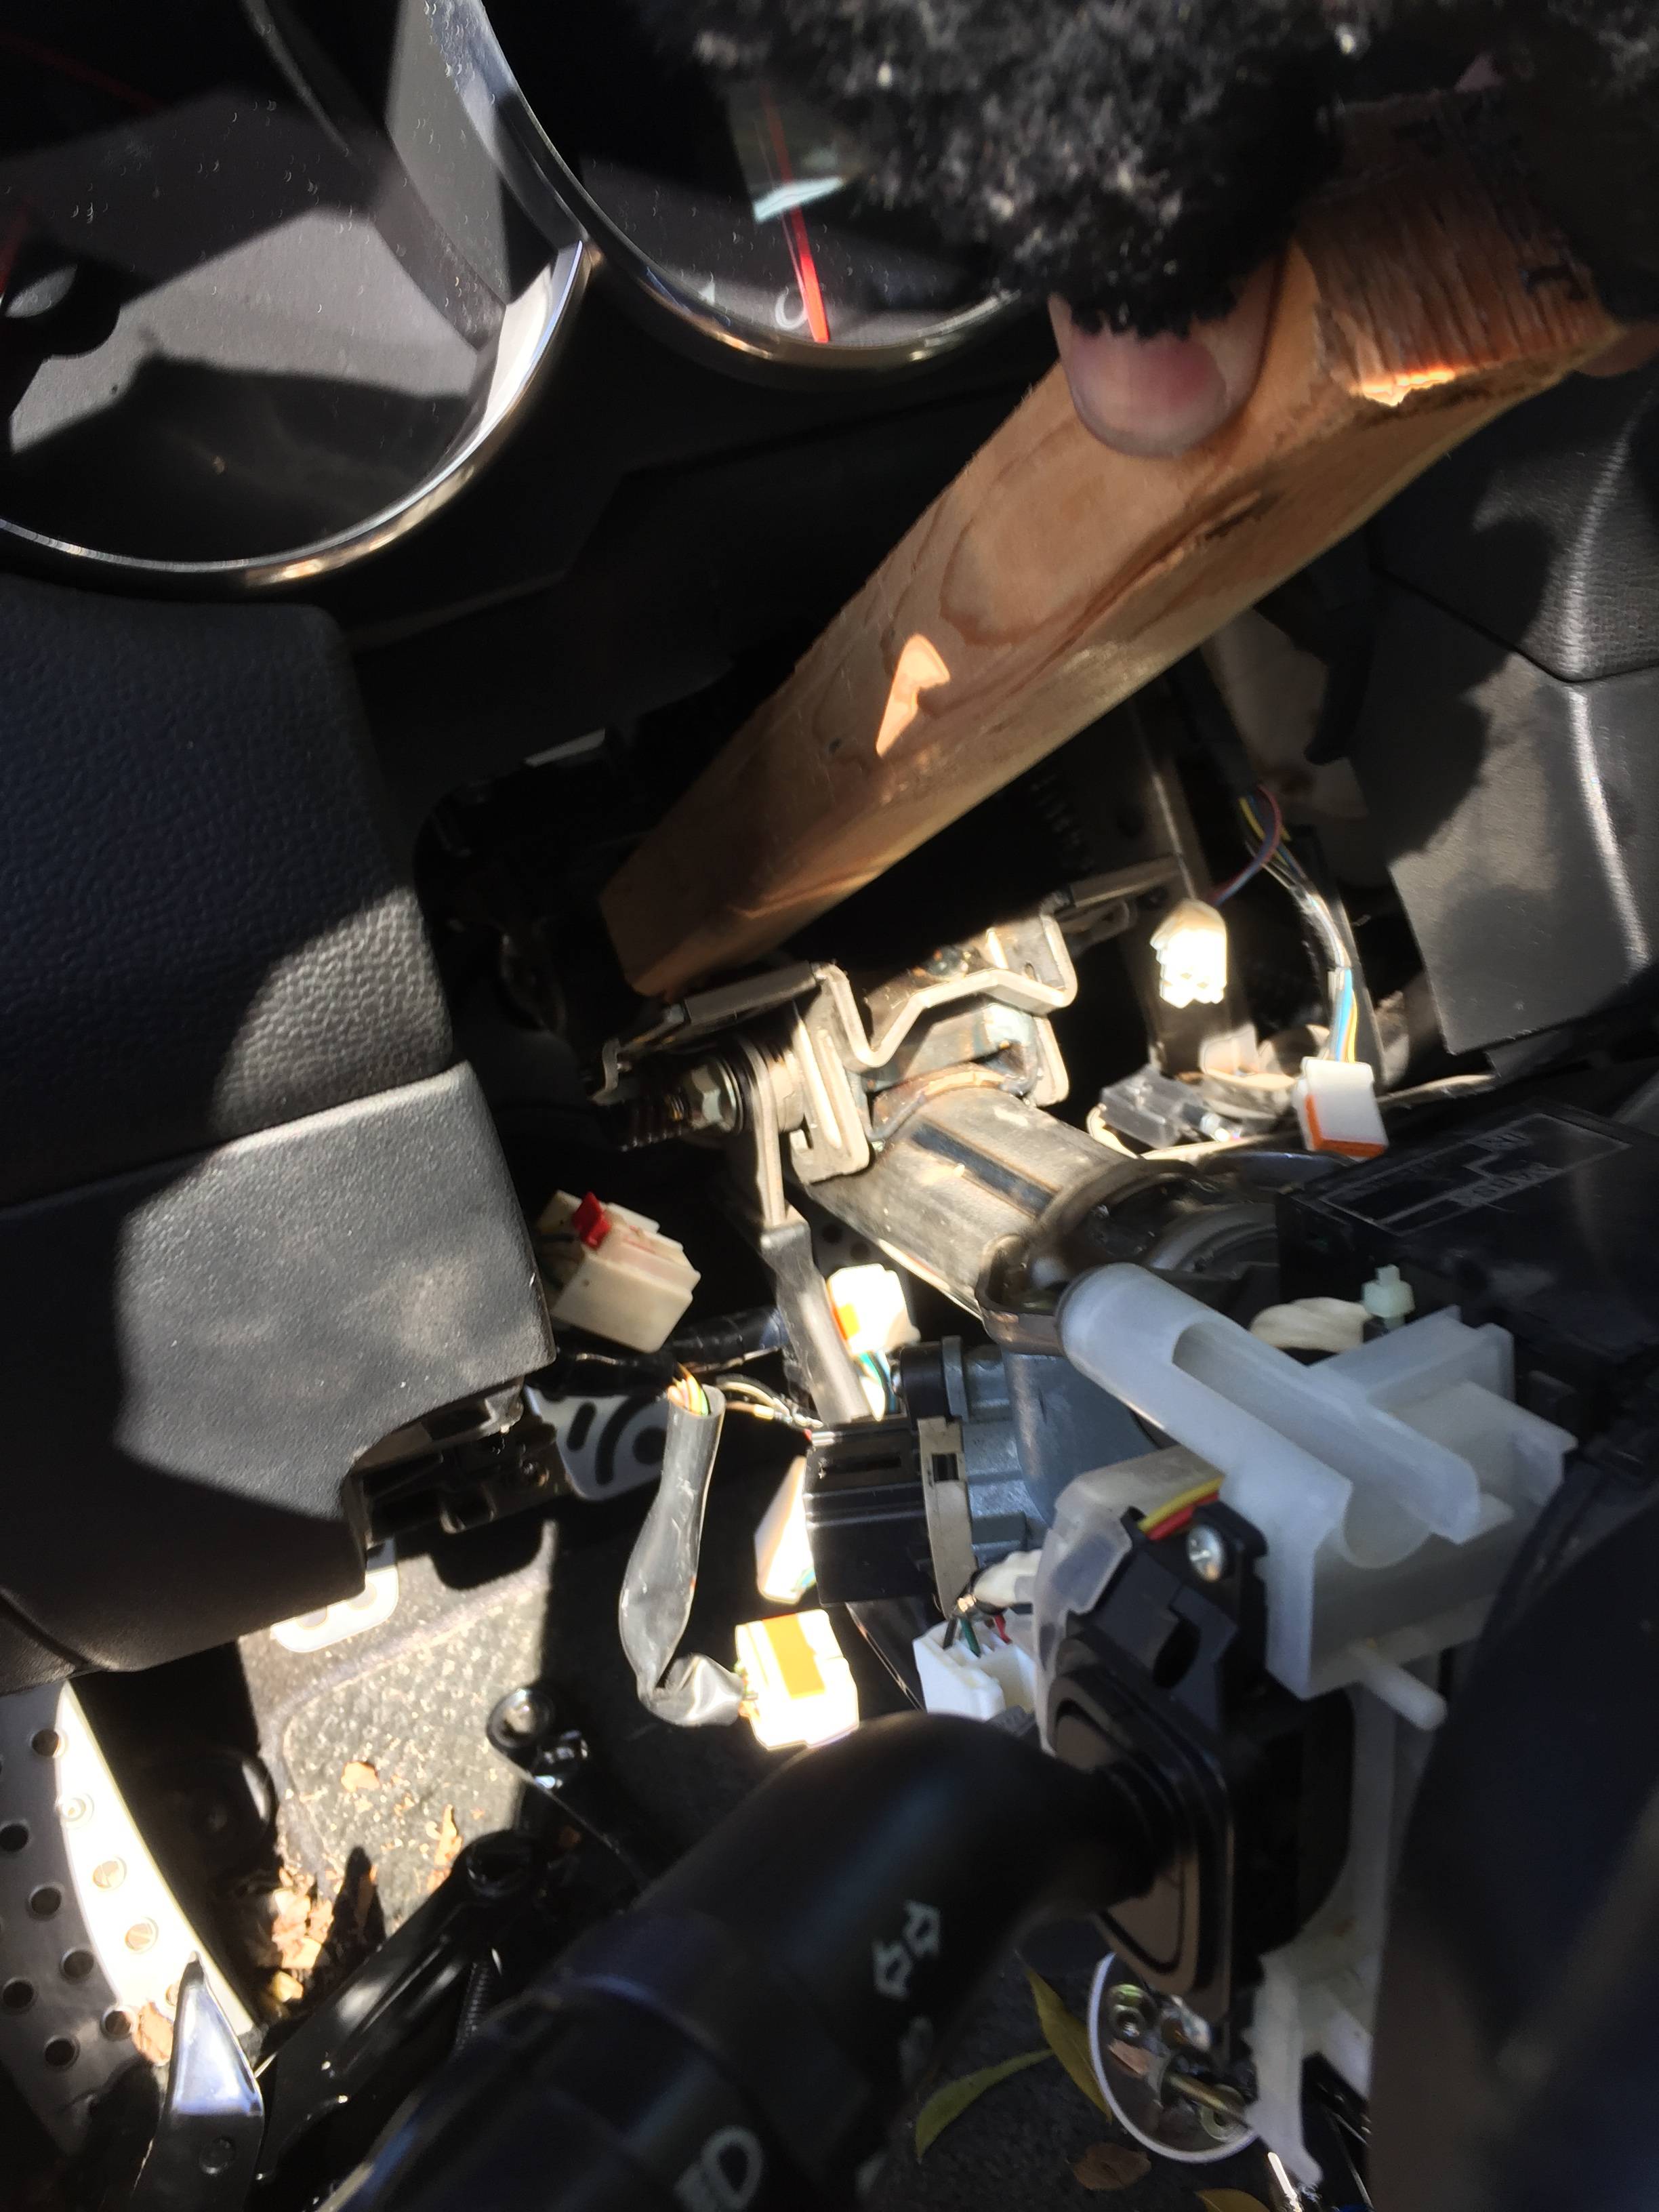
There are three sets of nuts that need to be undone that are holding the steering column in place - the ones holding the cover to the firewall, the ones holding the collar by the middle U-joint, and the ones right behind the steering wheel. It probably works best to take them off in that order. So, start with the cover by the firewall and remove those three nuts.
Next, get the two nuts holding the collar by the middle U-joint. (Sorry that this photo is so out of focus. Also, use your imagination about nuts.)
Finally, get the ones right behind the steering wheel. I kind of laid down sideways on the front seat and used my shoulder to hold the steering wheel up while doing this, with the tilt all the way up to give me room to get in there. (Use your imagination about the missing nut.)
Step 10: Pull the steering column out from the steering rack
A couple words of warning before doing this next step. First, you're about to lose the alignment between the steering wheel and the steering rack. It will be possible to go back together off by a few splines and have the steering wheel be crooked compared to what it should be. But don't worry too much about that. You should be able to get everything pretty close just by eye.
The bigger warning is that you're about to make the clock spring vulnerable to being broken (guess who didn't know about clock springs before doing this project). The clock spring isn't really a spring. It's a ribbon cable wrapped up inside a case, with enough slack that you can turn the steering wheel all the way from stop to stop without breaking that cable. It's what the new cars use to get power / signal to the airbags, horn, and all the other buttons in the steering wheel. It works a whole lot better than slip rings. Unfortunately, unlike slip rings, if you spin the steering wheel past the normal stops, which you'll be able to do once you separate the steering column from the steering rack, you can ruin the clock spring, and it's not just super cheap to replace. So, if you're planning on actually pulling the whole steering column, at this point you should make sure the key's out of the ignition, so that the steering wheel will lock if it tries to turn. If you're just replacing the steering rack and not the steering column, you don't have to worry so much, but still be careful.
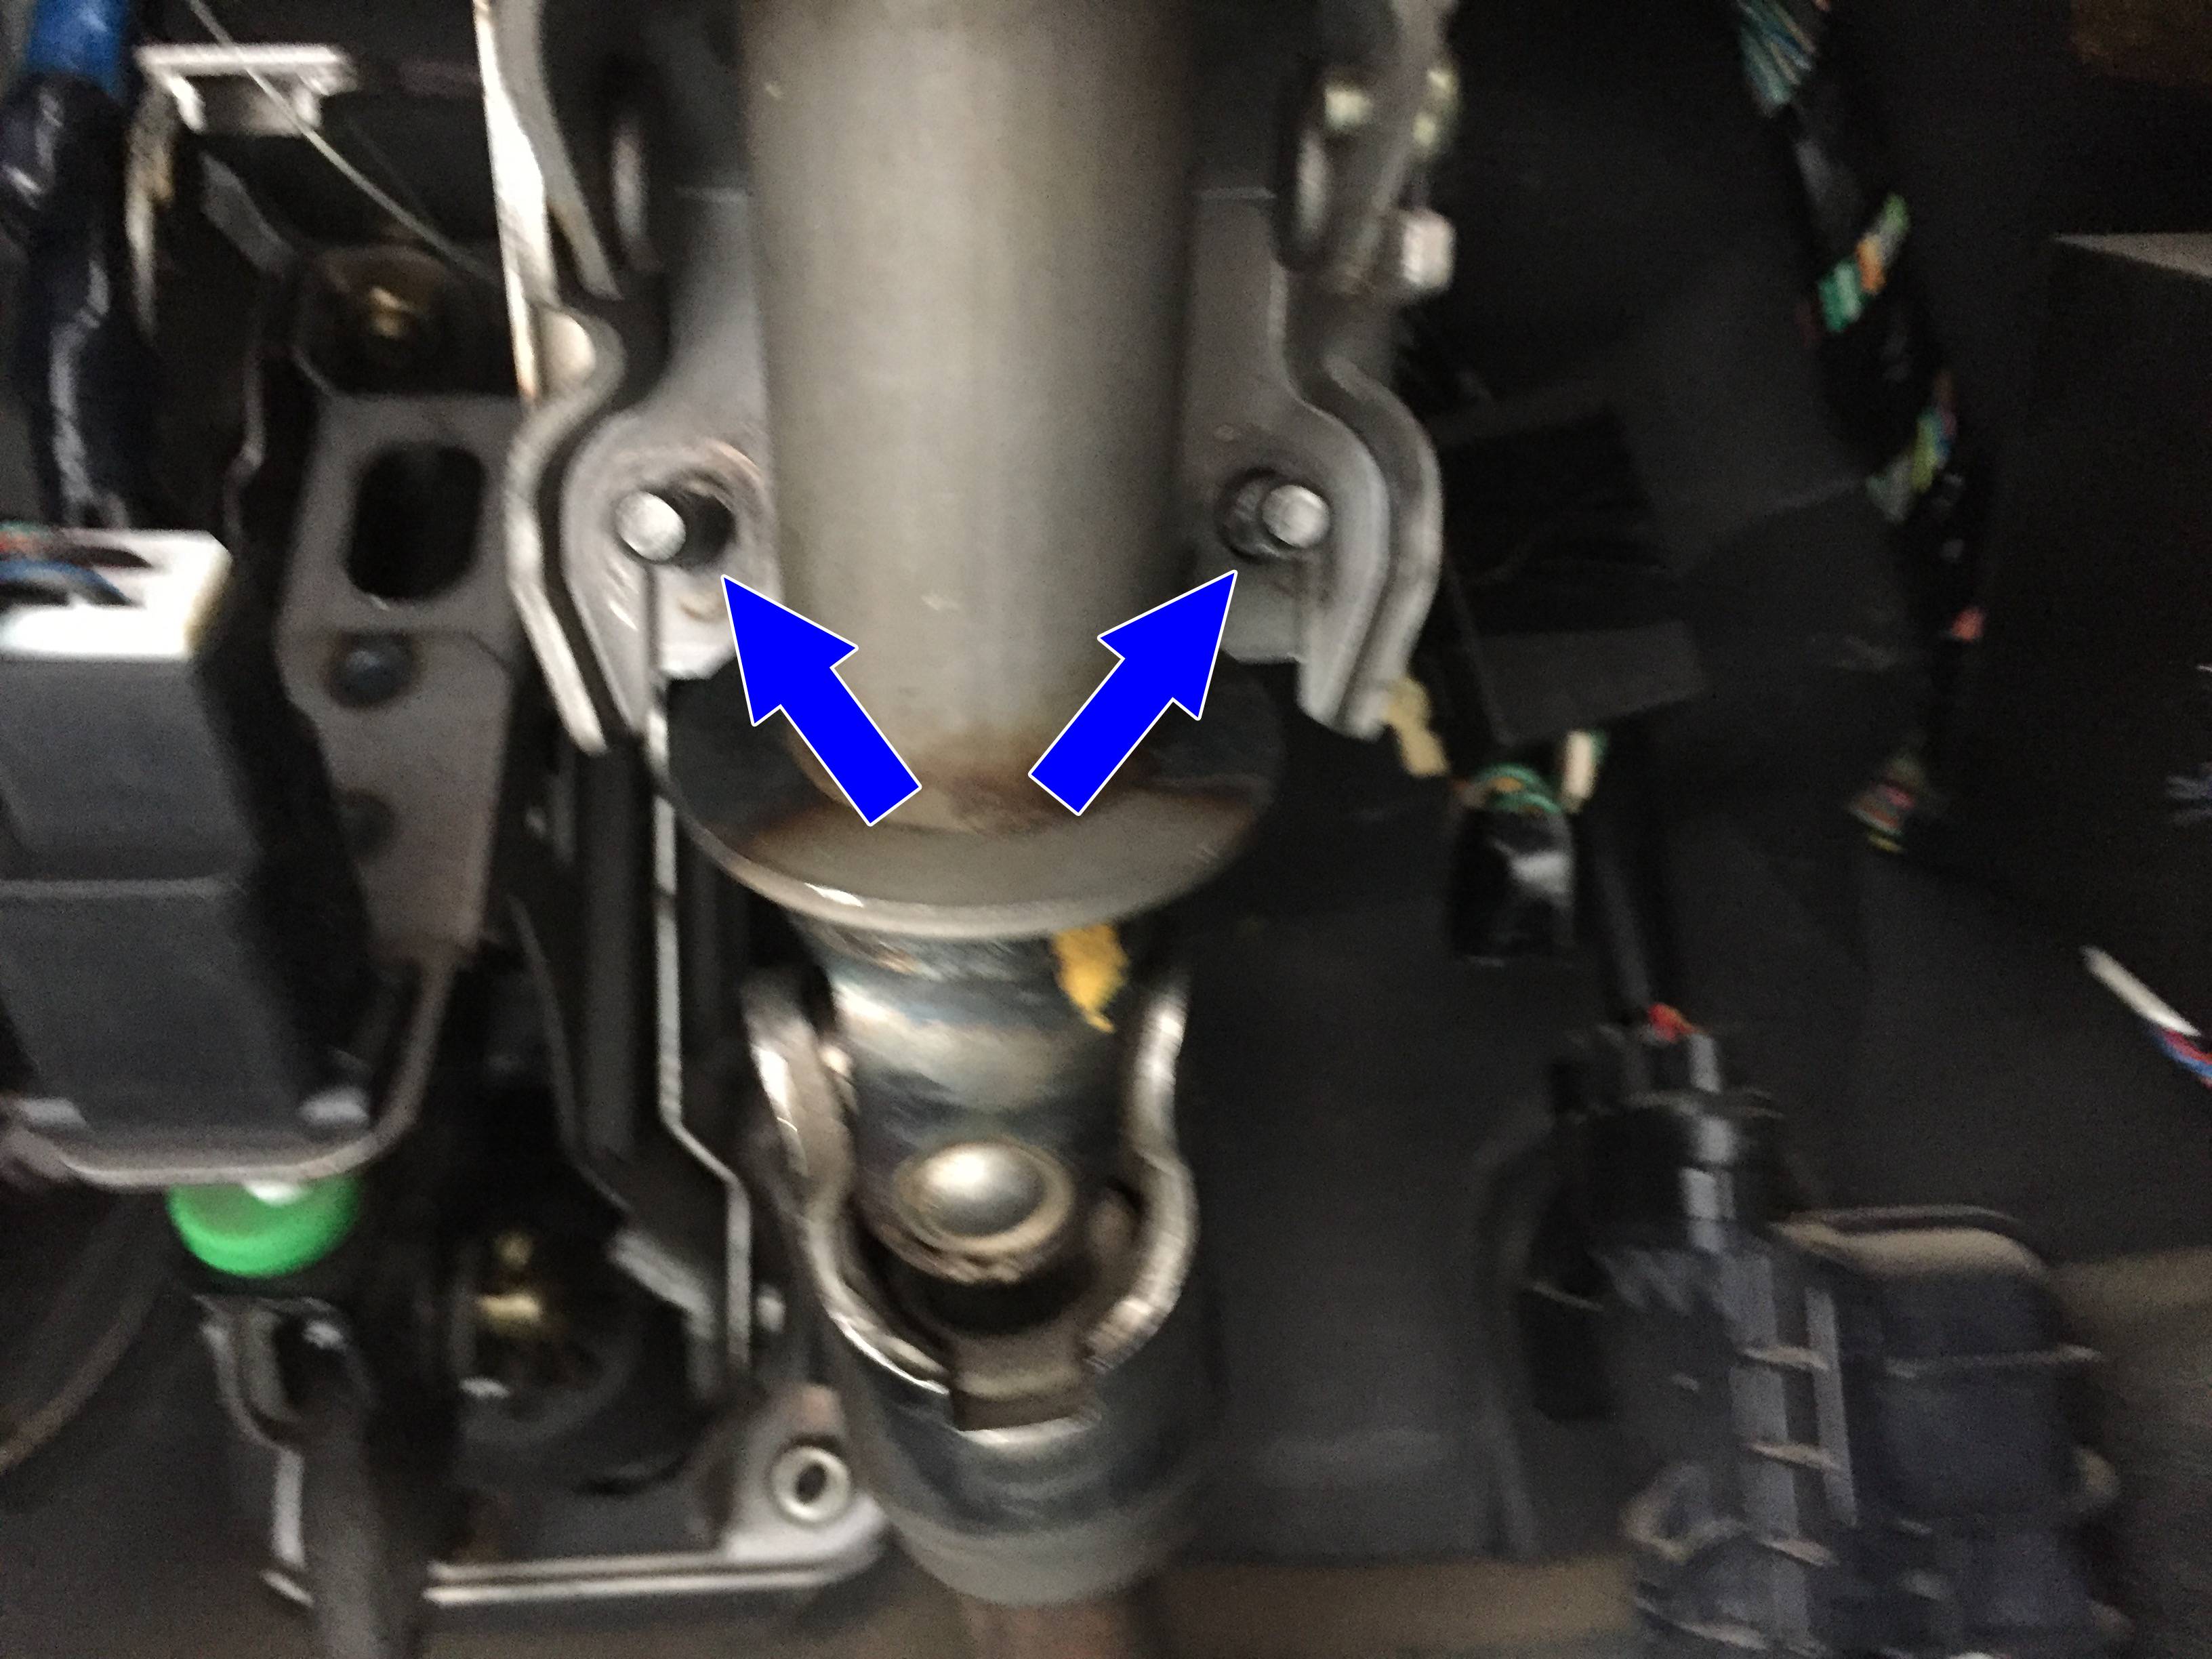
So, you should just be able to give the steering wheel a slight tug to pull the whole steering column back away from the steering rack. Alternatively, you could go back under the hood and push it back from there. If you're not planning on pulling the steering column, you can just set the steering wheel on the front seat and leave it there. Under the hood, this is what you'll see.

If you are planning on pulling the whole steering column, then pull it all the way out now. I'll continue with this write up as if the plan is to pull the whole steering rack. If you find a problem in the steering column and there's no problem in the rack, then you can skip ahead and not worry about all that.
Step 10b: Remove steering wheel and/or lower U-Joint if necessary
If you actually find a problem in the steering column or lower U-Joint, you'll have to do some more pulling apart here to replace whatever parts need to be done. Pulling the lower U-joint is so straightforward that I don't think I need to detail what to do. Pulling the steering wheel is a little more involved, but other people have already made good write-ups of that, so I'm just going to link to those. The one note I'll add is that my steering wheel was on so tight that it wouldn't budge without a steering wheel puller. Moreover, the puller I bought from the parts store didn't have bolts with the correct threads, so I had to buy two bolts from the hardware store (Lowes). Anyway, here's a link to a description of how to pull the steering wheel:
RX8Club.com - DIY Steering Wheel Removal
Step 11: Remove all the panels underneath the front of the car
There are a ton of trim clips, screws, and bolts you're going to have to take off to get these panels off. If this is the first time you're doing this, and you're a dumbass like me, you might be wondering why those trim clips have a Philips head drive, when it seems like putting the screw driver in there and turning doesn't do anything. Well, if you hold the outer part of the clip so that it doesn't turn and do a quarter turn with the screw driver, it should push the head of the clip out just far enough that you can grab it with your fingers and pull it out further. Here's a picture I stole off of Google to show a close up of what I'm talking about.

If there are any clips that are just giving you a hell of a time (stripped head or something similar), just pry them out with a screwdriver. It may ruin the clip, but you can buy good enough replacements at the parts store. The Dorman 461240BP ones seem to work pretty well, even if they're supposed to be for a GM (note they're not the quarter turn style). If you've had any work done on the car previously, you might already even have a different style clip for some of them.
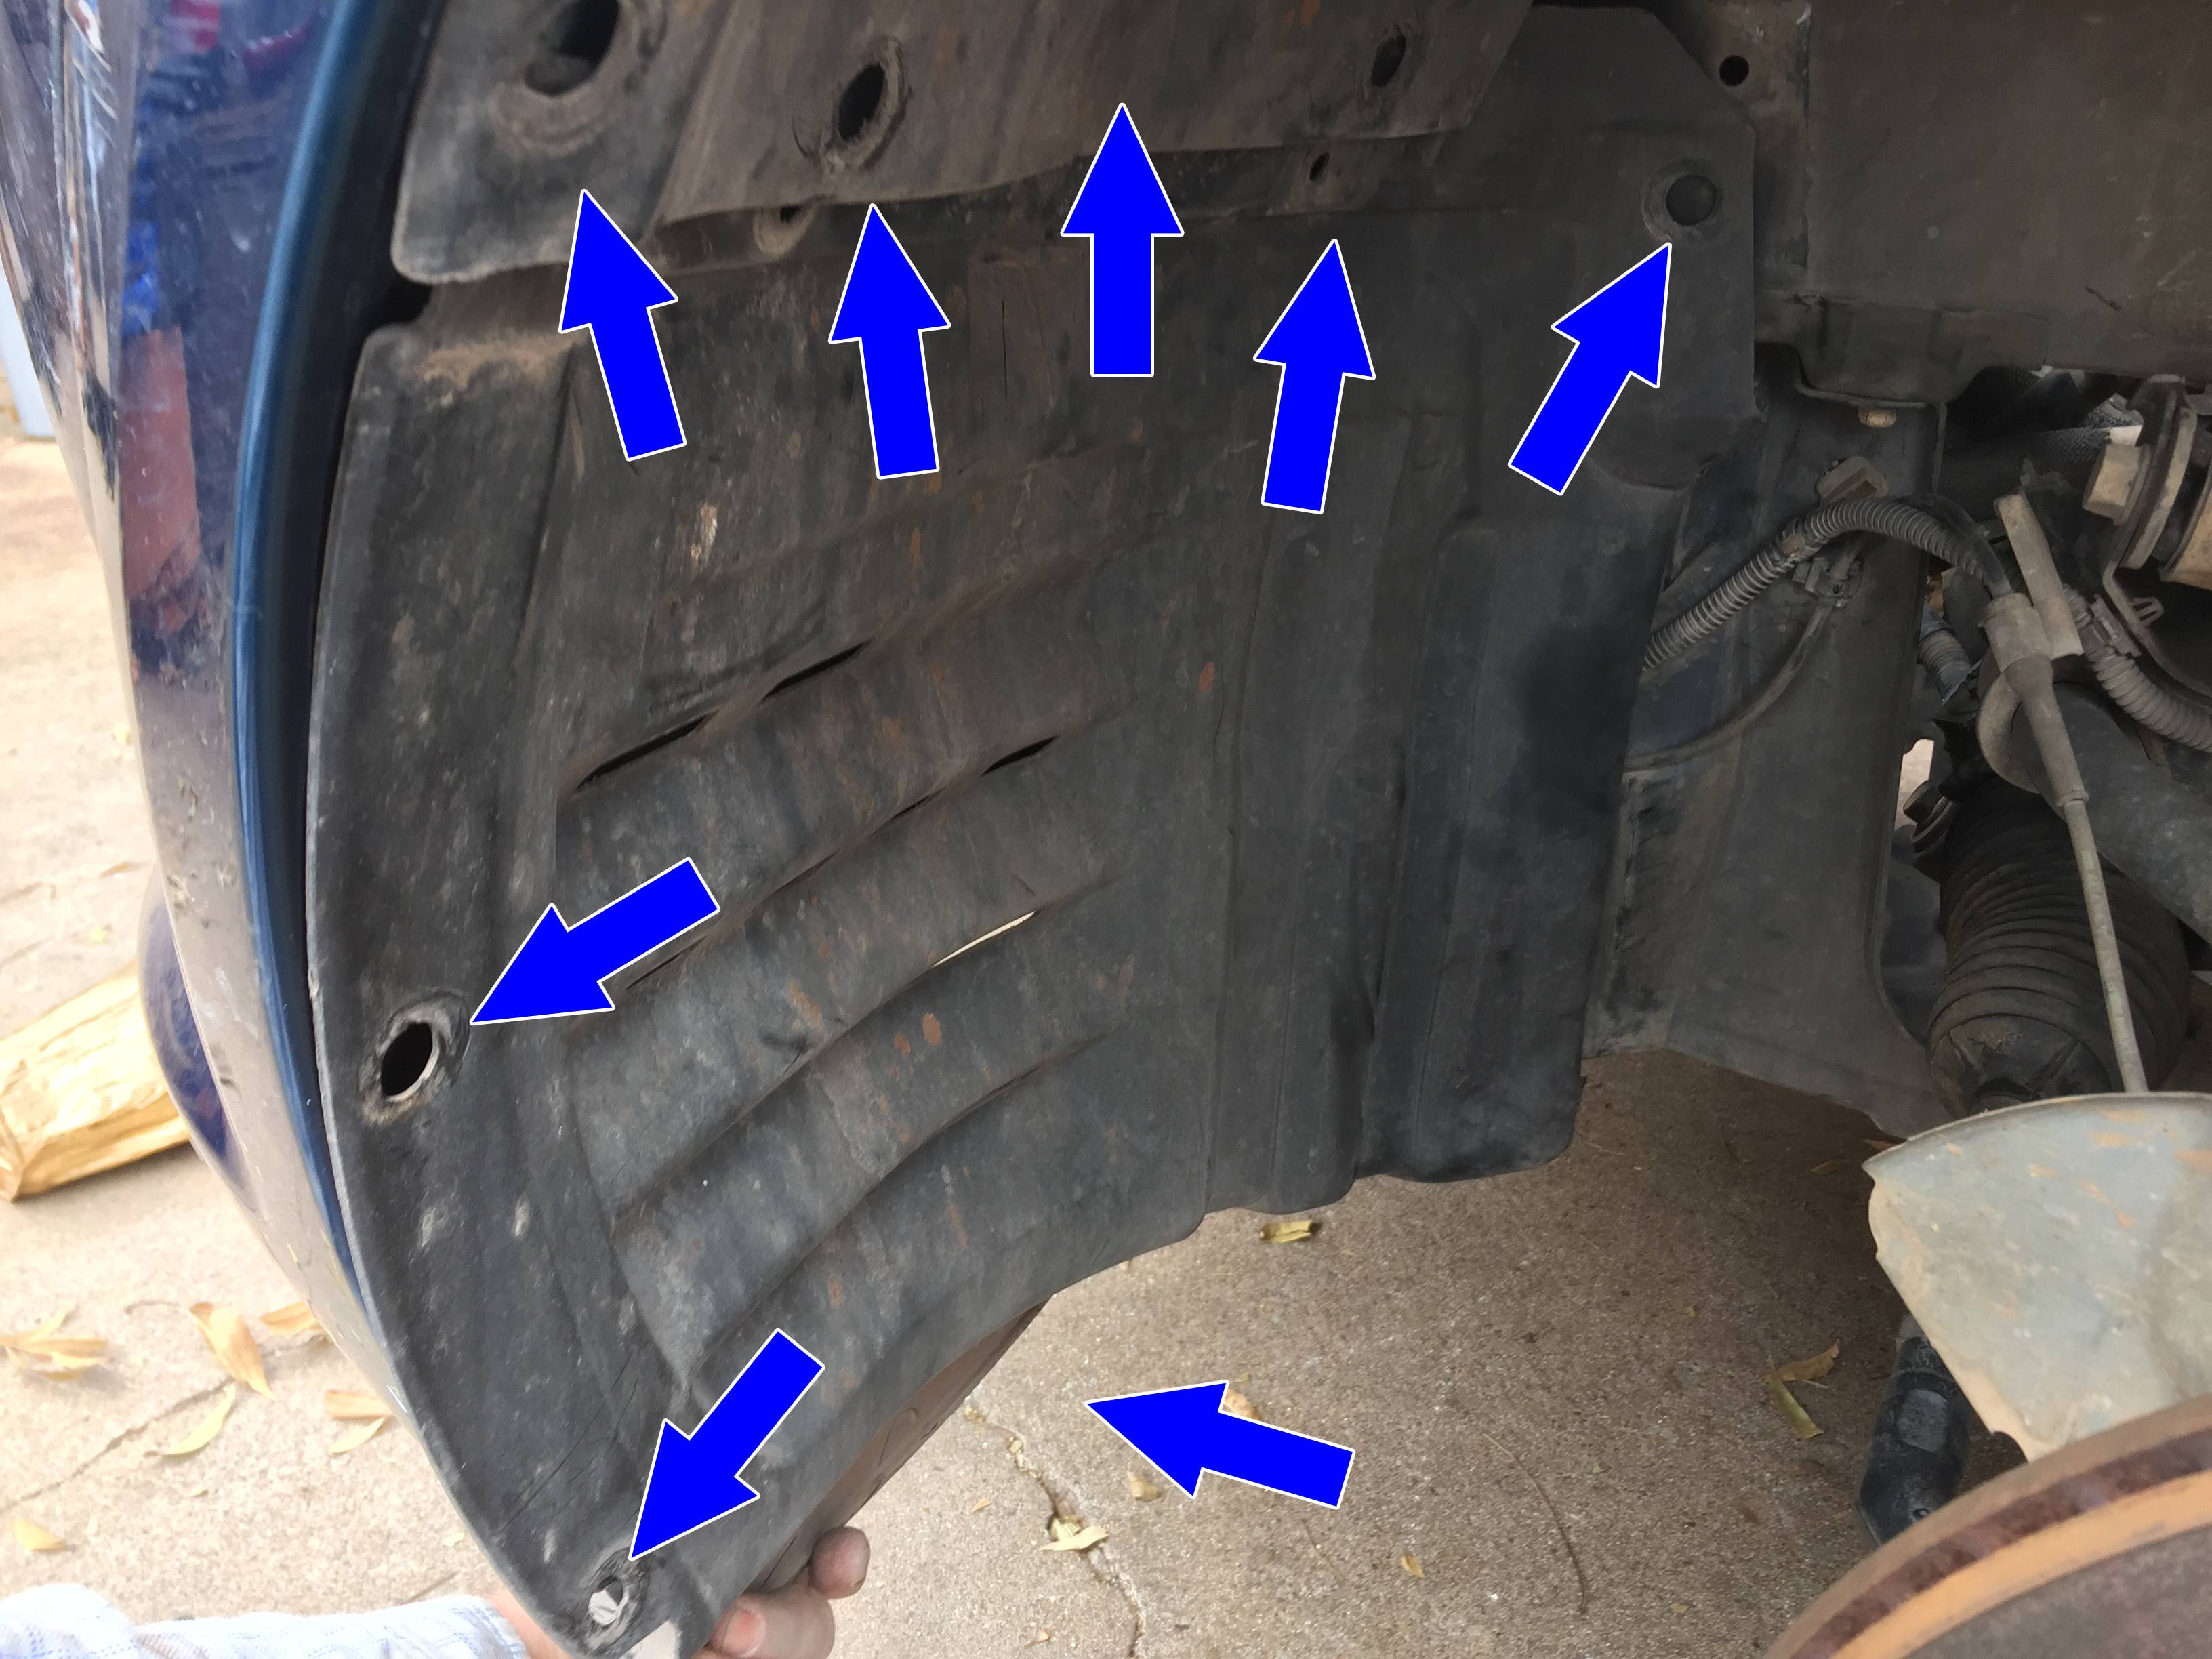
I didn't actually take a photo of all the different clips, screws, and bolts that have to be removed to get these panels off, but most of them should be fairly obvious. Start with the ones in the wheel wells. Here's a photo of the driver side one. The passenger side is pretty much a mirror image. Once again, I forgot to take the picture until after all the fasteners were removed. The arrow that looks like it's pointing at nothing is just to imply that there are a lot more fasteners under the car.
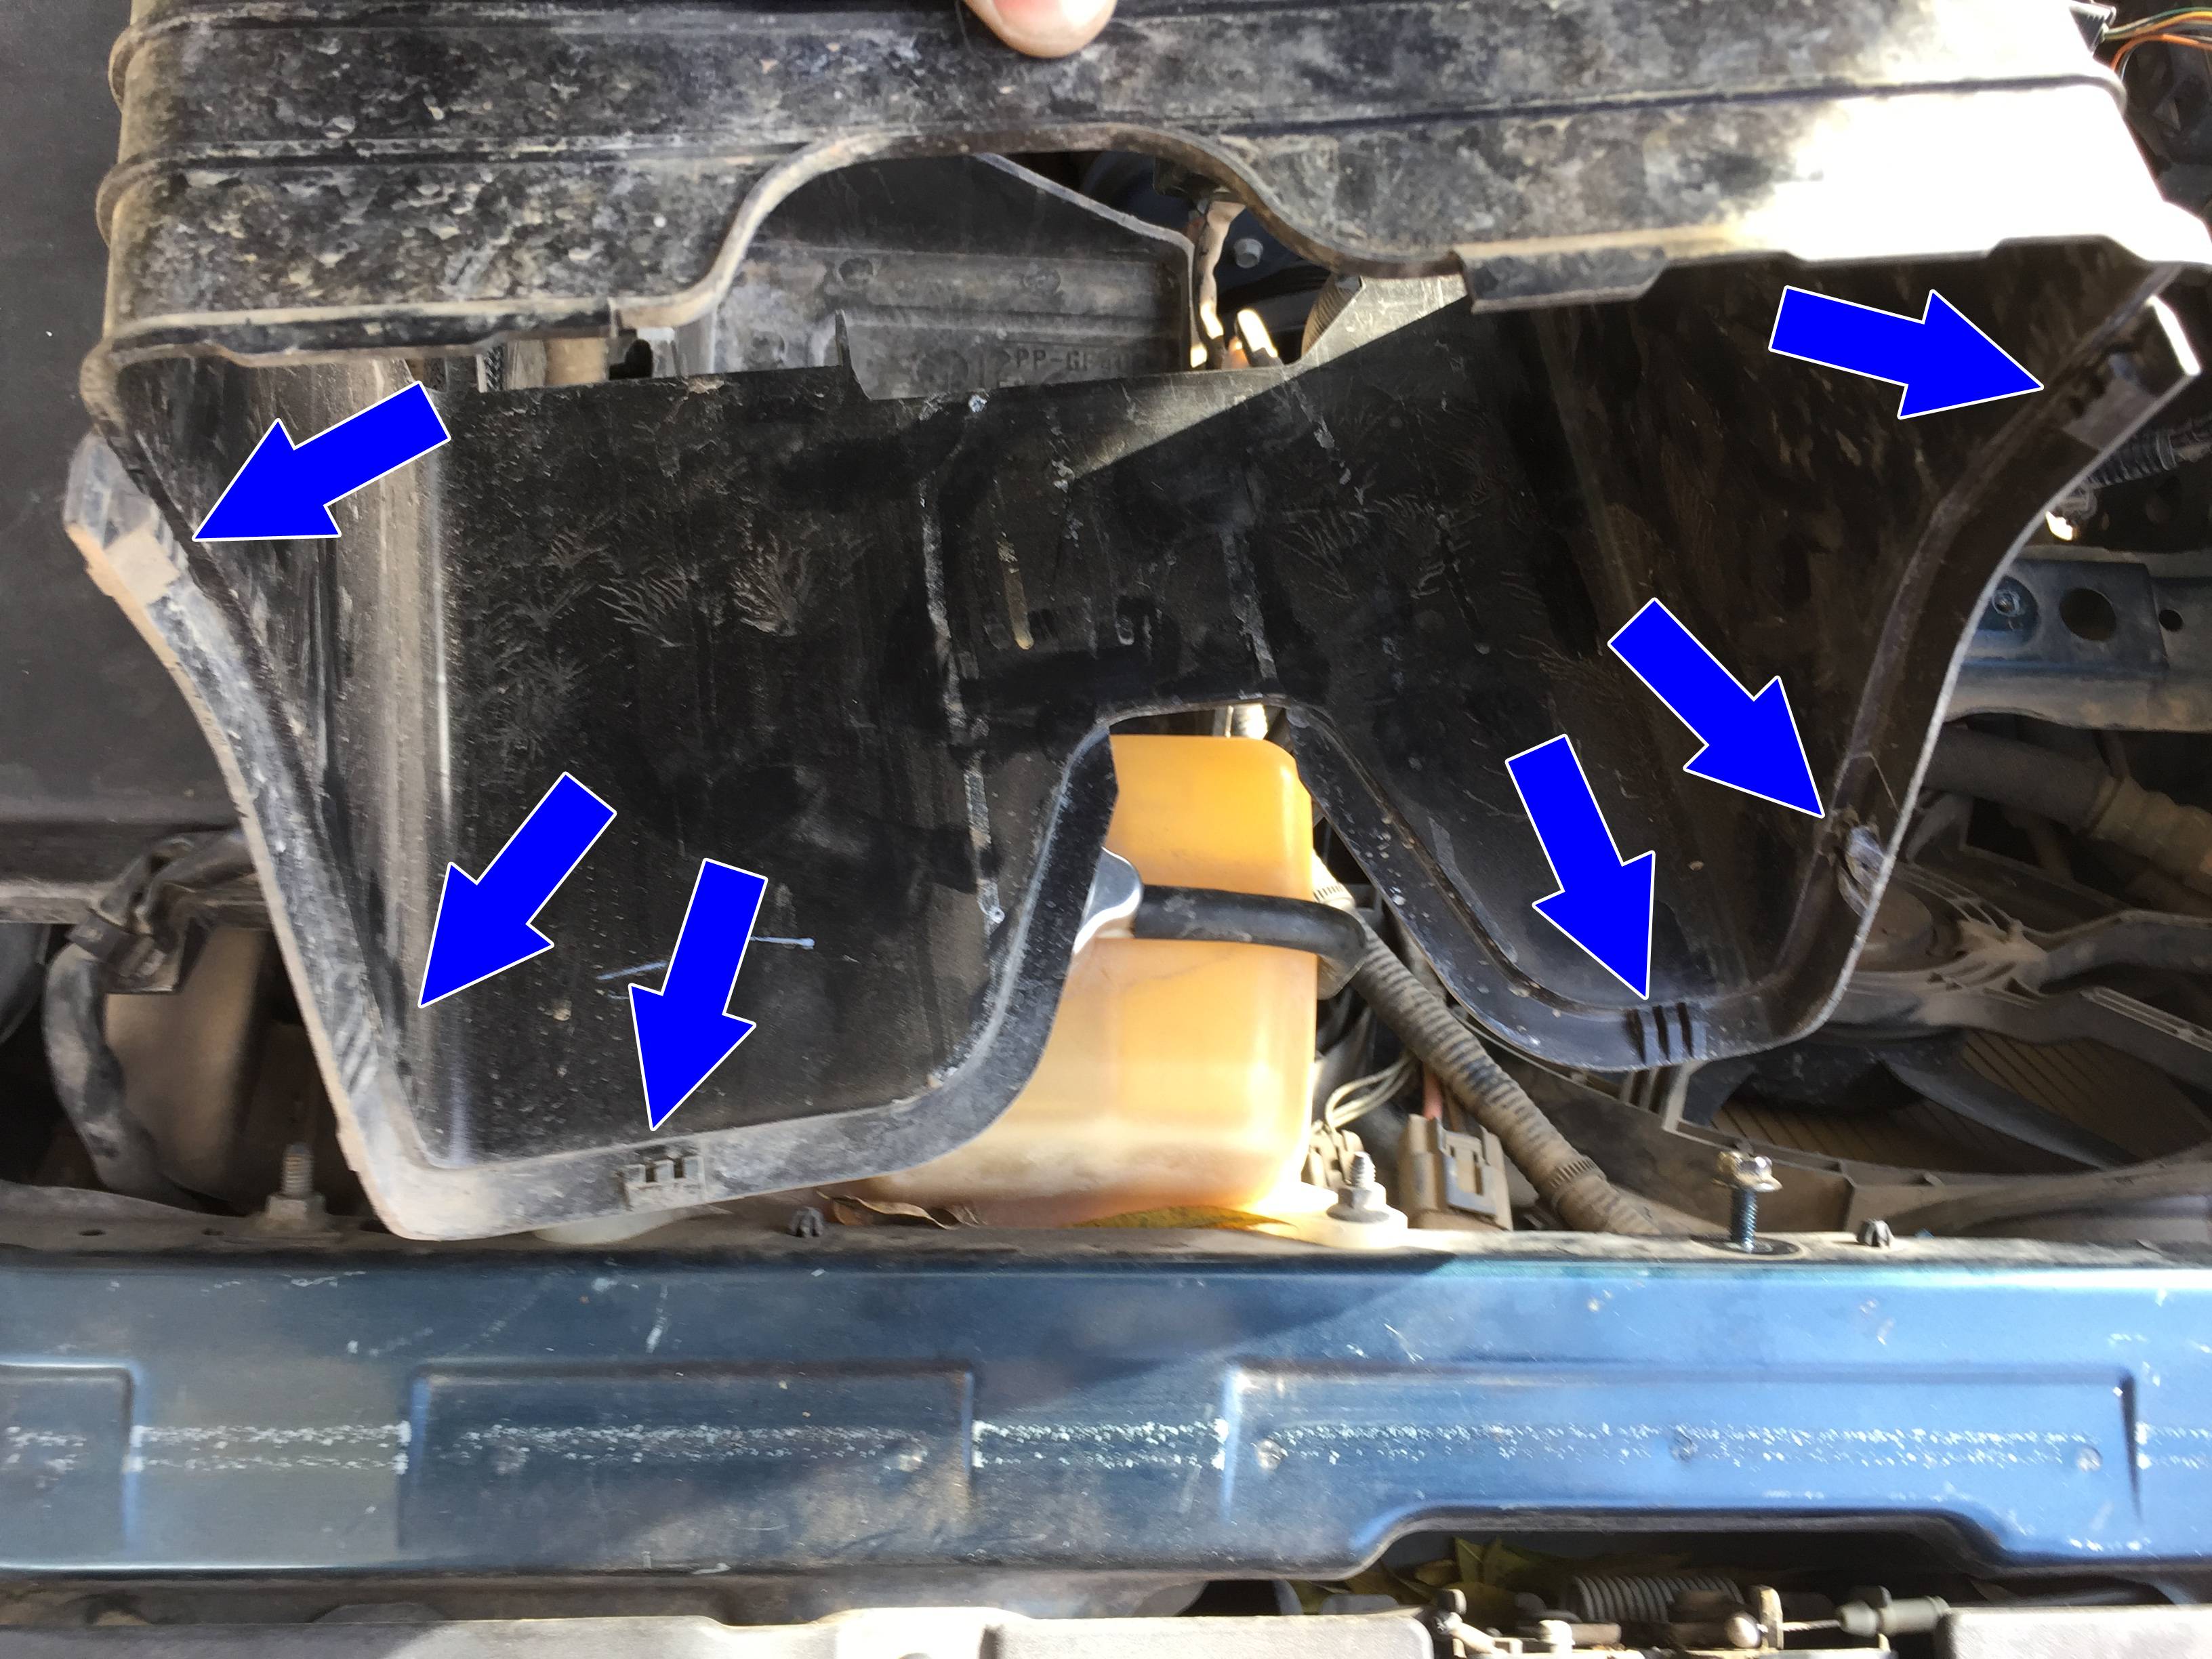
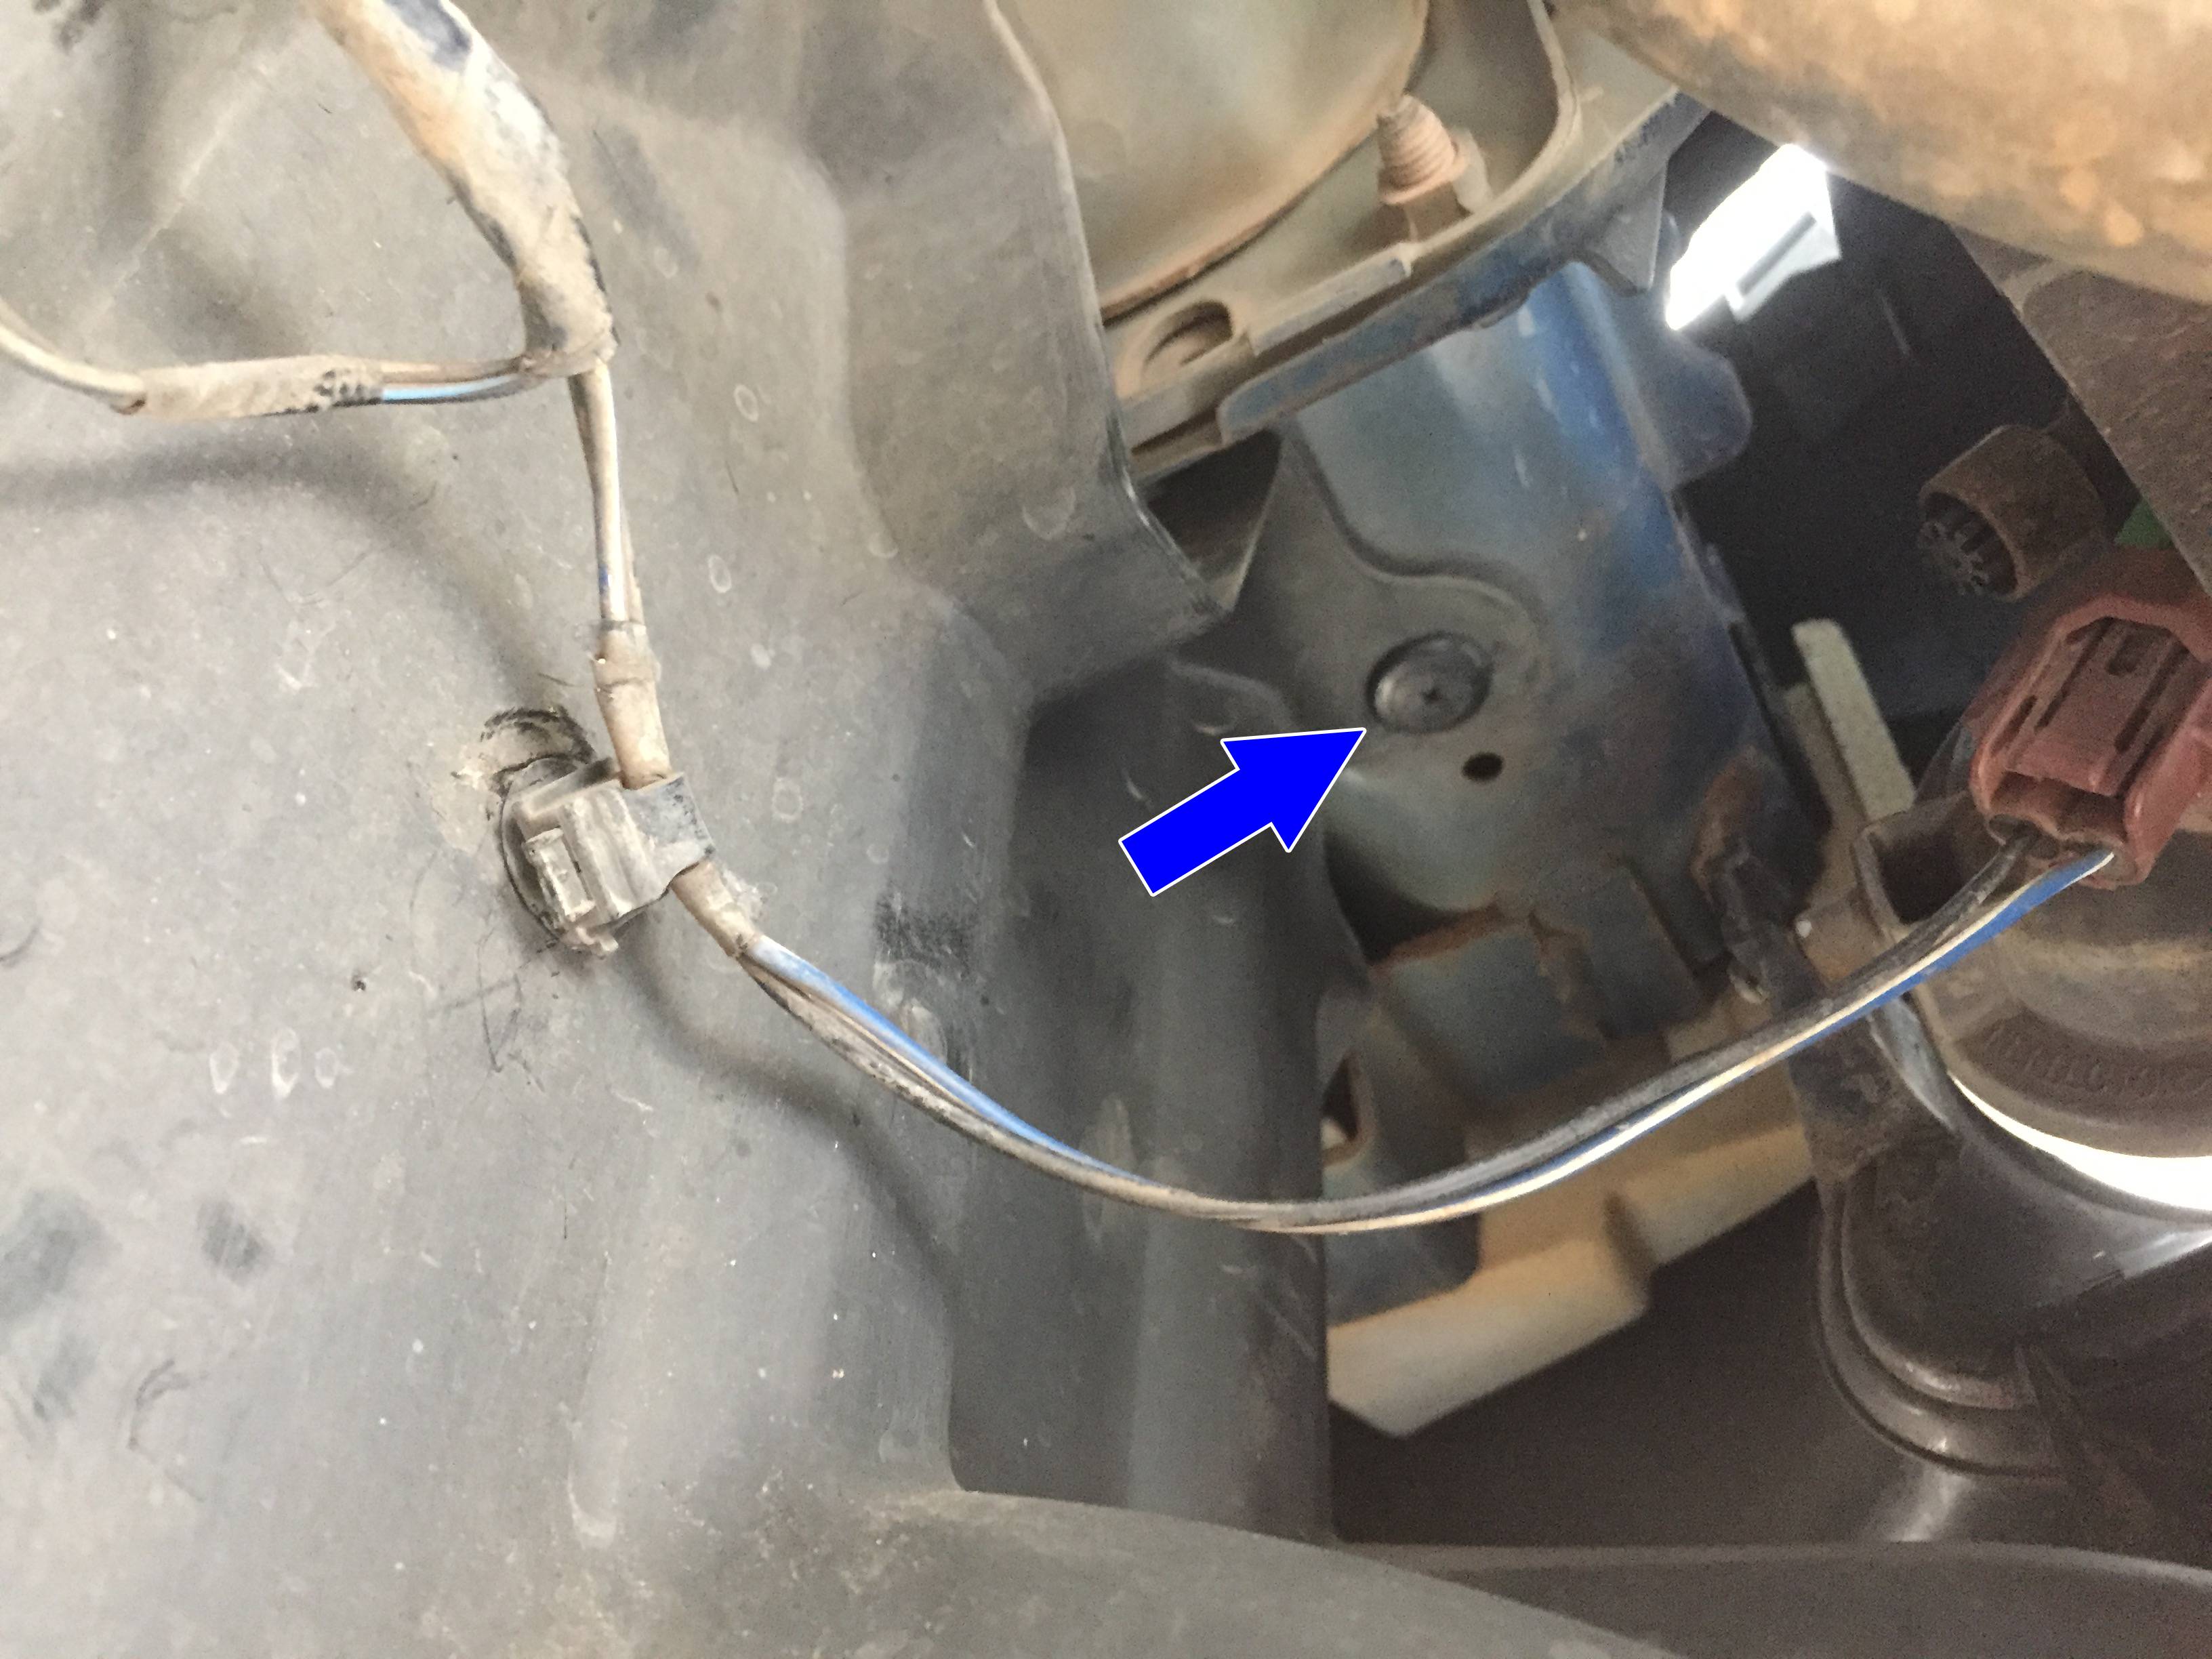
The main panel in the center is a little more involved. First off, there are a couple of those trim clips hidden up where they're a little hard to get to. There's one on the driver side towards the front of the car, and one on the passenger side towards the front of the car. The photo below is the passenger side, with the right of the photo being the front of the car.
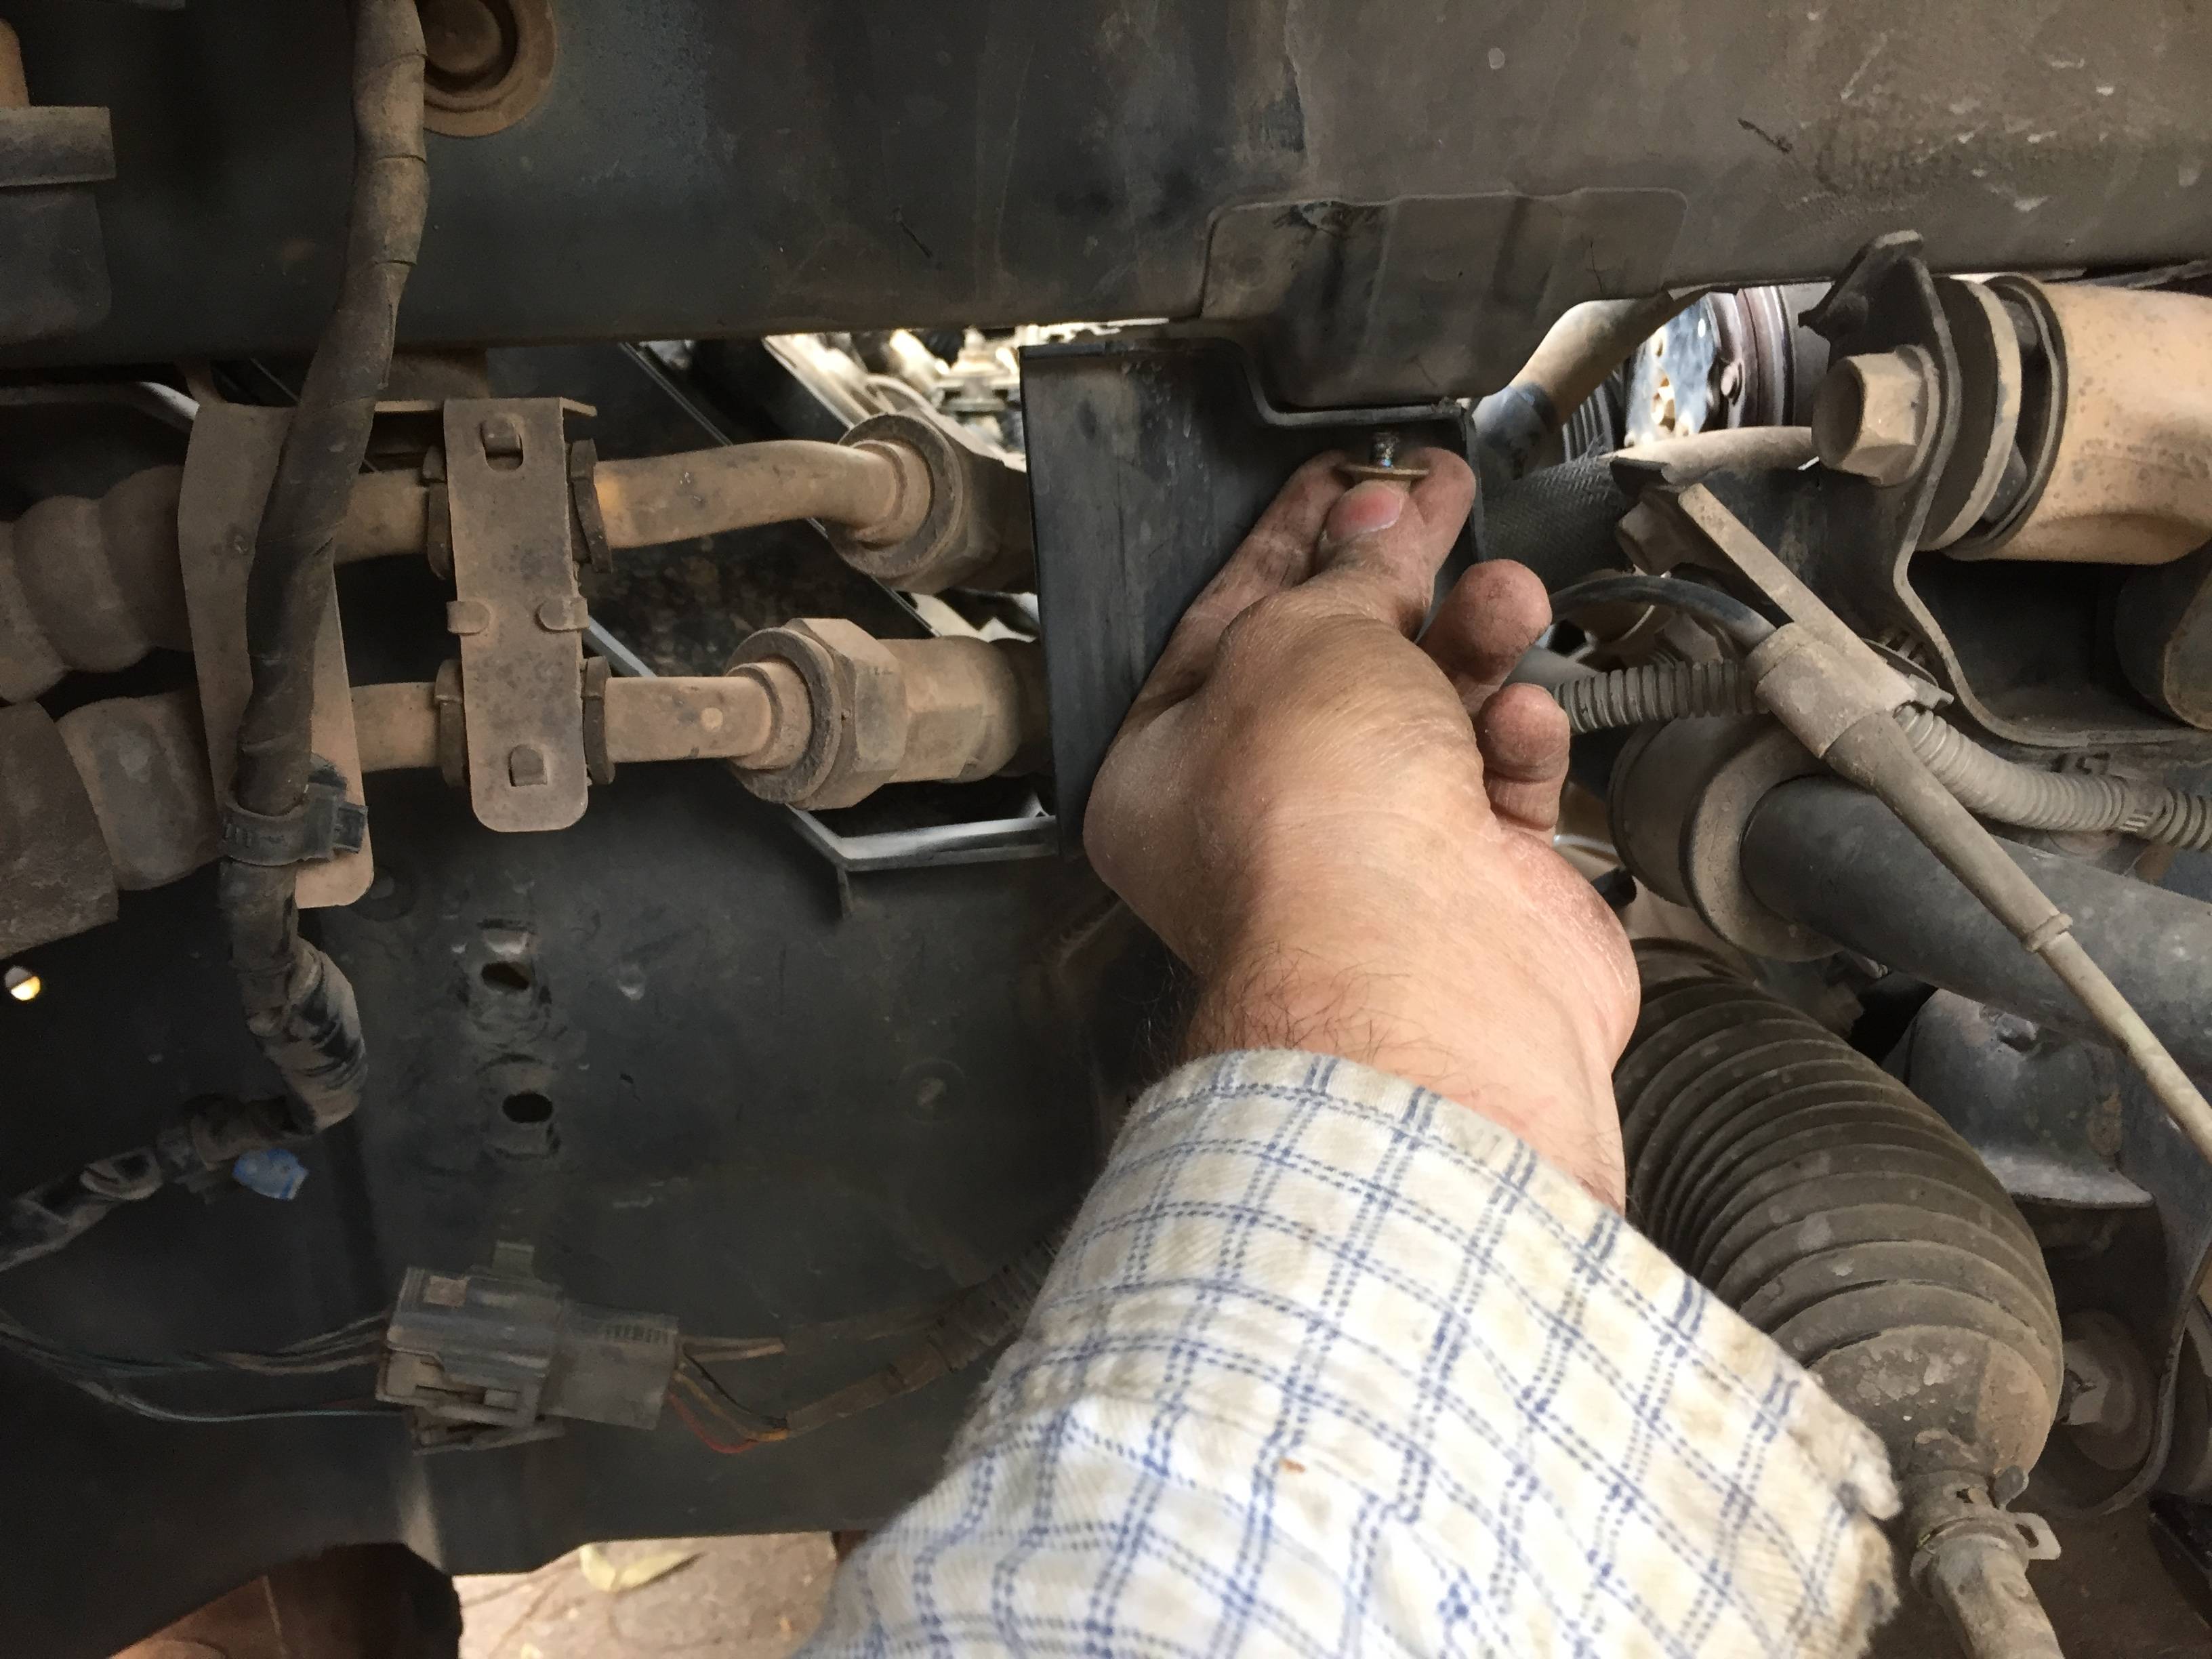
Go ahead and remove all the rest of the fasteners except for the bolts in the wheel wells. Save those for last. But even once you get to them, it's going to be a little more work because of the hoses and wires clipped to the cover. Do one side at a time, and slide your legs underneath to keep it from falling when you remove the bolts. Take out the bolts, and drop the cover just enough to make it easier to get to the back side of all the clips holding hoses & wires. If you can figure out how to get a needle nose back there to push the clips through, good luck. I ended up doing it with just my finger tips - not quite the easiest thing to do, but a whole lot easier once the cover has dropped a few inches. This photo's actually from going back together again, but here's the last bolt I took out from the driver's side from that panel.
Once you've finished with one side, repeat on the other. Then, you should be able to drop that whole panel down:
Step 12: Remove lower radiator brackets
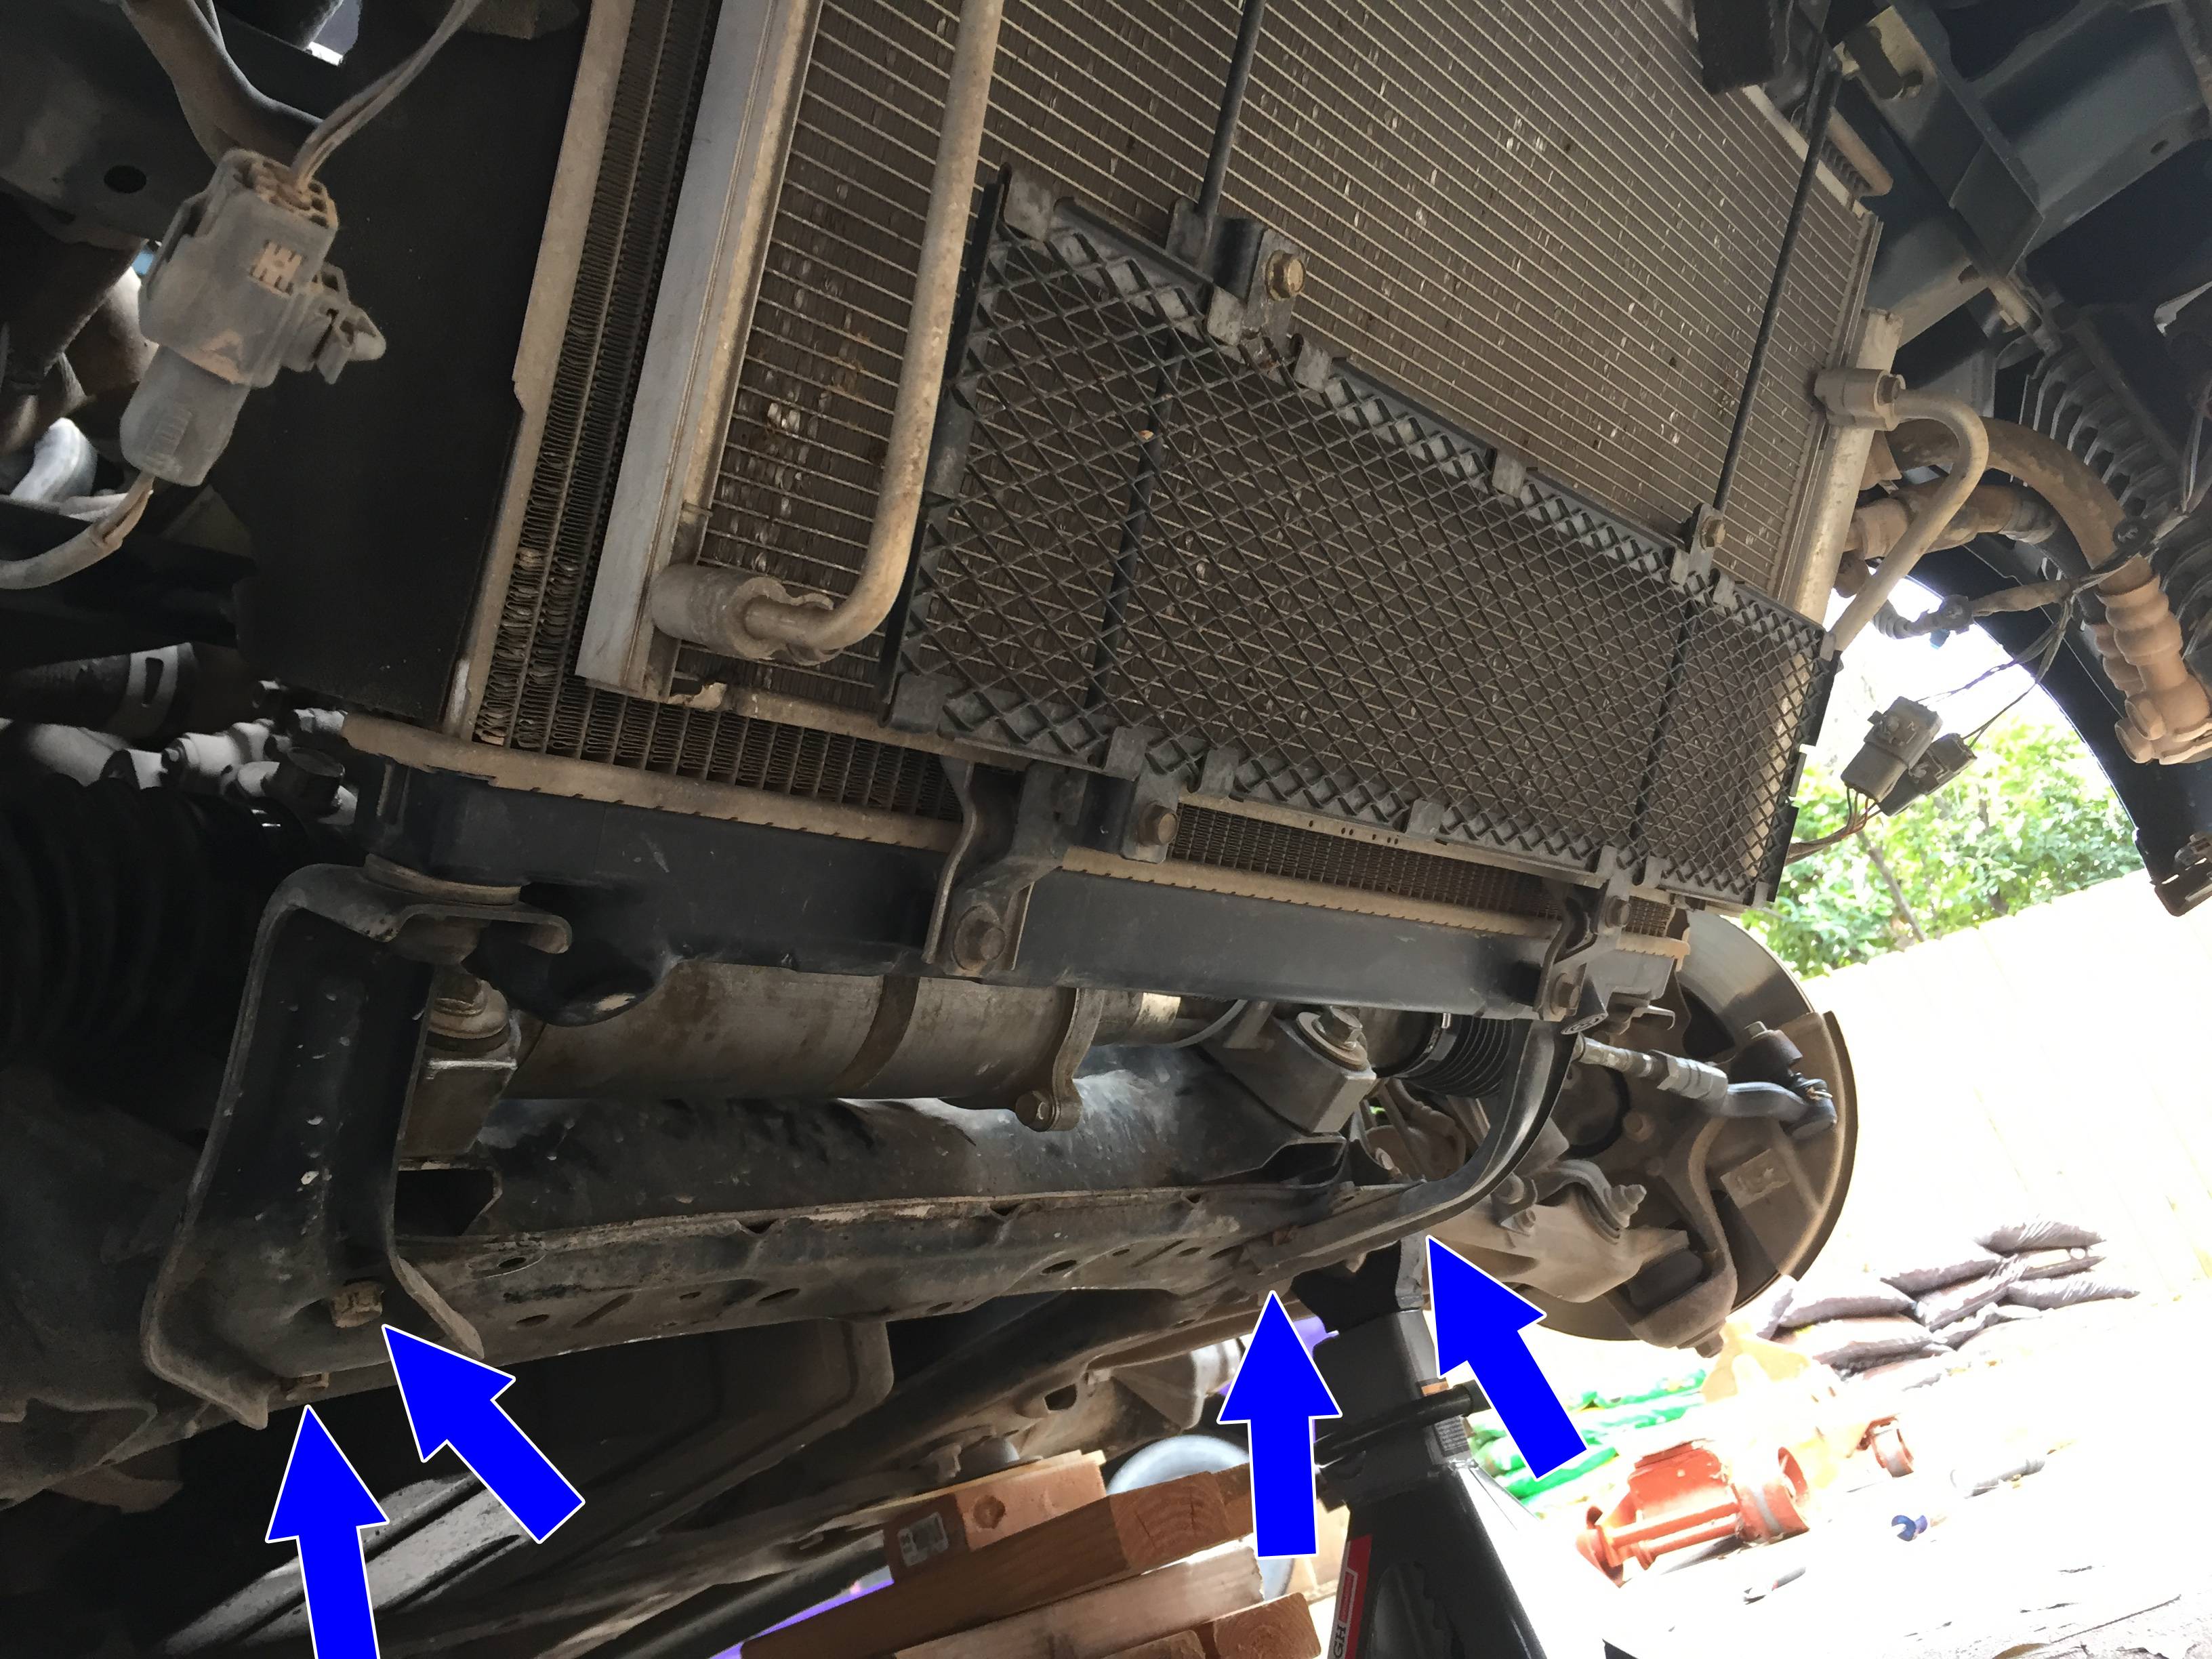
The passenger side bolts holding the steering rack are very close to the radiator hose, with the lower bolt being particularly close. Taking off these brackets will give the radiator just enough play to let you get those bolts out. Each bracket has two bolts holding it in. Simply take out the bolts, then remove the brackets.
Step 13: Disconnect the tie rod ends from the steering knuckle
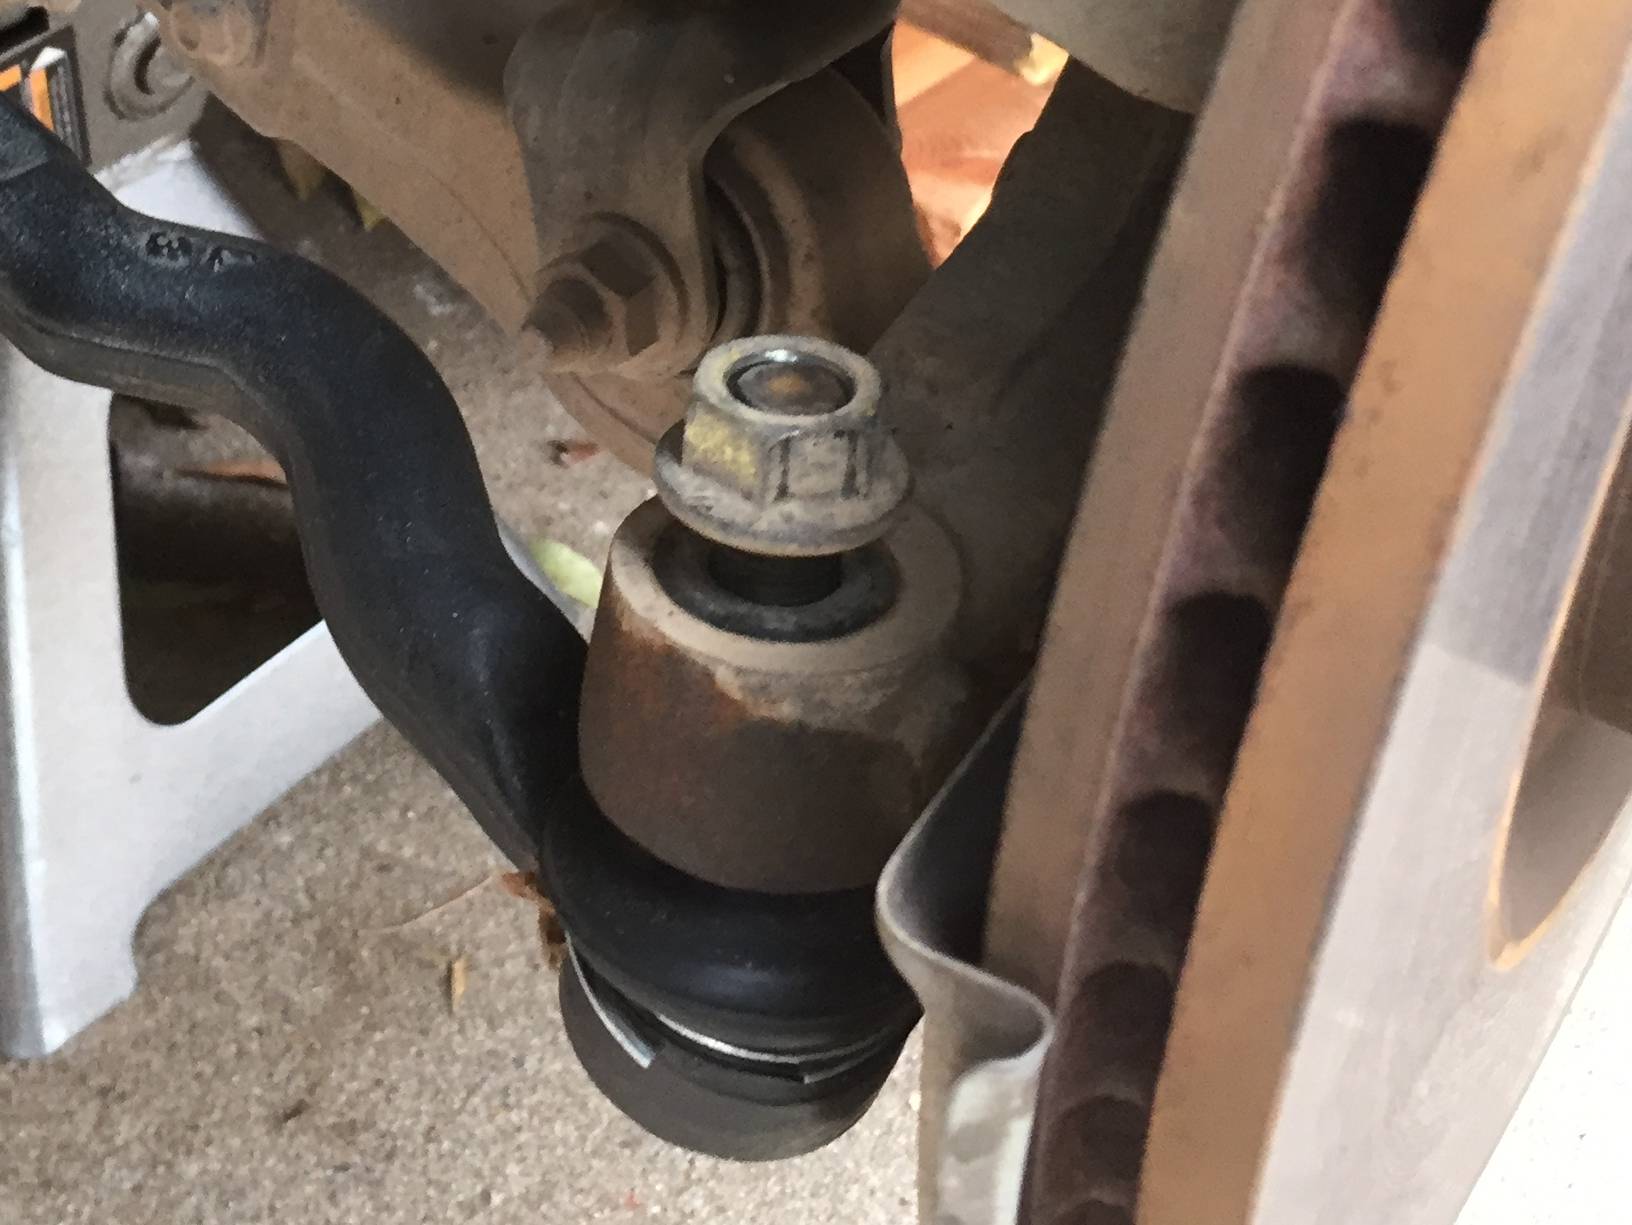
This isn't too hard, but there is a trick to it. First things first, remove the cotter pin and nut holding the tie rod end. But you don't actually have to take the nut all the way off.

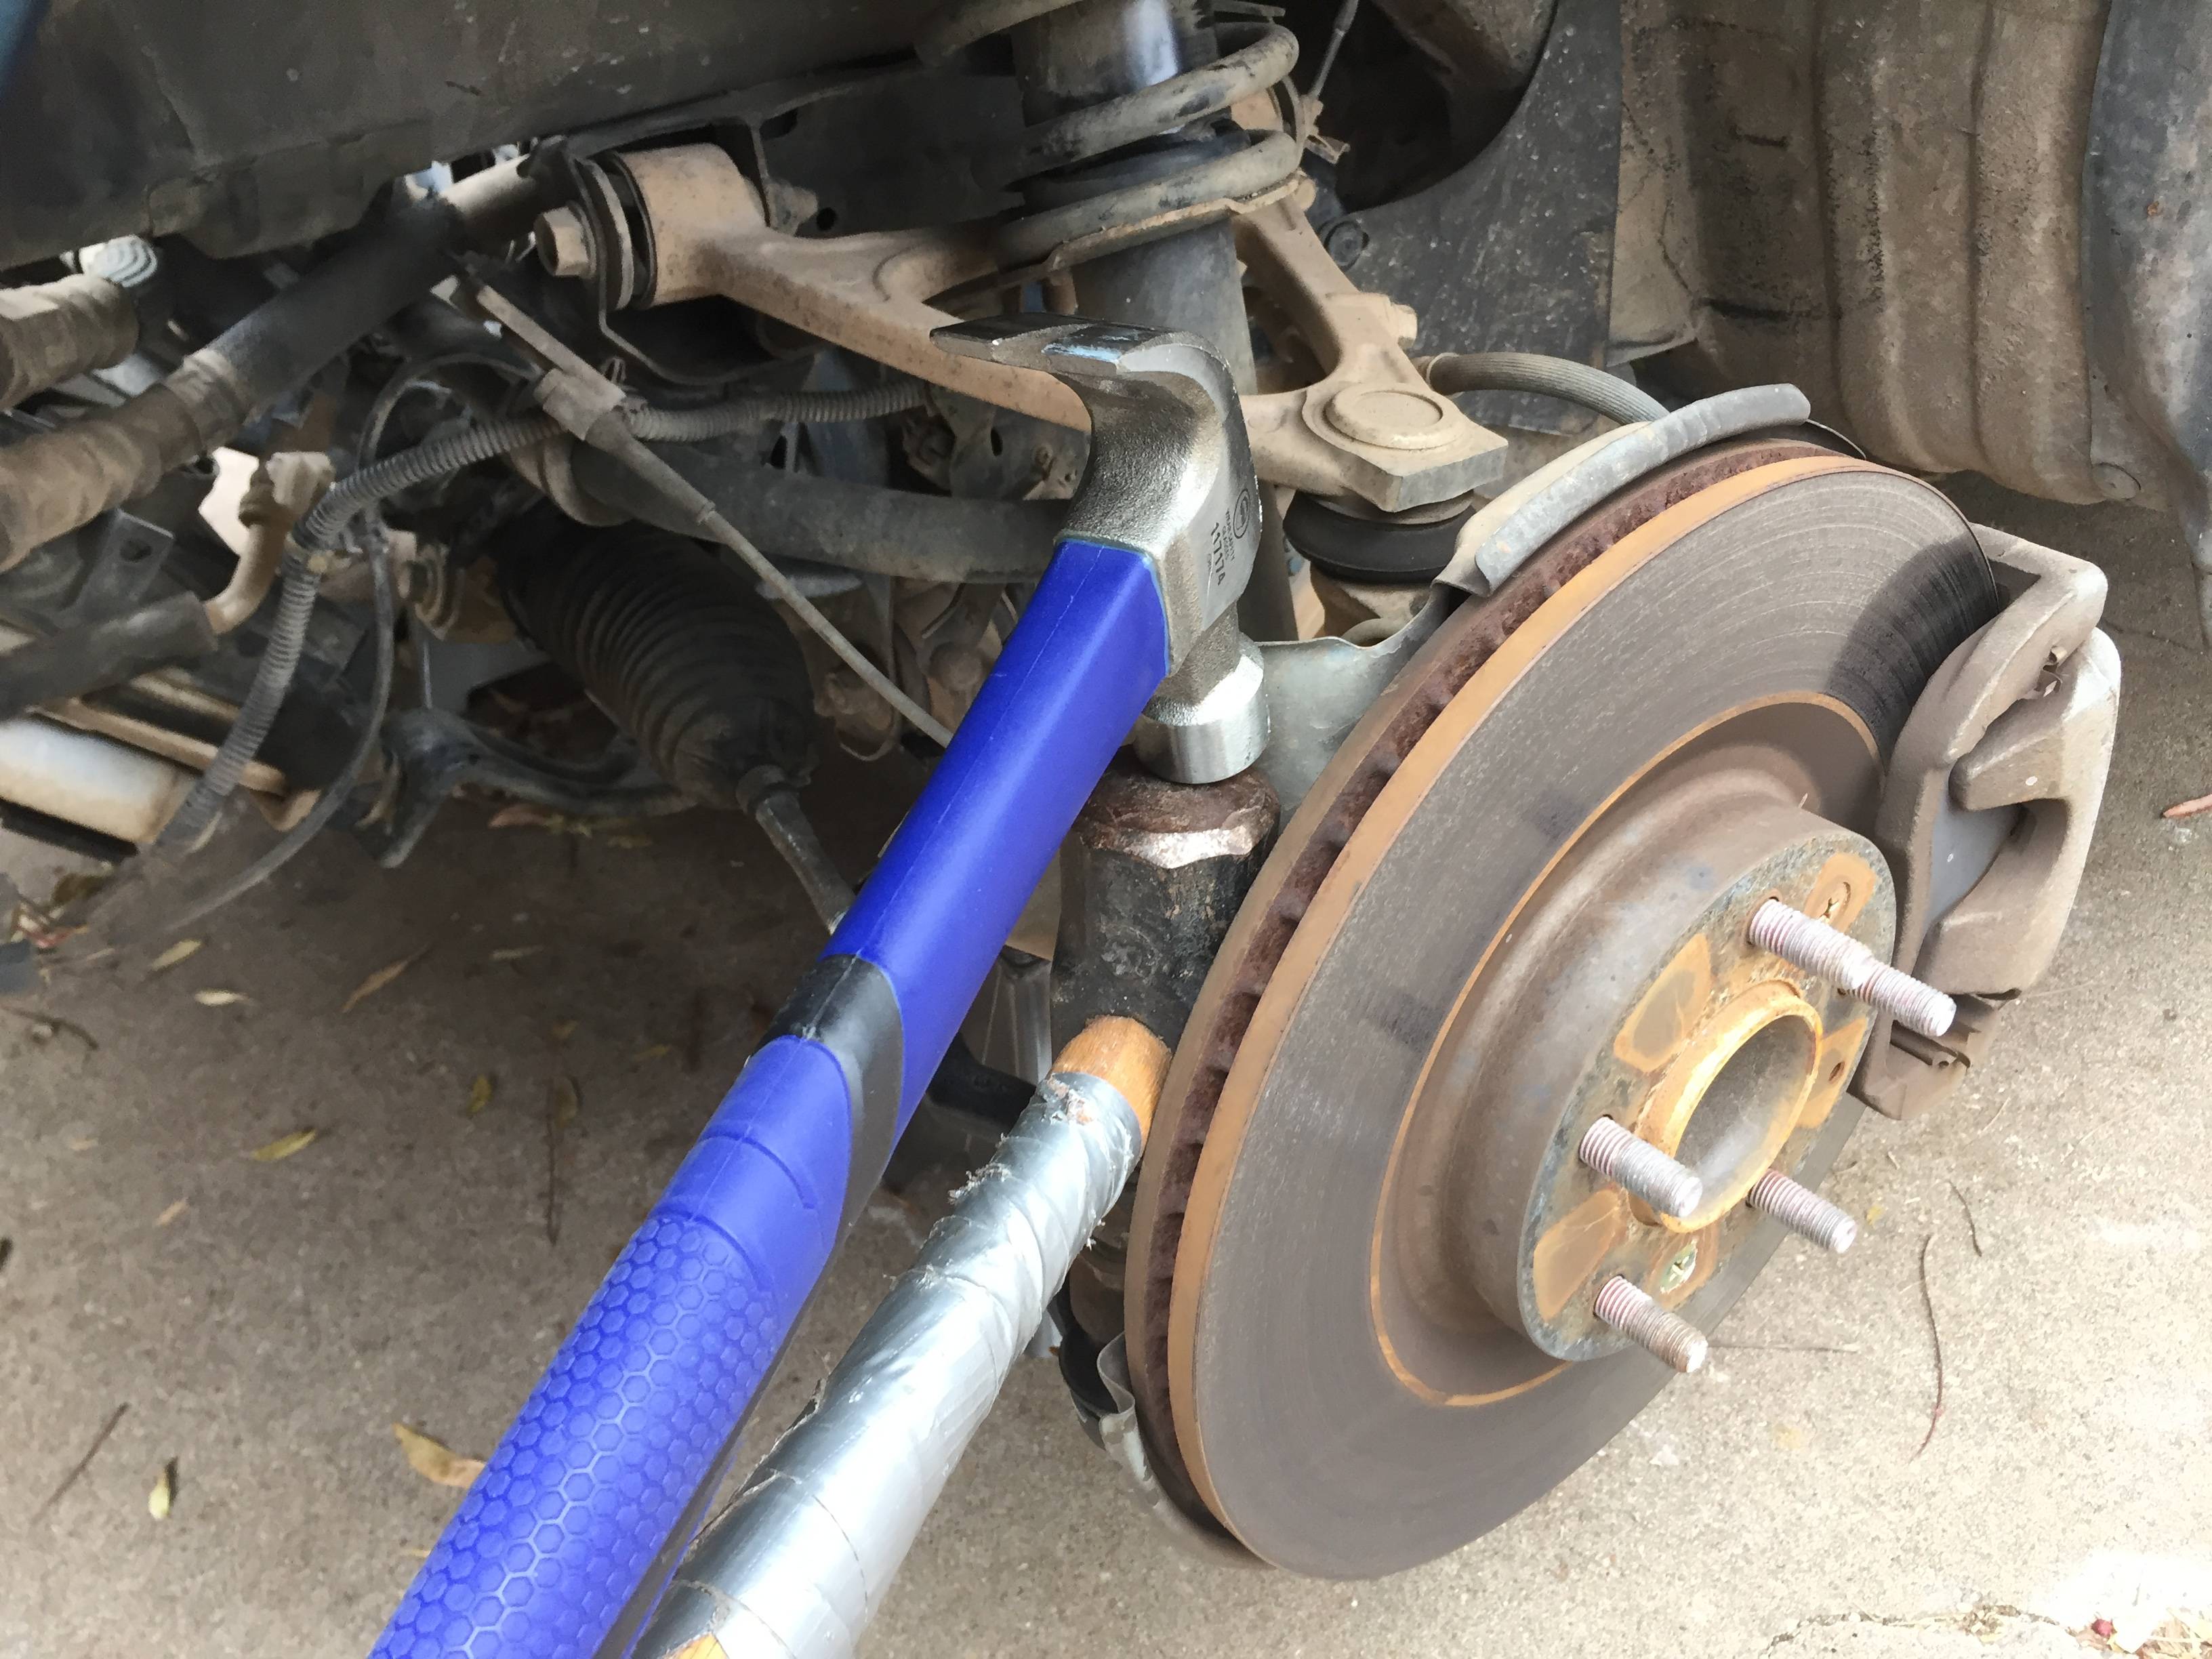
Tie rod ends use tapered pins, so the pin is probably wedged into the knuckle pretty tight, and you won't be able to get it out just by pulling. You'll probably need to tap it out with a hammer. Put the nut so that it's almost even with the top of the tie rod end, but just a little higher. This will protect the threads when you tap it out.
To further protect the threads, it's good to put something else on top of the nut and hit that, instead of hitting the nut directly. I started off with a scrap 2x4, but the wood gave too much and cushioned the hit too much. So instead, I used a two hammer setup - putting a small sledge hammer on top of the nut, and then hitting the sledge hammer with a claw hammer (which looks so shiny and clean because it's a brand new one I just got for Christmas). Start out just tapping, and increase how hard you have to hit until the tie rod end finally drops. It may take a decent amount of force.
Once the tie rod ends drop, then you can take off the nuts. Make sure you actually do remove the nuts before removing the steering rack, or else you'll get hung up on those.
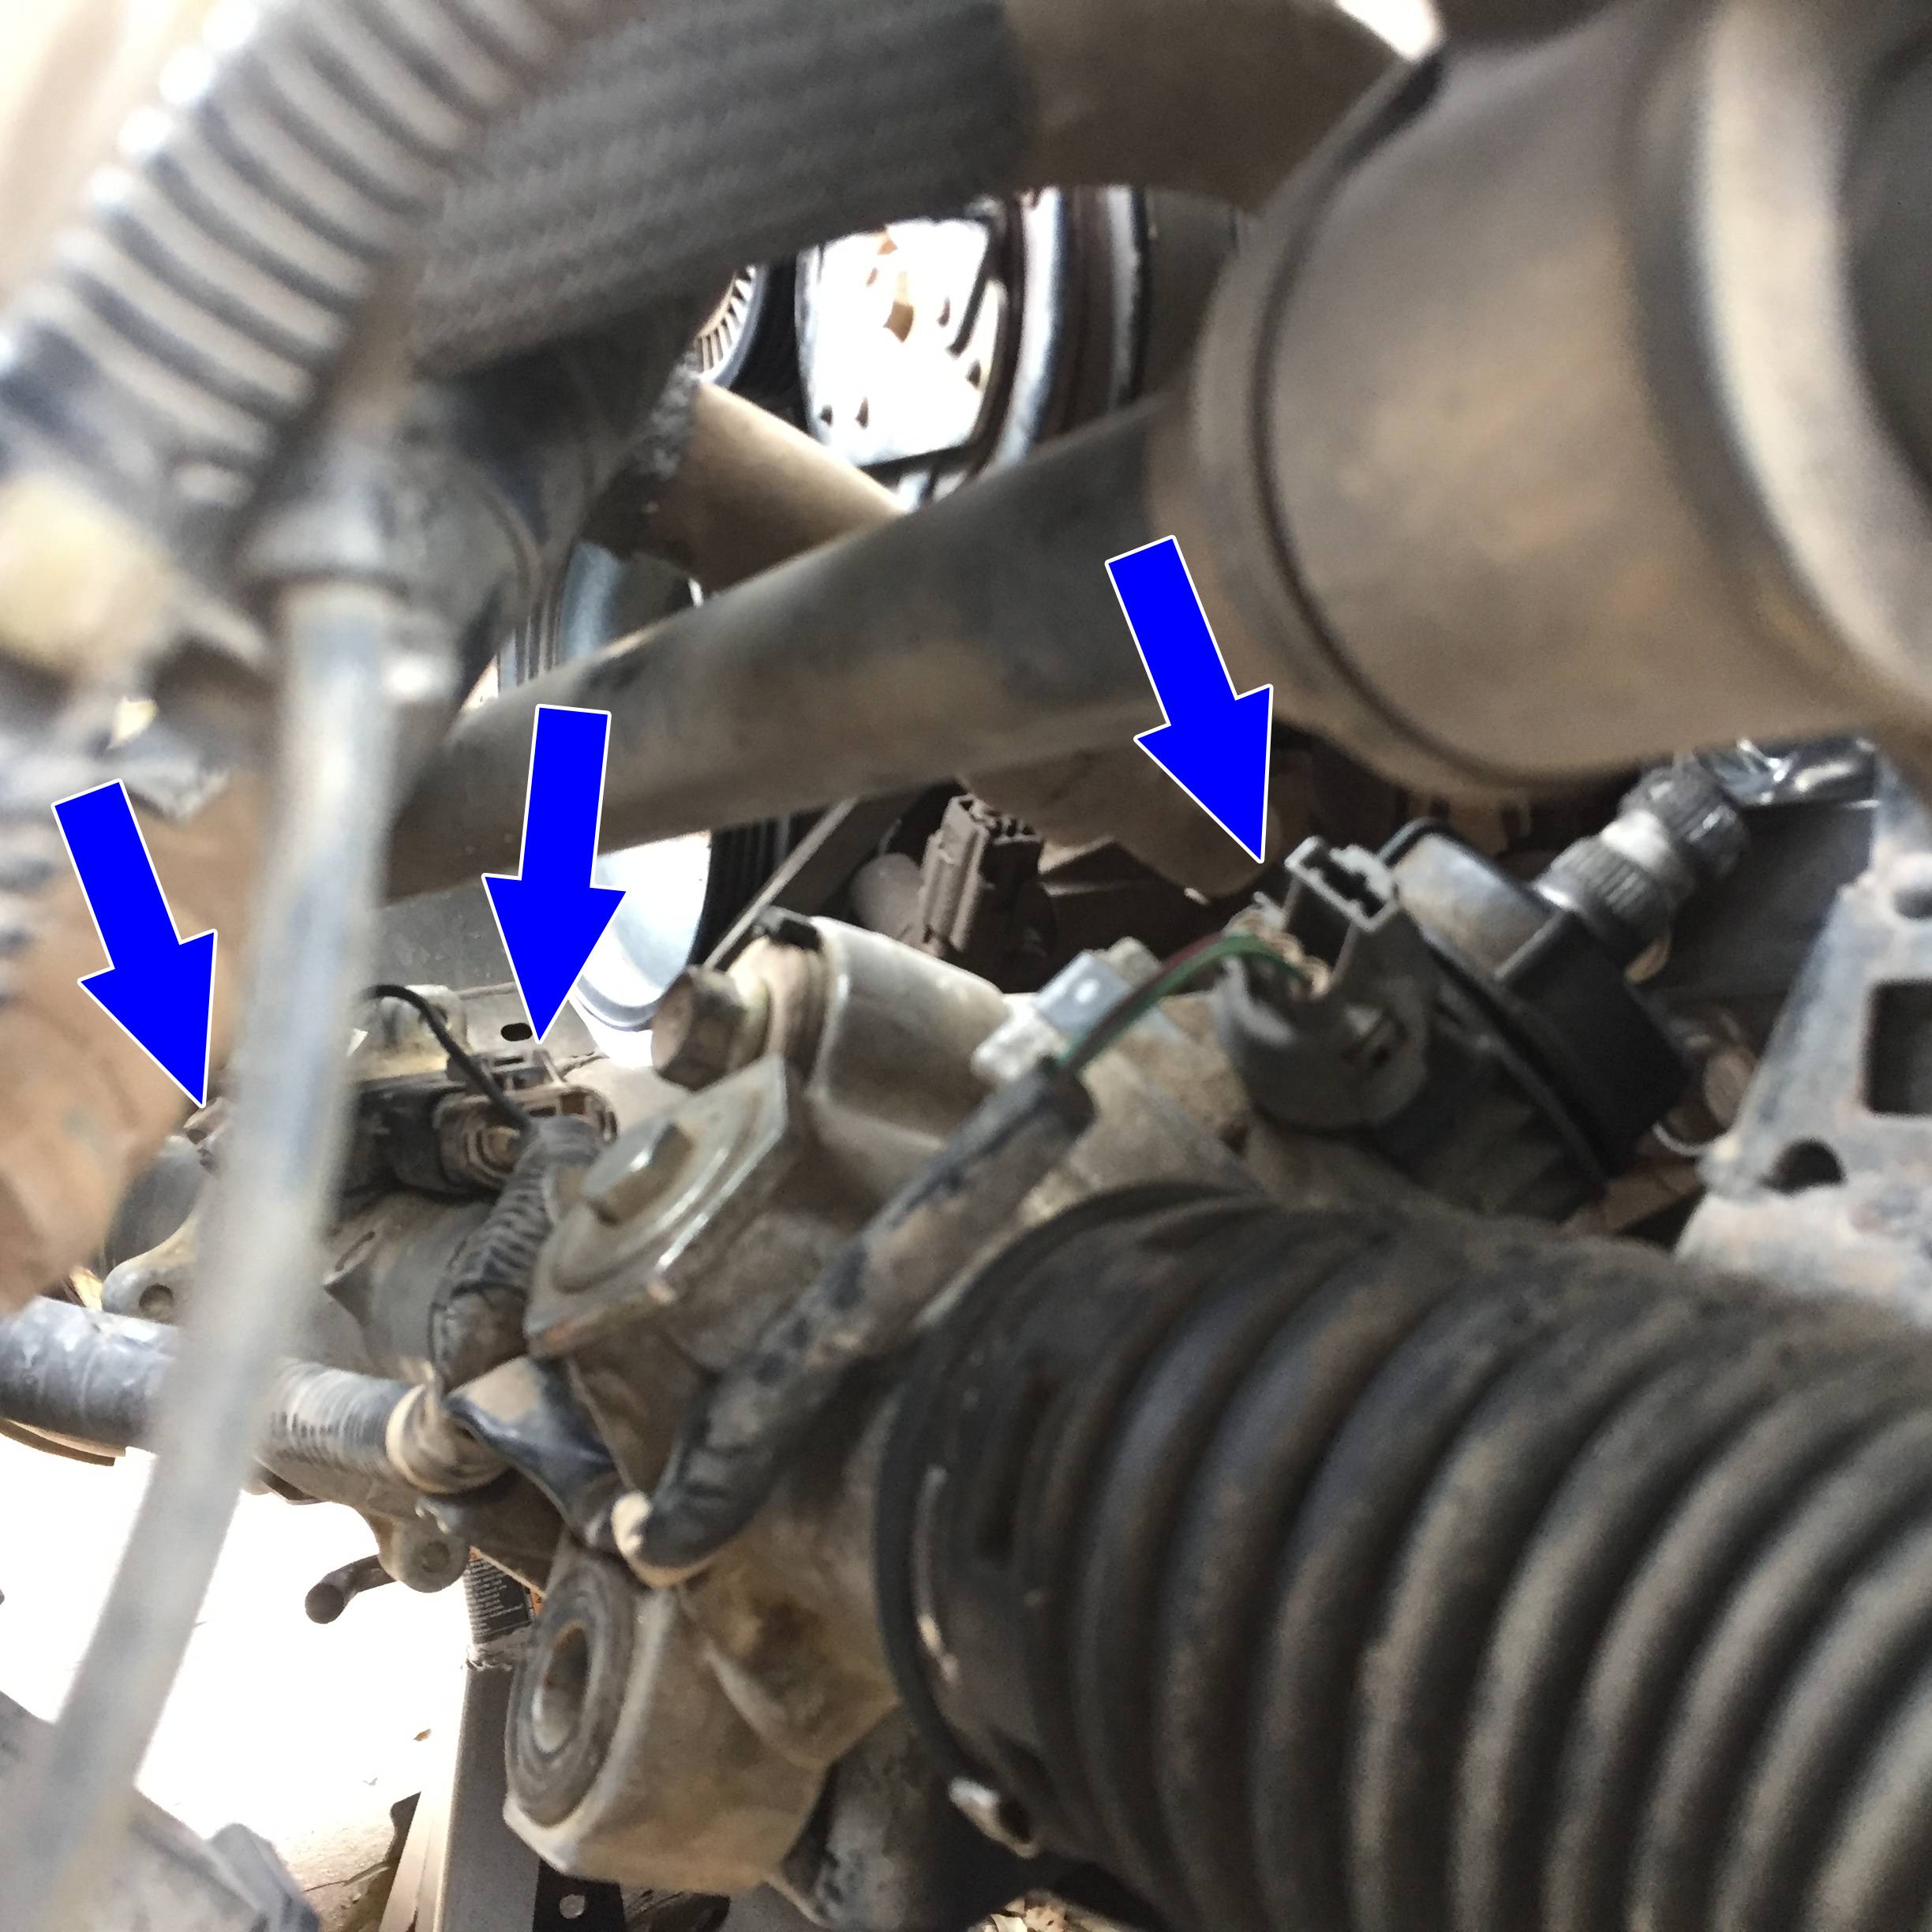
Step 14: Disconnect the wires going to the steering rack
There are three connections to undo - one going into the rack right by the attachment to the steering column, one going into the power steering motor, and the ground connection right by that second one (note the power steering is electric - no hydraulics). But first, there are a couple zip ties to cut.
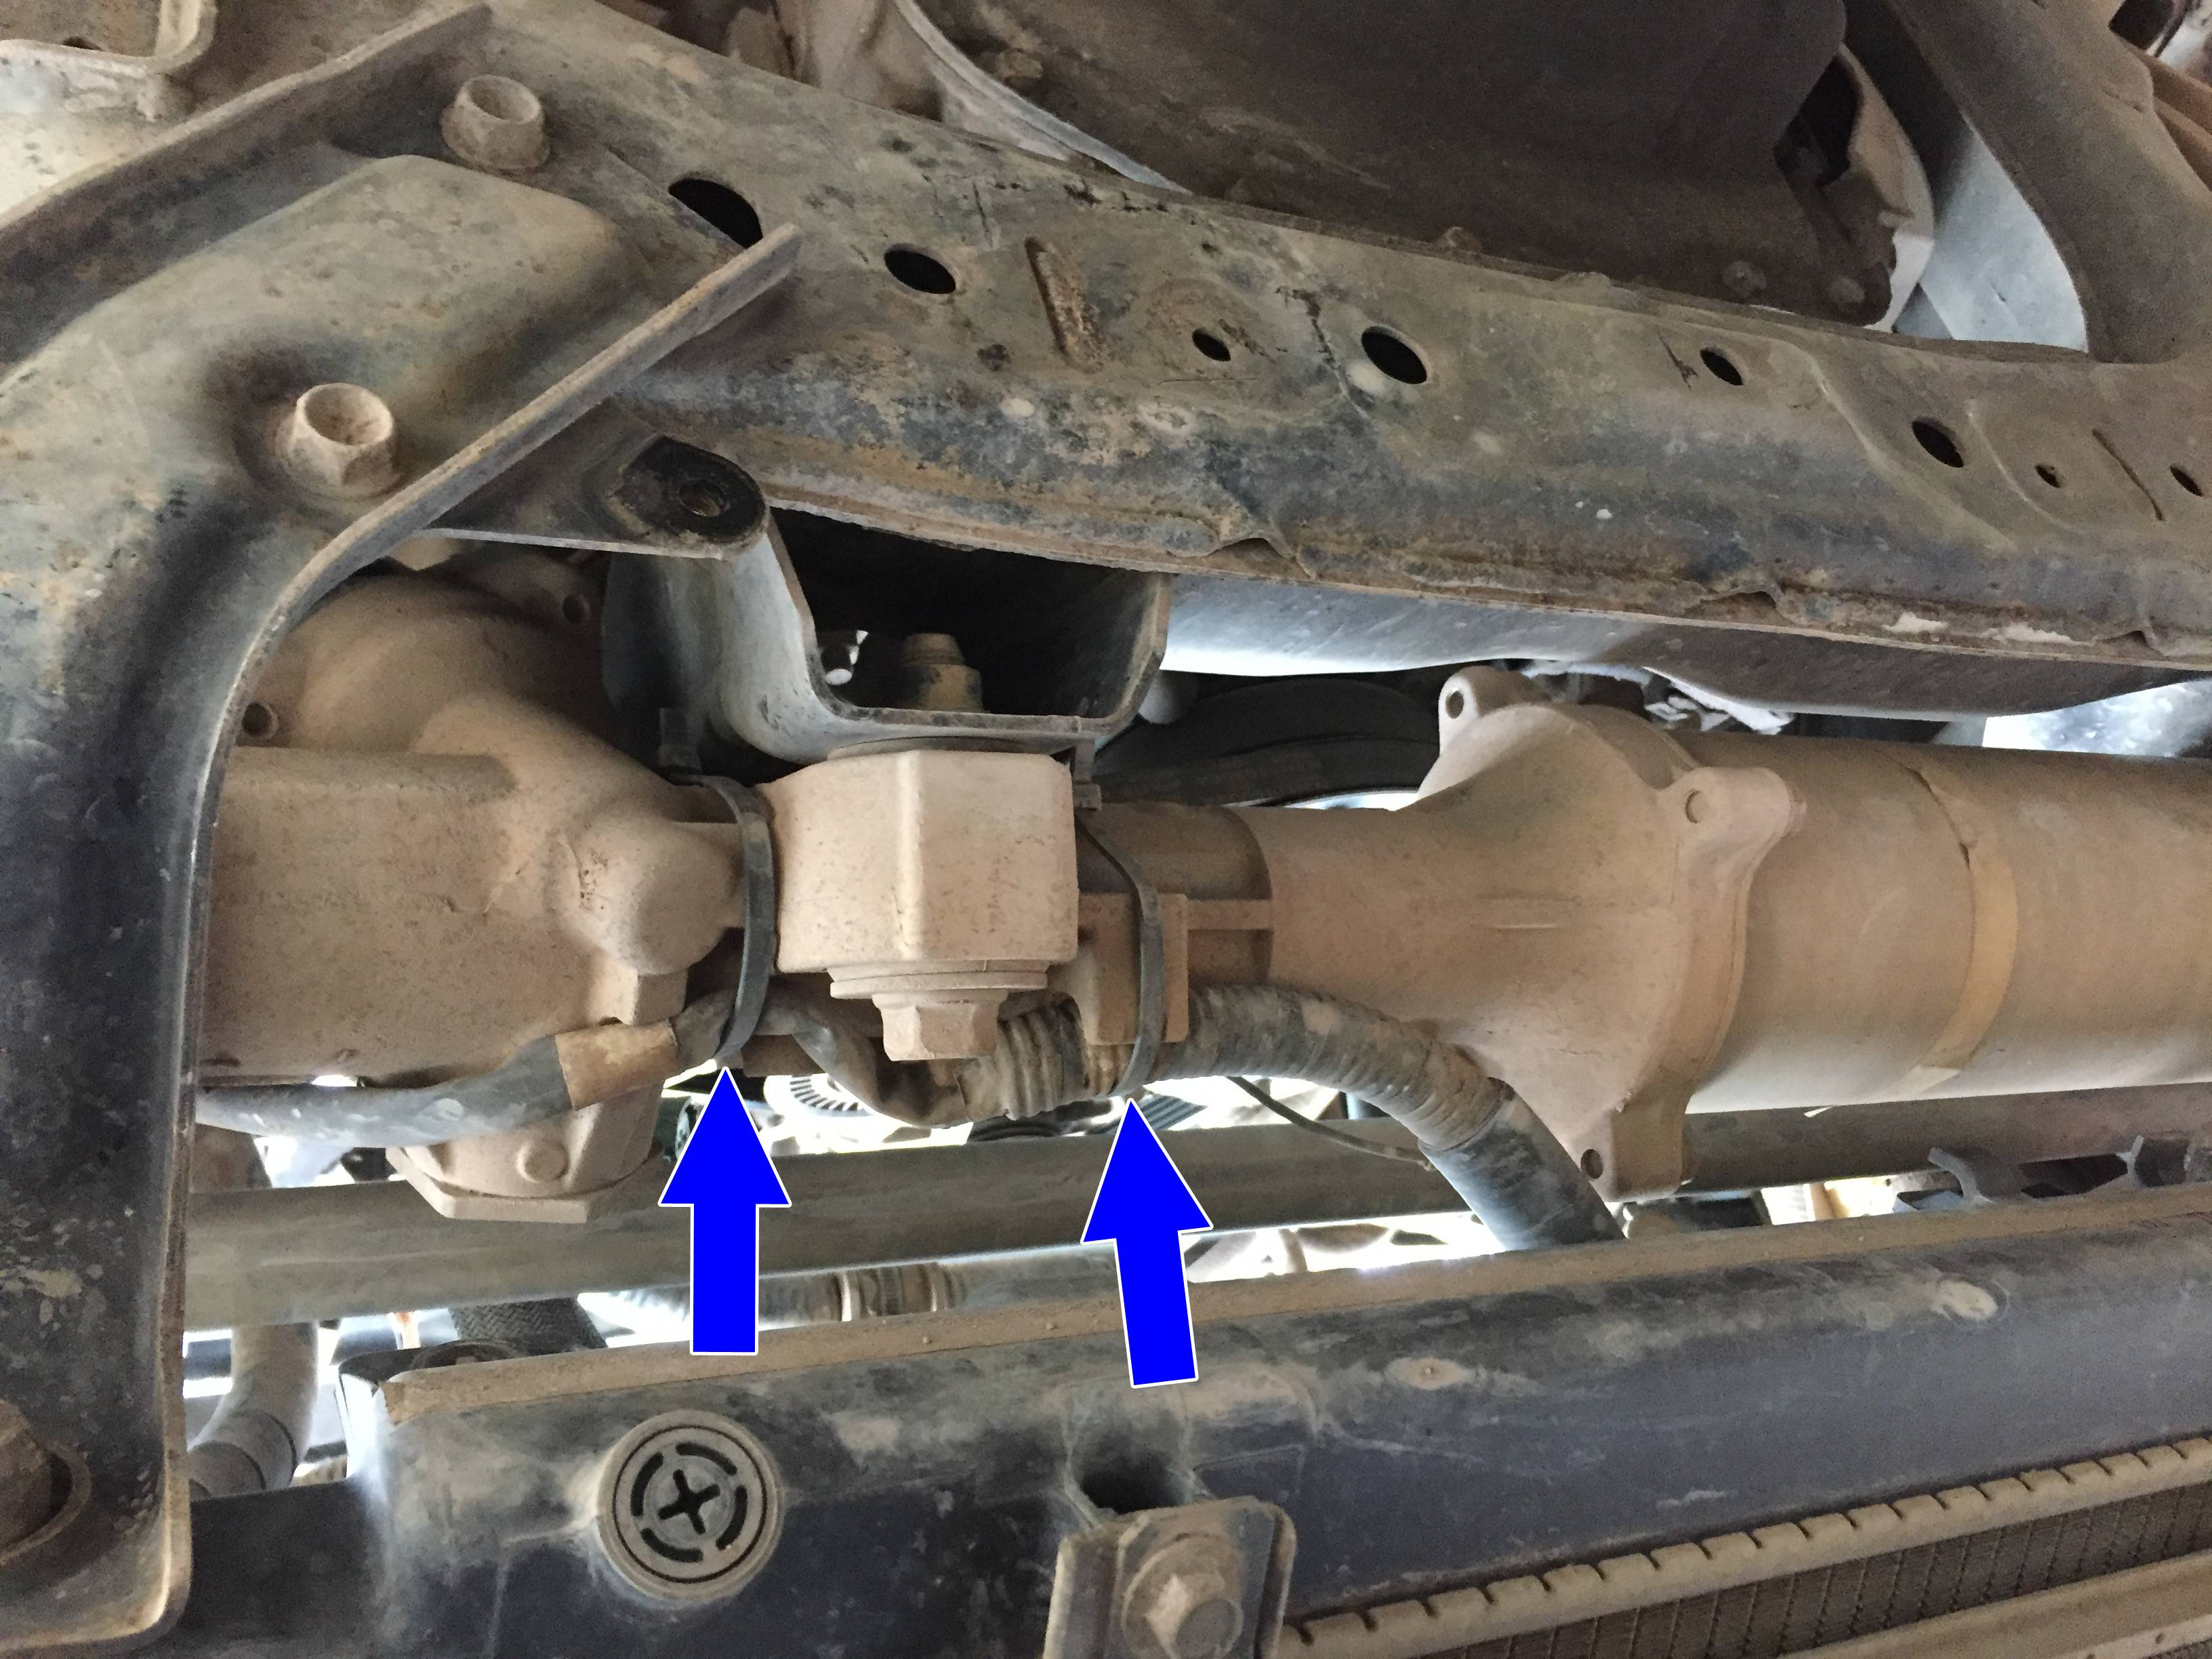
Once the zip ties are cut, you can remove all the connectors. The ground wire is easiest to get to from the top. The other two can be reached from a variety of angles.
Step 15: Clean power steering wiring harness connectors
This one's optional. A lot of people that have had power steering problems have said that they fixed them simply by cleaning the wiring harness (and in fact, if you're not positive the steering rack is your problem, you should probably try that first, as well). So, I figured that as long as I had the car taken apart this far, it might be a good time to do some preventative maintenance and do the same thing, even though I haven't ever had any power steering problems. And if you're going to do it, it's good to do it now to give the connectors plenty of time to dry after spraying them with the electronic cleaner. Since there are already good write-ups out there on how to do this, I'm not going to detail it here. Instead, I'll just provide a link. The first note I'll make is to remove the connectors to where you can leave them hanging to where the cleaner can drain, and gently shake them a few times to help get as much of the cleaner out so that it won't take as long waiting for the cleaner to evaporate. The second note is to not do the dielectric grease and reconnect everything right away. Give the connectors plenty of time to dry while continuing on with replacing the steering rack.
RX8Club.com - DIY: Power steering connector cleaning with pics
Step 16: Remove the steering rack
First, make your life easier get some boards to help hold the steering rack while you're undoing the bolts. I ended up wedging a 4x4 underneath the center of the steering rack.

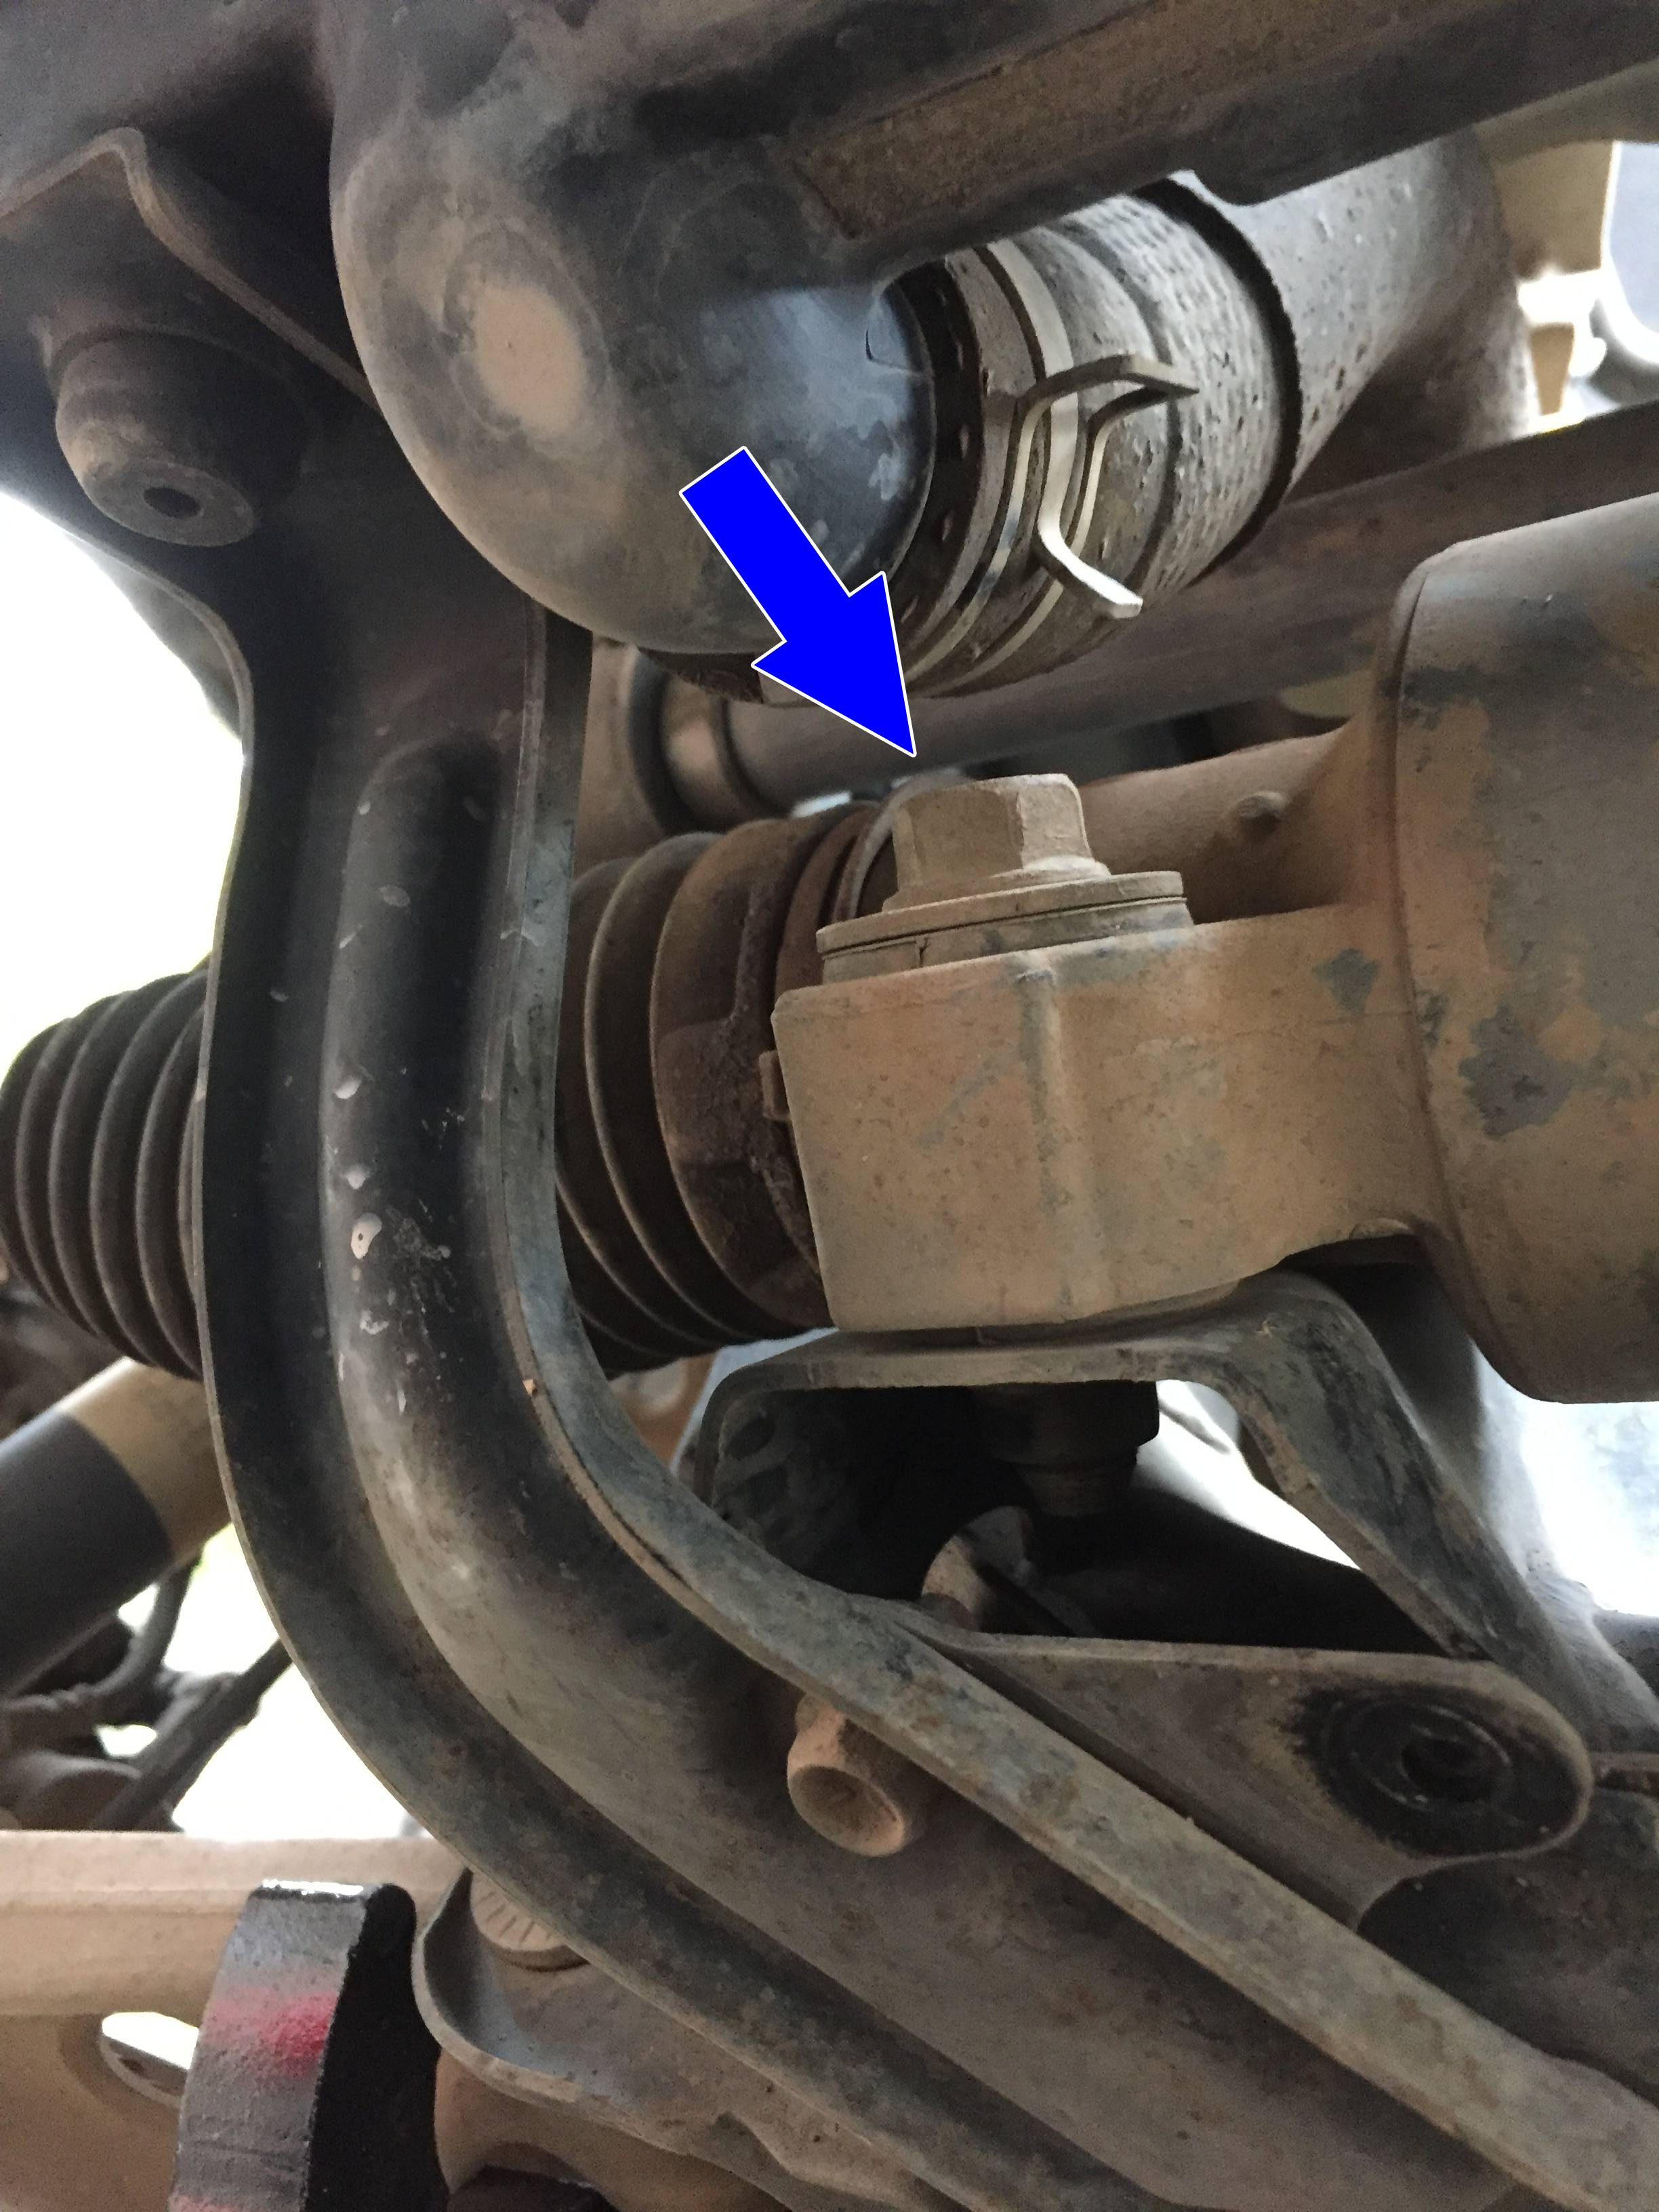
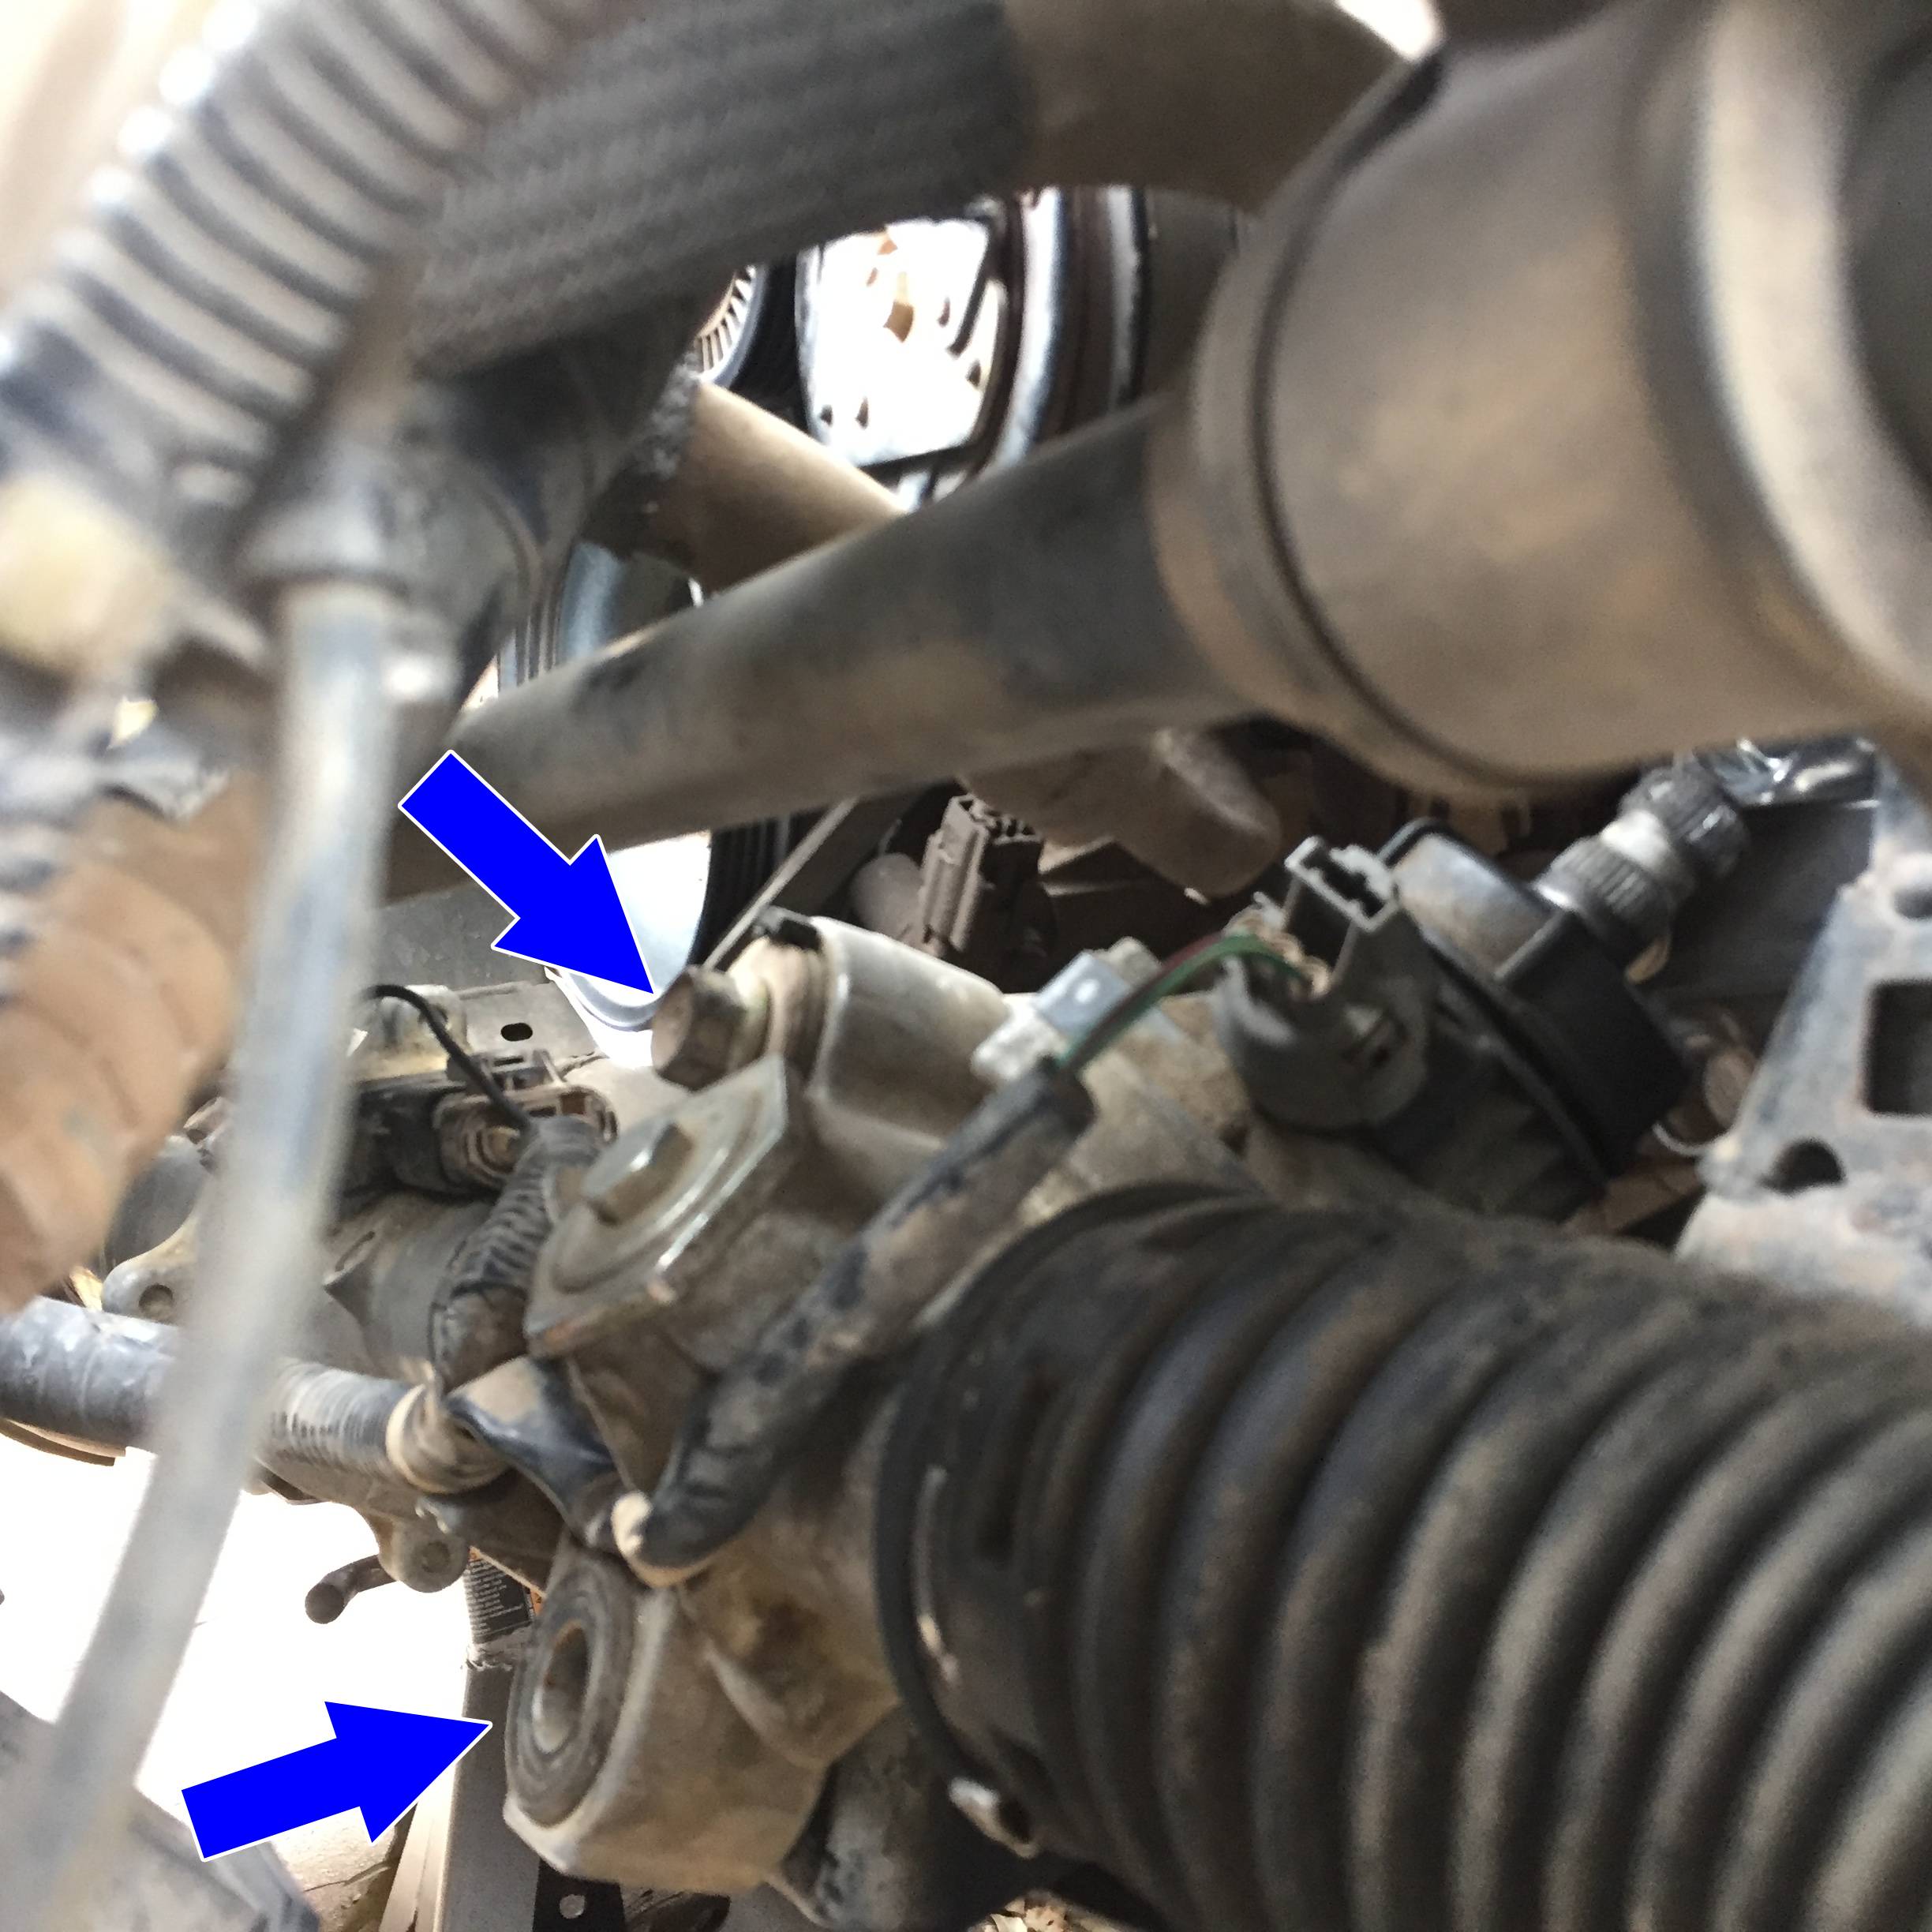
There are only four bolts, but one especially is going to be a pain, so that's the best one to start out with - the lower passenger side bolt. It's so close to the radiator hose that I couldn't get a socket on it and had to use just a wrench. And it's tight, so it takes a lot of force to get it off. Luckily, it is in a position where you can get some good leverage on it. I had to wrench it off the whole way, then finagle the radiator hose out of the way to get the bolt out (the reason we already pulled the radiator brackets). I forgot to take a picture with the wrench on it, but here's the bolt you'll have to remove. Note that this is from underneath, before the radiator brackets were removed. You can see how close that radiator hose is and why the brackets needed to be removed.
The rest of the bolts are all pretty straightforward. You should be able to get a socket and breaker bar on them, with the breaker bar handle sticking out through the wheel well. However, the upper passenger side bolt was too close to the radiator hose to be able to ratchet it off. I had to wrench that one off as well. For these remaining three bolts, I'd recommend using the breaker bar to break all three loose, first. I'm not sure how imporant the order is to remove them, but the order I'd recommend is lower driver side, then upper passenger side, the upper driver side. The main point is to save the driver side for last, since you'll be able to use a ratchet on that side. Here's one photo showing how to position the beaker bar on the upper passenger side bolt (it should be pretty obvious how to get the breaker bar on the other two).
Just to be thorough, here are the other two bolts you'll have to remove. (Well, use your imagination on the lower bolt.)
Once you do get all the bolts out, you'll be able to drop the steering rack. It's a little heavy, but you should be able to manage. Though if you have a gopher helping you out, this might be a good time to get an extra set of hands. (I did fine by myself, though.)
Note: I'm going to cut back a lot on the pictures from here on out, since most everything is just going in reverse of taking it apart, and you should already be familiar with what everything looks like.
Put the new rack in. I used the 4x4 again to help hold it up until I could get a bolt started. Because it's easier access, I started the first bolt on the driver side, and then the top bolt on the passenger side. It helps to lift up a bit on the steering rack while doing this to take any load off the bolts.
Step 18: Connect the tie rod ends to the steering knuckles
First, simply push the tie rod end up into the steering knuckle and get the nut started. However, since the stud sticking out of the tie rod end is pretty free to rotate, you may run into an issue of it spinning when you try to tighten the nut. Wedge a board underneath the tie rod end to push it up into the knuckle, and the friction should be enough to keep the stud from spinning. If it does spin, get it back where the hole for the cotter pin is aligned where you want it, and wedge the board a little tighter. I had to use a hammer on the bottom of the board to wedge it tight enough. And of course, don't forget the cotter pin at the end.

Step 19: Install the lower radiator brackets
Just like Step 12, but in reverse. Remember there are 4 bolts to put it in.
Step 20: Reconnect the power steering wiring harness
The electronic cleaner should have had plenty of time to dry by now, so you can add the dielectric grease and plug all those connectors back in, including the two on the steering rack itself. Just as a reminder, here's the link to the external tutorial on this.
RX8Club.com - DIY: Power steering connector cleaning with pics
Step 21: Put wire ties on power steering wiring harness on steering rack
Remember those zip ties you cut in Step 14? Don't forget to put them back on. The first time I did this, I forgot until after all the panels were back underneath the car. You can do the zip ties from the top side, but it's a huge pain in the neck. I actually had to use grabbers to grab one end of one of the zip ties and then try to transfer that to my other hand without letting go of the end I was holding. Lots of scratches and cramped fingers. It's a whole lot easier to do from underneath with the panels out of the way.
Step 22: Install the front wheels
You'll only be able to snug up the lug nuts, but now's the time to put on the wheels to help out with aligning things and checking for interferences.
Step 23: Connect the steering column to the steering rack
This is mostly the reverse of Step 10 and Step 5, but there are a few notes. First, if you actually removed the whole steering column, push it back in through the hole in the firewall and get it as close to fully in as you can get it.
Next, remember that you want to end up with the proper alignment between the steering wheel and steering rack. Since the car's up on stands and there's very little friction on the rack, you can adjust the steering on the tire end just by pushing on the tires. So, do your best to get them as close to straight as possible. Then, inside the car, turn the steering wheel so that it's straight (if the steering wheel is locked, put the key in and turn the ignition far enough to unlock it). Then you'll have to go back under the hood, and push the lower U-joint onto the steering rack. You might want to hit it with some WD-40 first to make it a little easier to slide. You'll have to get it all the way on before the bolt will go all the way in and catch the threads on the opposite side of the U-joint. Just as a reminder, here's what the joint looks like when uninstalled. You have to get the bolt past that notch in the spline coming out of the steering rack.
To tighten the bolt up, you'll probably have to go back inside the car and turn the steering wheel a little bit so that you can get your socket on the bolt. But remember - don't turn the steering wheel until after the U-joint is mated to the steering rack, since you don't want to screw up the alignment between the steering wheel and steering rack.
Step 24: Install the nuts holding the steering column in place
This is mostly the reverse of Step 9, but there is an important note. The bracket / collar around the mid U-joint has a tendency to shift a little bit when you drop the steering column. If you just go right back in with everything without making sure the collar is where it needs to be, a flange on the steering column might rub against a part of the bracket (yes, that's the voice of experience). I had to tap it back in, using a narrow board, tapping from both the top and bottom to try to shift it evenly. You'll know it's right if the marks from the nuts on the bracket are centered in the studs sticking out from the car.
Step 25: Check for interferences - adjust tie rod ends if necessary
Before going any further, it's probably a good time to make sure everything looks like it should. Turn the steering wheel all the way on way, and make sure the front tires spin freely, then do the same test with the steering wheel turned all the way the other way. If there are any intereferences, you may have to adjust the tie rod ends, or you may have other issues.
Step 26: Install all the panels underneath the car
Reminder: make sure you've already done the zip ties holding the wiring harness to the steering rack.
This is mostly like Step 11, but in reverse. Start with the center panel, first getting a bolt on each side, then finishing up all the bolts, trim clips, and screws. If you tore up any of the trim clips and had to replace them, use whichever ones are easiest to remove again on the two clips that go furthest forward. Once the center panel is in place, then do the clips that hold the wiring and hoses. Then move on to the panels in the wheel wells.
Step 27: Install all the wire connectors to the steering column
Just like Step 8, but in reverse. Plug all the connectors back into the appropriate sockets.
Step 28: Install the trim behind the steering wheel
Just like Step 7, but in reverse. Don't forget about the wire/LED that plugs into the lower portion of the cover. The top and bottom halves just snap back together. Be careful about the screws. The one with the fine thread goes closest to the firewall. The two with the coarse thread go closest to the steering wheel.
Step 29: Install the trim & cross member from underneath the steering column
Just like Step 6, but in reverse. Remember there are 4 screws to hold in the cross member, and the trim just snaps in place.
Step 30: Install the battery box and battery
Just like Step 4, but in reverse. Remember there are 3 bolts for the lower half of the battery box, and the top half just snaps in place. With the battery in place, you kind of have to fish the hooks on the bracket into the appropriate catches.
Step 31: Install the air box shelf
Mostly like Step 3 in reverse. However, it's probably easier to do the 2 nuts and 2 bolts first, and then do the hoses and the clips holding the wiring harness.
Mostly like Step 2 in reverse. This might be a good time to replace your air filter while you have everything apart. Note that it does take a little bit of elbow grease to reconnect the flexible intake duct to the airbox. However, if you're fighting too hard with it, you may try pushing on it at different angles to get it to slide on easier. I had to push down and towards the driver side to get it to slide on. Don't forget about the two hoses and electrical connectors.
This procedure is easiest to do while the car's still up on stands (though if you get ahead of yourself and forget, you can do it with the wheels back on the ground). Make sure the battery is connected, then follow the procedure from RX8blog.com. Basically: turn the ignition to on (but don't start the car), then turn the steering wheel all the way to the left stop, then all the way to the right stop. The DSC and skid lights should go out. Turn the ignition off. Turn it back on one more time just to verify that the DSC light goes out like normal.
Step 34: Lower the front of the car & fully tighten the lug nuts
Should be self explanatory.
Be careful. Make sure everything feels like it should.
Step 36: Do a front end alignment
Personally, I just took it to the shop for this. They have the right tools for the job, and don't charge that much to do it. And at Firestone, if you pay just a little extra, it comes with a lifetime warranty for the car, where they'll do the alignment as often as you like.
---
I hope this write up helps. If you have any comments, please leave them at the related blog entry:
RX-8 Steering Rack & Steering Column Replacement